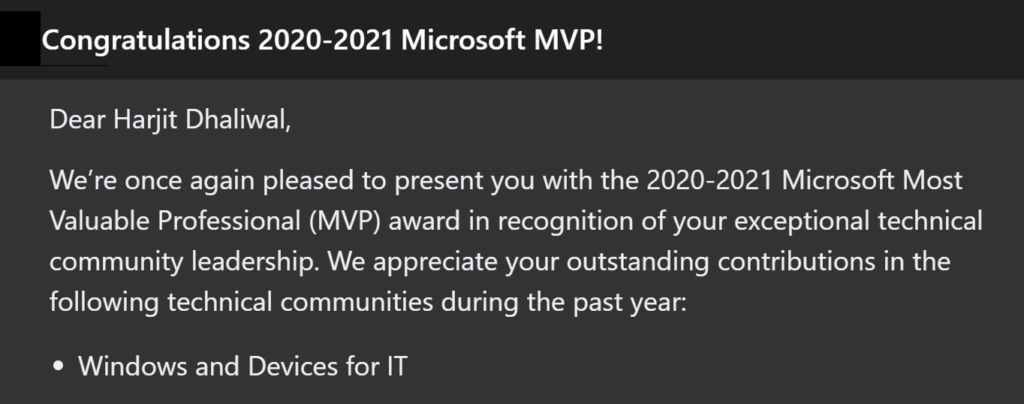
I’m so Thankful, honored, and excited to receive the confirmation email (below) from the Microsoft Most Valuable Professional (MVP) Award team confirming my award renewal for the 2020-2021 year. This is my fourth consecutive award since receiving my first one on January 1, 2017. It has been a wonderful, exciting, fun, challenging, and rewarding experience with so many positive opportunities.
The MVP award has provided me with some great opportunities in terms of my career growth, skill development, and various avenues to give back and help others in the IT Professional community. I had been invited to speak and delivered technical and soft skill sessions at conferences such as Microsoft Ignite Orlando 2019, Midwest Management Summit (MMSMOA), MMS Jazz Edition (New Orleans), and most recently covered the international circuit at Microsoft Ignite The Tour in Milan (Italy), Johannesburg (South Africa), and Dubai (UAE). I was also scheduled to deliver sessions on behalf of Microsoft at Microsoft Ignite The Tour in Zurich (Switzerland), Mumbai (India), Bangalore (India), and Tel Aviv (Israel), however these events were unfortunately cancelled due to COVID-19. I have also delivered various webinars, guest and ghost blogged, joined some technical expert panelist, reviewed technical books, tested and evaluated software, provided technical expertise, guest on podcasts, moderated technical forums, and engaged with the community both in person and online.
This is my 4th MVP Award and I am very grateful and appreciative for this honor and for the various opportunities provided to me over time. Thank you very much to each and every one of you for making me successful in my efforts as a MVP, IT Professional, and community contributor, and for providing me with the valuable resources and networking opportunities. I could not have achieved any of the above without the support and encouragement from the community, my friends in the technology industry, people I look up to as mentors, my mentees who keep me on my toes, wonderful Program Managers at Microsoft, a few industry leaders, and last but not least my loving family. Thank you!
I would like recognize and give my special Thank you to:
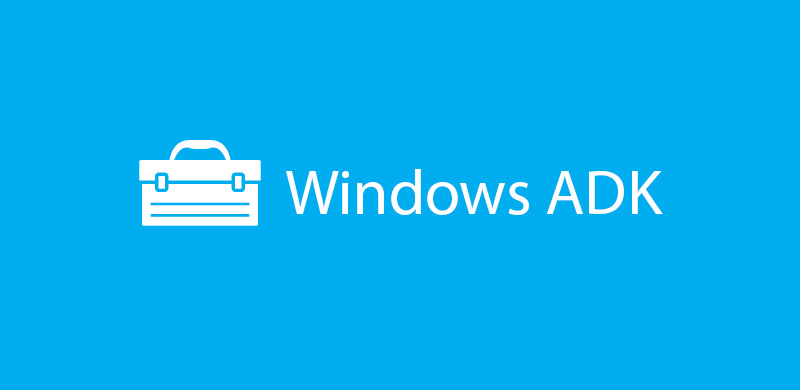
With the release of Windows 10 version 2004, the following tool to support this latest Windows 10 build, Windows Assessment and Deployment Kit (ADK) version 2004 is now available. You can download it from: Windows 10 Assessment and Deployment Kit (ADK).
NOTE: There is a change with this ADK which requires an add-on installation to include Windows PE.
Starting with Windows 10, version 1809, Windows Preinstallation Environment (PE) is released separately from the Assessment and Deployment Kit (ADK). To add Windows PE to your ADK installation, download the Windows PE Addon and run the included installer after installing the ADK. This change enables post-RTM updates to tools in the ADK. After running the installer for the WinPE add-on, the WinPE files will be in the same location as they were in previous installs of the ADK.
The Windows ADK is also available to Windows Insiders. Join the Windows Insider Program to get the Windows ADK Insider Preview.
The latest version of the Windows ADK includes:
Windows Performance Recorder (WPR)
New SkipPDBGen Option – During WPR stop, you can now specify in the command line the ability to skip generation of PDBs (NGen & Embedded) to help reduce trace stop time.
I recently switched to using my new-ish laptop (Lenovo P1) for my day-to-day technical work and decided I should redo my test lab in Hyper-V, particularly for my ConfigMgr / MEMCM / Intune testing and troubleshooting stuff. While I have been actively using my ConfigMgr site in my lab, I didn’t pay much attention to the built-in reports until very recently, when I discovered I had an issue as all the reports produced an error.
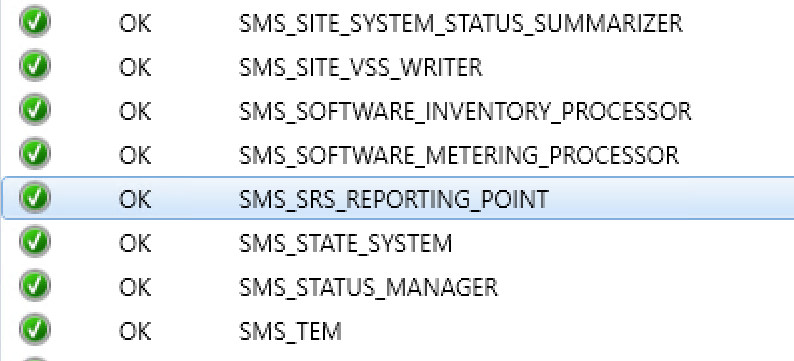
The Component Status in the Monitoring node of the ConfigMgr console indicated no issues with the Reporting Services Point Role.
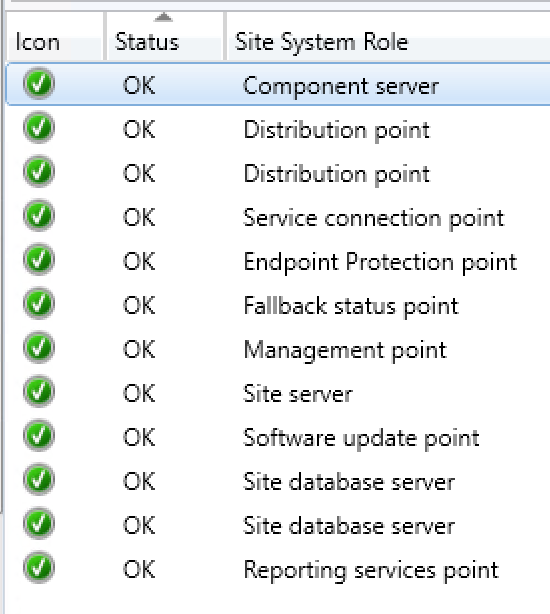
The Site Status was lit up nice and green and indicated all was working fine with my ConfigMgr site.
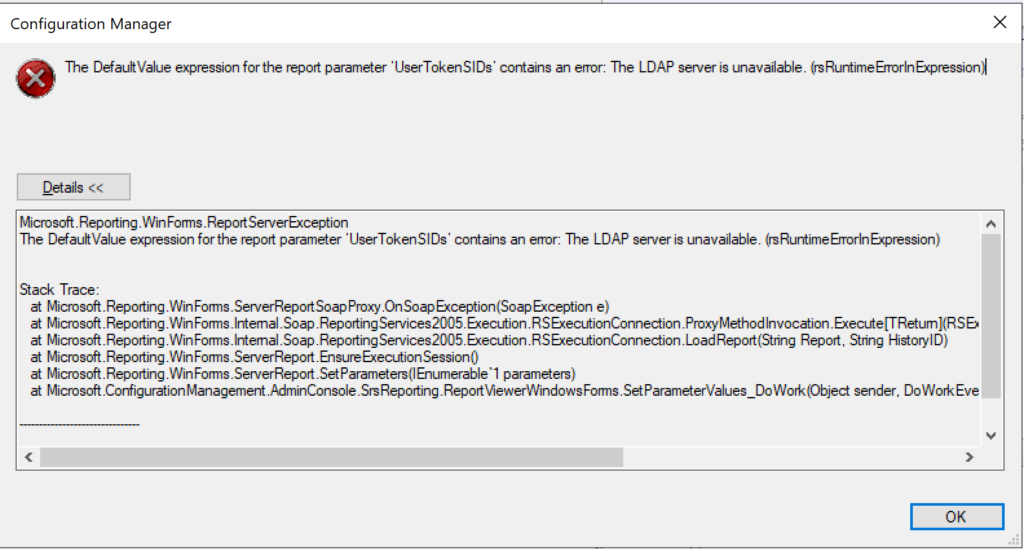
When a report is run from the ConfigMgr console or SSRS, the following error is produced (see image above):
The DefaultValue expression for the report parameter ‘UserTokenSIDs’ contains an error: The LDAP server is unavailable. (rsRuntimeErrorInExpression)
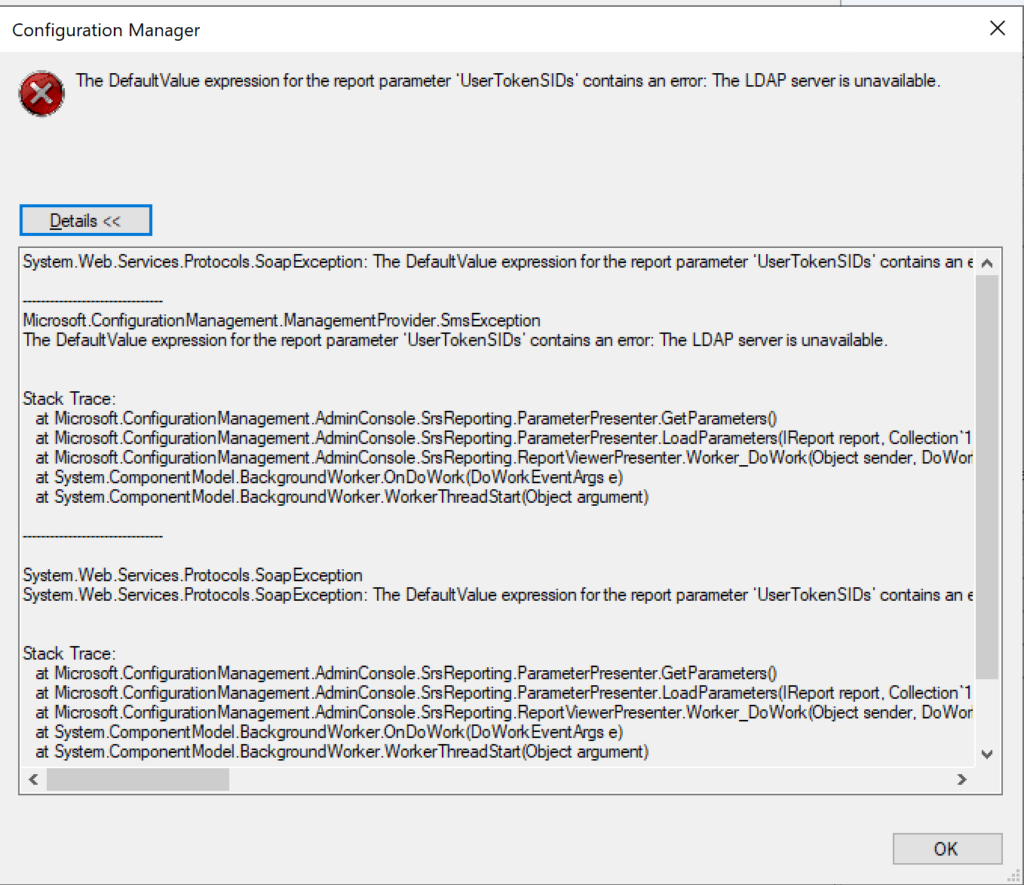
The full error is provided below:
System.Web.Services.Protocols.SoapException: The DefaultValue expression for the report parameter ‘UserTokenSIDs’ contains an error: The LDAP server is unavailable. at Microsoft.ReportingServices.Library.ReportingService2005Impl.GetReportParameters(String Report, String HistoryID, Boolean ForRendering, ParameterValue[] Values, DataSourceCredentials[] Credentials, ParameterInfoCollection& Parameters) at Microsoft.ReportingServices.WebServer.ReportingService2005.GetReportParameters(String Report, String HistoryID, Boolean ForRendering, ParameterValue[] Values, DataSourceCredentials[] Credentials, ReportParameter[]& Parameters)
Microsoft.ConfigurationManagement.ManagementProvider.SmsException The DefaultValue expression for the report parameter ‘UserTokenSIDs’ contains an error: The LDAP server is unavailable.
Stack Trace: at Microsoft.ConfigurationManagement.AdminConsole.SrsReporting.ParameterPresenter.GetParameters() at Microsoft.ConfigurationManagement.AdminConsole.SrsReporting.ParameterPresenter.LoadParameters(IReport report, Collection`1 navigationParameters, IResultObject resultObject) at Microsoft.ConfigurationManagement.AdminConsole.SrsReporting.ReportViewerPresenter.Worker_DoWork(Object sender, DoWorkEventArgs e) at System.ComponentModel.BackgroundWorker.OnDoWork(DoWorkEventArgs e) at System.ComponentModel.BackgroundWorker.WorkerThreadStart(Object argument)
I tried several troubleshooting steps including the following:
1. Uninstalled the Reporting role from ConfigMgr 2. Uninstalled the SQL Reporting Services 3. Reinstalled SQL Reporting Services 4. Reinstalled the Reporting role in ConfigMgr 5. Changed the registry key: “HKEY_LOCAL_MACHINE/SOFTWARE/Wow6432Node/Microsoft/ConfigMgr10/ AdminUI/Reporting/ReportBuilderApplicationManifestName” from the value “ReportBuilder_2_0_0_0.application” to “ReportBuilder_3_0_0_0.application” 6. Edited the file: “C:\Program Files (x86)\Microsoft Configuration Manager\AdminConsole\bin\Microsoft.ConfigurationManagement.exe.config” and changed the 2 to a 3 in the two locations: <add key=”10.0″ value=”ReportBuilder_3_0_0_0.application”/> <add key=”DEFAULT” value=”ReportBuilder_3_0_0_0.application”/> 7. Checked accounts including the service account for SQL reporting
None of the above steps helped fix the UserTokenSIDs issue. I searched high and low on Google / Bing and did not discover anything regarding “LDAP server is unavailable” specifically relating to UserTokenSIDs. I finally got the big guns out and contacted my close friend, Garth Jones, who is a known industry expert with SQL and SSRS. He is a Microsoft MVP and also owns a company called Enhansoft which provides a subscription service for all things reports, which extends the reporting capabilities in ConfigMgr. Enhansoft also provides a free report as a giveaway each month.
RESOLUTION:
With Garth’s help, the issue was quickly discovered and fixed quite easily. Bottom line is that I was using a local administrator account (CM01\Administrator) to login to my ConfigMgr server as opposed to using a Domain account (Dhalico\Harjit) with the necessary privileges. FYI, “Dhalico” is my domain. 1. Added the Dhalico\Harjit account in the ConfigMgr console under Administration > Overview > Security > Administrative Users (see image below) 2. Provided “Full Administrator” security role 3. Logged on to the ConfigMgr server as “Harjit” and tested running reports 4. Success! And Thank you Garth! 🙂
The installation of the ConfigMgr client on workstations and servers is pretty straight forward, and can be done manually, with Client Push, and Software Update Based client installation to name a few. However, it is not as simple when dealing with Windows VDI systems, where extra steps need to be taken to avoid duplicate ConfigMgr client GUIDs and certificates on cloned VDI systems. Below are the steps to follow.
On the master or template system:
Install the ConfigMgr client. Ensure it is properly functioning and has all the necessary components and actions.
Stop the SMS Host Service. This can be done by launching the Command Prompt (CMD) as Administrator and running the following command: net stop ccmexec
Delete the SMSCFG.ini file from the Windows folder location. In Administrator CMD, run the following command: del %WINDIR%\SMSCFG.ini
Delete the SMS Certificates. To do this, launch PowerShell as Administrator and run the following command: Remove-Item -Path HKLM:\Software\Microsoft\SystemCertificates\SMS\Certificates\* -Force
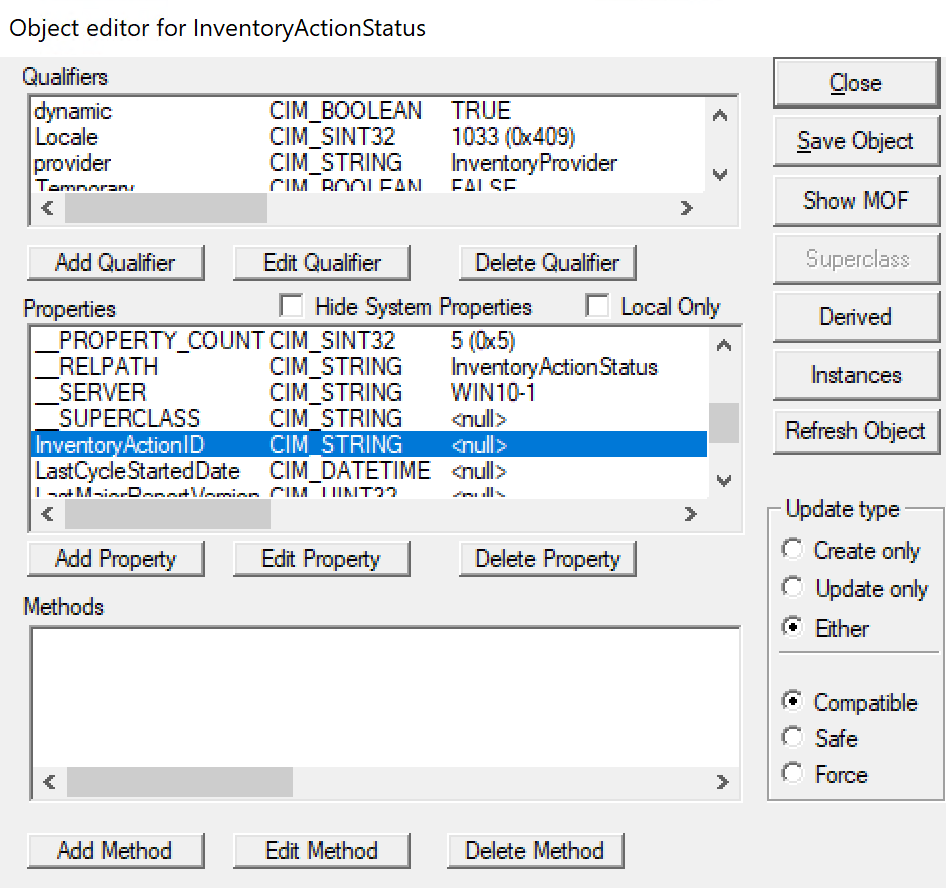
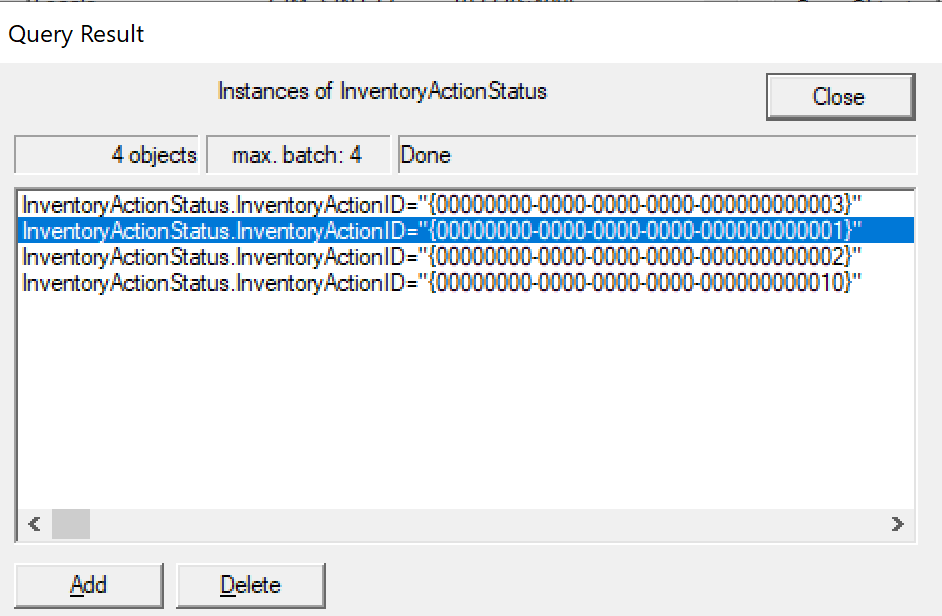
Remove the Inventory Action ID 1 in WMI. You can run the following command: wmic /namespace:\root\ccm\invagt path inventoryActionStatus where InventoryActionID=”{00000000-0000-0000-0000-000000000001}” DELETE /NOINTERACTIVE
Once the above steps have been completed, shutdown the master template, capture a snapshot, and provision the VDI systems. At this point, each VDI system will generate a unique ConfigMgr GUID and will function as expected.
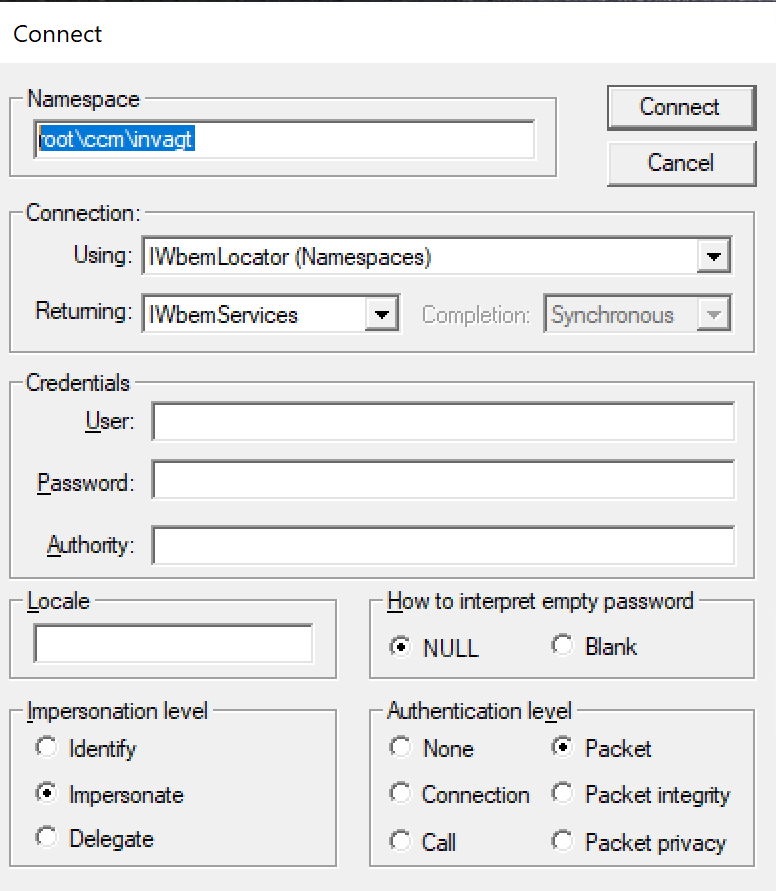
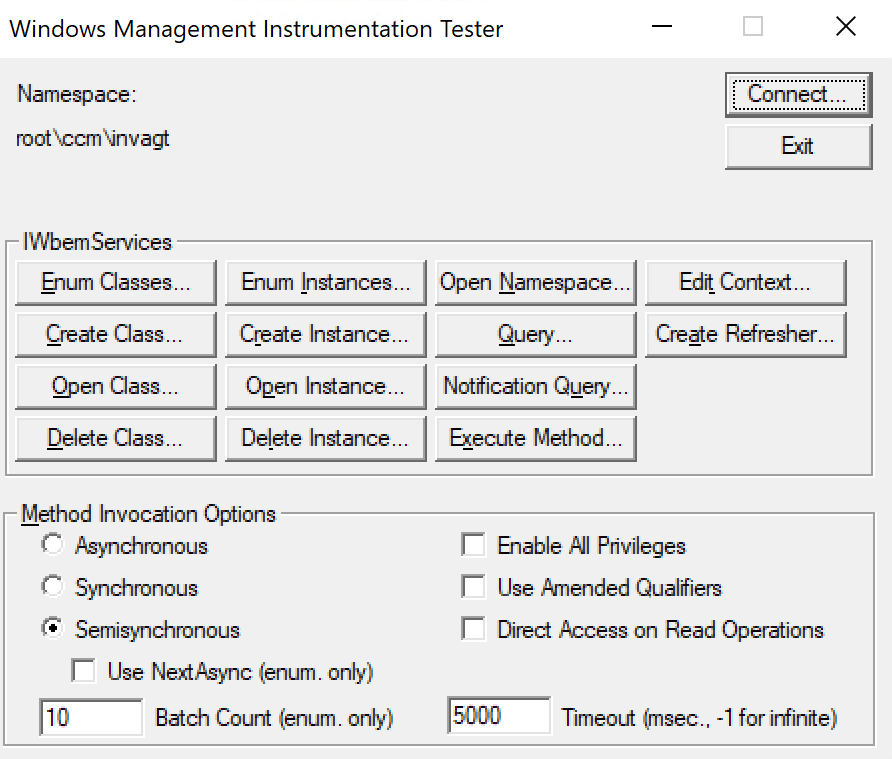
For step number 5, this can be achieved by using the wbemtest tool with the following steps:
Launch wbemtest as Administrator
Click Connect
Change the Namespace field as root\ccm\invagt, and click Connect
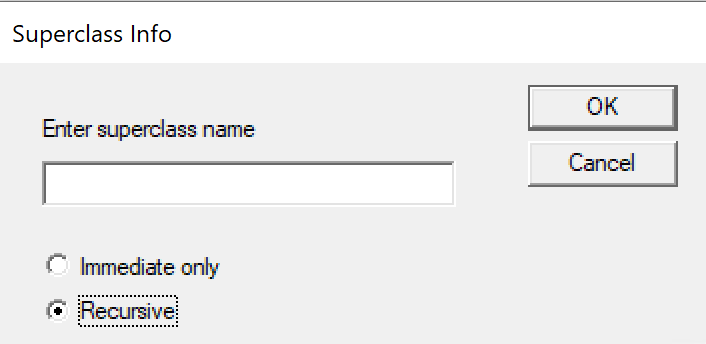
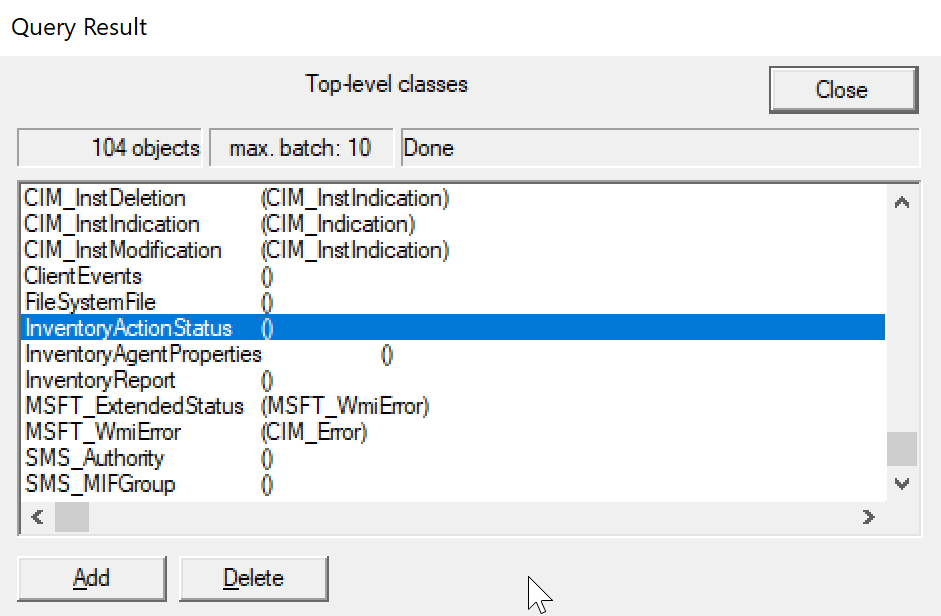
Click on Enum Classes
Select Recursive and click Ok
Scroll down and locate InventoryActionStatus, and double click
I came across this great opportunity from Microsoft for some free Azure training and a free exam voucher for the AZ-900 certification. See below:
Join us for Microsoft Azure Training Day: Fundamentals to improve your understanding of cloud concepts and acquire the knowledge you need to earn the Microsoft Azure Fundamentals certification. Learn basic strategies for transitioning to the cloud along with concepts including security, high availability, scalability, elasticity, agility, fault tolerance, and disaster recovery.
You will find the sign up links for the free Azure training for different dates and time zones starting from end of April to end of June 2020. Keep in mind that some dates have filled to capacity. Sign Up: https://bit.ly/2VmlZFu
MMS Jazz Edition Conference is the 2nd edition of the MMS Conference in 2019, which will be held in New Orleans from November 11-13, 2019. This post will cover the various transportation options such as from the Louis Armstrong New Orleans International Airport (MSY) to the Hotel Monteleone located in the French District, as well as transportation in New Orleans.
Getting from the airport to hotel:
Airport Shuttle
Shuttle service is available from the airport to the hotel for $24.00 per person/one-way or $44.00 per person/round-trip. You are limited to 3 bags per person and additional baggage may be subject to extra fees. You can purchase the tickets at Airport Shuttle ticket booths located on the first level throughout the Baggage Claim area at the airport. Visit www.airportshuttleneworleans.com for more information.
Taxi
Taxi rides will cost $36.00 from the airport to the French Quarter for up to 2 people. For 3 or more passengers, there will be a $15.00 per additional person charge. Taxi booths are located on the first level outside of Baggage Claim 1 and 14. You have to wait in line at one of these booths for taxi service. They accept credit card payments.
Uber and Lyft
Uber and Lyft is available from the Airport. Meet your ride outside of the Ground Transportation Center located on the first floor of the Short-Term Parking Garage by crossing the pedestrian crosswalk located outside of Baggage Claim 6. The cost is approximately $35 one-way. See fare estimators below: Uber at MSY Lyft at MSY
Car Rental
The Consolidated Rental Car Facility (CONRAC) is available for car rentals from 9 care rental companies (Alamo, Avis, Budget, Dollar, Enterprise, Hertz, National, Payless, Thrifty). To get to CONRAC, exit the Baggage Claim area at level 1 near Baggage Claims 12-14 and take a short walk to the right down a covered walkway to the rental facility. Visit the Rental Information page for more details.
Mass Transit
The Jefferson Transit Authority (JET) and the Regional Transportation Authority (RTA) provides 9 daily departures to downtown New Orleans. To utilize this service, you have to use the bus stop located on the outer lanes of the second floor, outside the Concourse C Lobby Information Booth.
The Airport-Downtown Express (E2) Bus operated by JET will cost $2 and takes approximately 50 minutes. More information on JET is available here: www.jeffersontransit.org.
If you fancy riding in style in a limousine, you have this option as well from the airport. A-Airport Limousine is the official service provider for Louis Armstrong New Orleans International Airport. You can request for a limousine at one of the A-Airport Limousine’s kiosks located in the Baggage Claim area on level 1.
Rates will range from $58 for 2 passengers and up to $118 for 8 passengers, and will depend on the type of vehicle. For more information: www.airportlimousineneworleans.com or call 504-305-2450.
Getting around New Orleans
Pedicab
Pedicabs can offer a convenient way to get around the French Quarter and other areas. Pedicabs will cost you $5 for the first 6 blocks and $1 for each additional block per person. These fares are mandated by the city of New Orleans.
These are iconic and a fun way to travel. In fact, the St. Charles streetcars which is one of the 4 main routes, is the oldest continuously operating streetcar in the world. The streetcar fare is $1.25 one-way and exact change is required. You can purchase the Jazzy Pass or use the Go Mobile smartphone app.
Board one of the dark green colored streetcars at Carondelet and Canal Street and let it take you through the Central Business District, the Garden District and past the uptown universities.
The red and yellow Canal streetcars offer two options: a direct route to the cemeteries or a trip to the entrance of City Park and the New Orleans Museum of Art. When boarding from Canal Street in the French Quarter, pay attention to the signs on the front of the streetcar for which option to choose.
The Riverfront line offers easy transportation between the French Market and the Aquarium of the Americas and Riverwalk area, while the Loyola Avenue/Union Passenger Terminal loop makes it easy to get from the Amtrak train and Greyhound bus stations to the French Quarter.
Microsoft Ignite Conference 2019 is taking place in Orlando, Florida from November 4-8, 2019. This is one of the largest Microsoft conferences in the world but there is always the dilemma of what to pack. Here are some suggestions from a conference veteran like me to help you with that the task of packing. While the conference is a week long, it is not necessary to go overboard with the packing and even bring the kitchen sink!
What to Pack:
#1: Shoes – Make sure you have comfortable shoes to wear during the conference as you’ll be spending a lot of time in them everyday. The conference involves a lot of feet power and you’ll be glad you have some good shoes. Also, make sure you have broken in your new shoes prior to the conference.
#2: Tech – Start collecting all the cables and charges you’ll need to keep your devices up and running at the conference. I recommend that you pack a portable battery charger for your smartphone(s), especially helpful when you are on-the-go and the power outlets are not easily accessible. It’s also advisable to pack a small power strip as power outlets can be scarce and you’ll make friends by sharing an outlet with others. This is also handy to use in your hotel room where the power outlets could be inaccessible due to their location (behind the bed, behind the entertainment system, etc). As for the portable battery chargers, I’m a big fan of the Anker brand for their ruggedness, quality, capacity, and great customer service when I need them.
#3: Clothes – The setting for the conference including the social events is casual. Pack comfortable clothes, don’t pack too much as you’ll receive loads of tshirts at the conference to last you for years to come. So, travel light. You’ll definitely want to pack the essential items such as socks, underwear, a hoodie or sweatshirt for the cold conference rooms, some shorts, a pair of jeans or casual pants, a couple of shirts, and whatever else you think is essential. Don’t forget your toiletries too. Keep in mind that the weather in Orlando can be hot and humid. The current forecast during the conference is a high of approximately 80F and a low of approximately 60F.
#4: Bottle / Mug – A traveling coffee mug if you’re a coffee drinker. Makes it easier to fill up on coffee and to travel from session to session without spilling. Plus, you’re helping safe the planet without using the disposable cups. You could also bring a water bottle as you should rehydrate often, however you will receive one along with a backpack when you sign in for your Microsoft Ignite badge on-site.
#5: Cards – Bring along some business cards for networking purposes as well as to enter some cool contests organized by several vendors. I generally get my cards ordered in advance from Moo as I prefer the mini-card format and the high quality. You can also order some inexpensive business cards from VistaPrint but since it’s late in the game now to get some cards ordered in time for the conference, either make some at home with your personal printer or order some in-store at places like Staples.
#6: Social Media – Networking is one of the most important aspects of attending a conference such as Microsoft Ignite. By now you have connected with several attendees via Twitter, Facebook, LinkedIn, WhatsApp, Slack, and Microsoft Tech Community. If you haven’t, then it’s time you get on the social media band wagon to collaborate with others, make some new friends, help to enhance your career, don’t feel left out at the conference, and so on. One tip for helping with the process on location and to make the social media connections as smooth as possible is to print QR Codes of your favorite social media medium such as Twitter or Facebook. This way, you can easily whip out your QR Code when you meet someone that you’d like to connect and they can easily scan the code with their smartphone which will pull up your information with ease.
#7: Luggage – Apart from your main suitcase or bag that you will pack with your clothes and above items, it is advisable to pack an empty bag that can fold such as a duffel bag. You’ll Thank me later when you realize by the end of the week that you have collected way too much swag but luckily you have that extra bag to bring all those tshirts and “things” home. Keep in mind that you’ll have the spanky new conference backpack to pack as well in case you traveled to the conference with your own.
#8: Laptop / Tablet – I generally travel with two laptops, one in case I need to jump in to handle some work issues back at the office, and the other as a personal device for daily use. Another reason for traveling with more than one laptop is in case one of them crashes for whatever reason and I still have something to manage my personal and work life. As far as note taking goes at the conference, I tend to use my iPhone as my primary device along with the OneNote and Twitter apps. If you have been my follower on Twitter, you’ll know how much I use that medium for note taking, as I do that quite efficiently with unique hashtags for each session and other matters related to the conference. So, if you’re not following me, do so now. You’ll find me as @Hoorge on Twitter.
#9: Medical – If you take any prescription medication, make sure you bring those and preferably in their original packaging, and this is to avoid any issues with TSA at the airport. I travel with my CPAP machine for my sleep apnea, so I always make sure that I have the power cord, hose, mask, and other fun stuff that goes with the machine packed as a priority item the morning that I’m leaving for the airport. If your CPAP machine uses distilled water for humidity control, you can always pick that up from a local pharmacy such as Kinney’s or CVS near your hotel. If you use spectacles and have an extra pair, bring that with you incase you encounter an unfortunate accident and break your main “four eyes”.
#10: Smartphone – I think it goes without saying that you won’t be traveling to the conference without your smartphone. To make your life a little easier, make sure you have enough free space to capture photos and videos during the week. Also, if you haven’t already done so, install apps such as OneNote for note taking; Twitter and Facebook for social media; OneDrive or Dropbox for uploading photos and videos to free up space on your device and for backup purposes; Microsoft Office Lens for capturing whiteboards, slide decks, business cards, and more; WhatsApp, Messenger and Slack for communication; Waze or Google Maps for navigation; and last but not least Untappd if you’re a beer lover.
#11: Camera – There are always some wonderful opportunities for capturing some great photos of the conference and the city of Orlando, so bring a camera with you. I would avoid bringing a large professional DSLR type camera with lenses and speedlights such as the Nikon D700 camera and the 24-70mm f/2.8 lens which I often use for my freelance photojournalism work and event photography. It’s cumbersome to travel with type of gear and to juggle during the conference. I tend to rely on my nifty iPhone for all of my photography and videography captures, and this year I will bring my Sony a6500 camera to do some high quality photo and video captures since this camera is pretty light and smallish. Selfie sticks can be fun but I’ll leave that at your discretion.
#12: Fitness Trackers – No doubt there’s going to be some tremendous amount of walking during Microsoft Ignite, so don’t forget to pack your fitness tracker units like Fitbit, Microsoft Band, smart watches and their respective charging units to see if you break any step records. Find a few friends and do a step challenge for the week.
#13: Credit Cards / Cash – As far as cash is concerned, you won’t need to carry much with you as food and drinks are generally covered at all of the evening social events, plus breakfast and lunch is provided at the convention center for attendees. I would carry a small amount of cash for incidentals and tips or when you need to split a bill with others. Credit Cards is the way to go for everything else but beware and pay attention to your statements as fraudulent charges have been reported by attendees from past conferences sometimes even 6 months after the fact. If you want some peace of mind and avoid the hassle of compromised credit cards, get a couple of prepaid credit cards with limited amounts on them to use in restaurants, bars, and other establishments.
#14: Snacks – Each day at the conference can be long, tough, and super busy as you run from session to session and network with fellow attendees. Sometimes, it can be a challenge to spare some time for breakfast or lunch, so food items such as granola bars, health bars, nuts, and pop tarts can be extremely helpful. While you may not need to bring any from home, although you could pack some in your suitcase, you can pick them up quite easily at a convenience store near your hotel.
#15: Sriracha and Beer – It goes without saying, I travel with my favorite hot sauce to spice up my conference center meals. How so you ask? Well, I often travel with the Sriracha2Go keychain container or the Sriracha2Go packets and they are so handy to have if you like to spice up your food on the go. As for the beer, there’s always a beer share happening during the week and several attendees often meetup to share and try out craft beer from all over the country and even from abroad. Pack some of your local craft beer in your suitcase and enjoy them with some old and new friends. Don’t forget to double ziplock bag them and wrap them with your clothing to avoid breakage.
#16: Trinkets / Souvenirs – It’s never a bad idea to bring a few little trinkets from your local town / city / state / country such as keychains, stickers, fridge magnets, candy, etc to hand out or exchange with a few fellow attendees. They become conversational items and everyone loves a little gift.
Hope this list will help you with your packing for the conference and has provided some helpful suggestions for things you may not have thought about. Good luck and see you soon in Orlando!
Follow (@Hoorge) on Twitter and join Tech Konnect on Facebook and Twitter (@TechKonnect) to stay current on technology related matters.
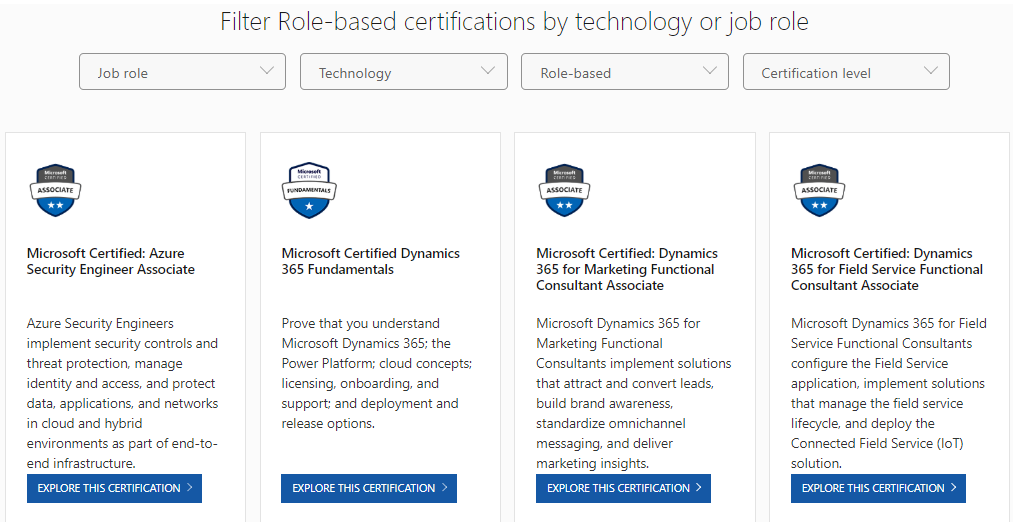
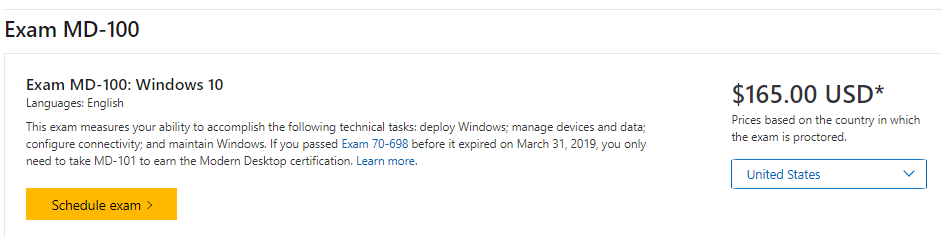
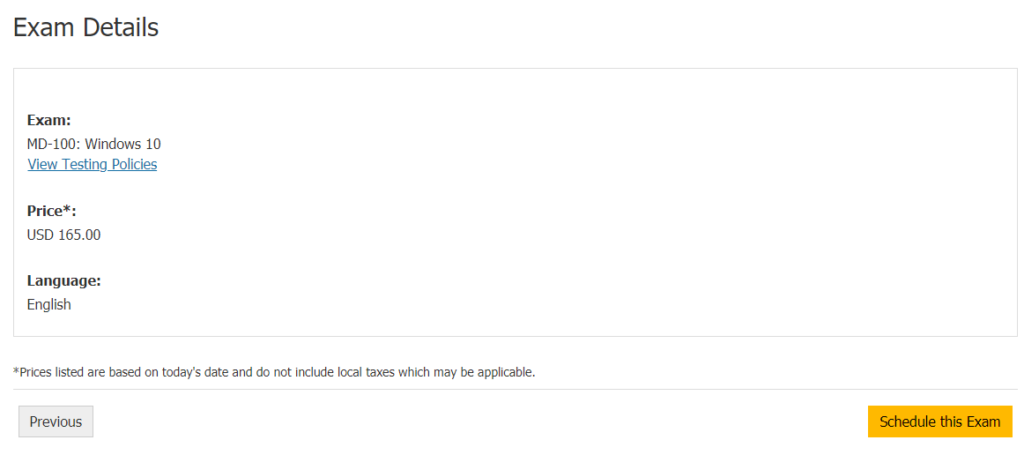
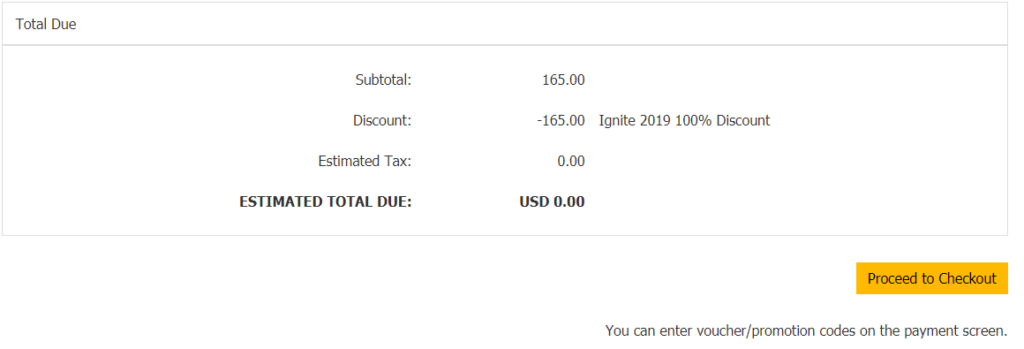
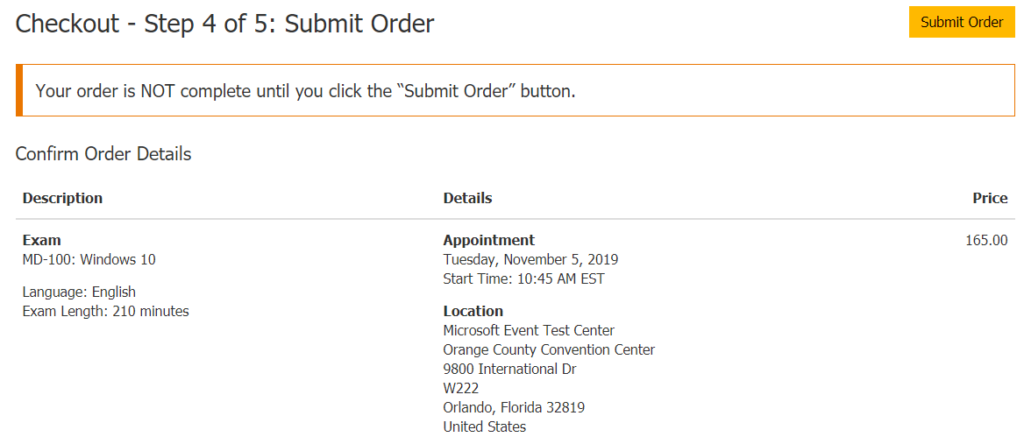
Microsoft Ignite 2019 Conference is taking place in Orlando, Florida from November 4-8, 2019. There’s some great news for everyone who will be attending the conference. Microsoft is offering free certification exams at the convention center during the conference, and these exams range from $99 to $165 each. Please note the free exams are for the Role-based certifications only (MS-xxx, AZ-xxx, MD-xxx, MB-xxx) such as Microsoft Azure and Microsoft 365. Sign up in advance to lock in your spot, and get certified! Below are the steps to do so:
Go to this landing page or here with the list of Role-based certifications available.
Select your preferred certification and click on Schedule exam
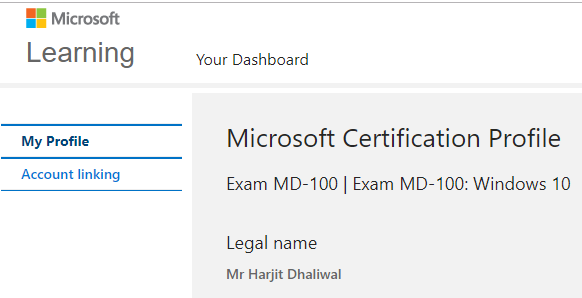
Fill out your profile information. Make sure your name matches your legal IDs which will be required to sit for the exams
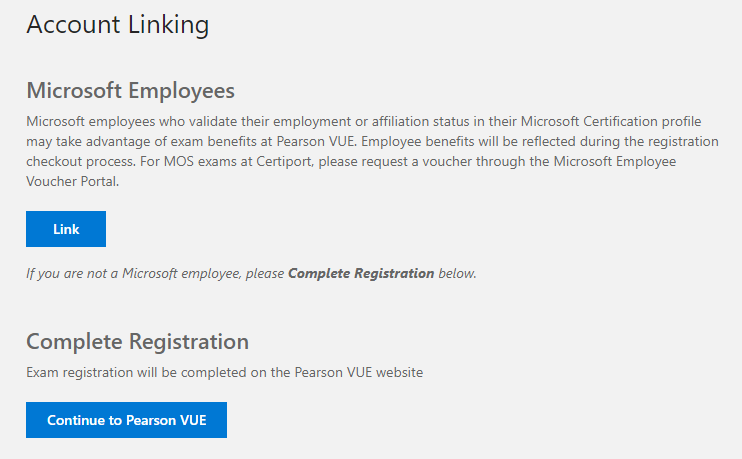
Select “Continue To Pearson Vue”
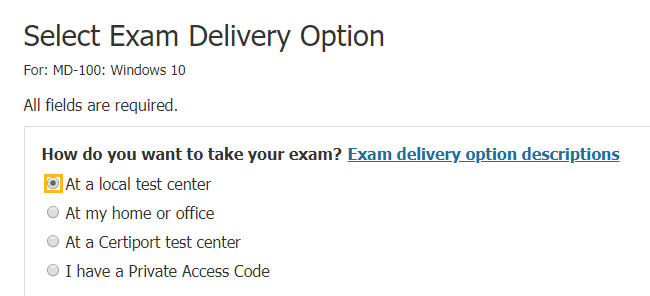
On the Select Exam Delivery Option page, choose “At a local test center”
Click on Schedule this exam
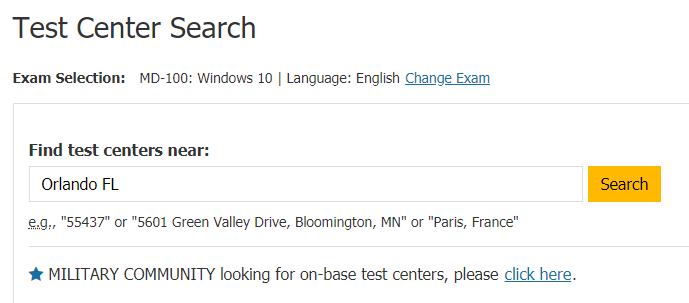
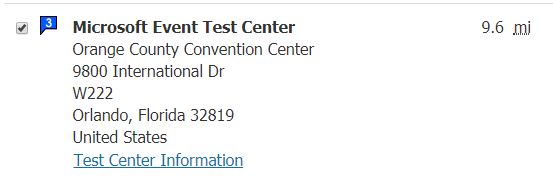
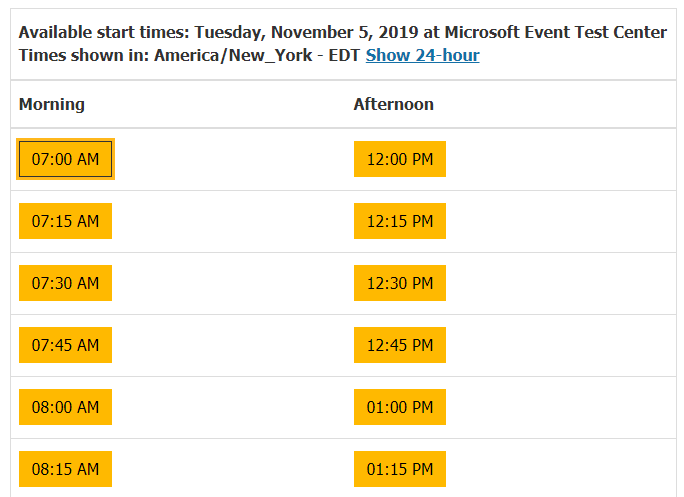
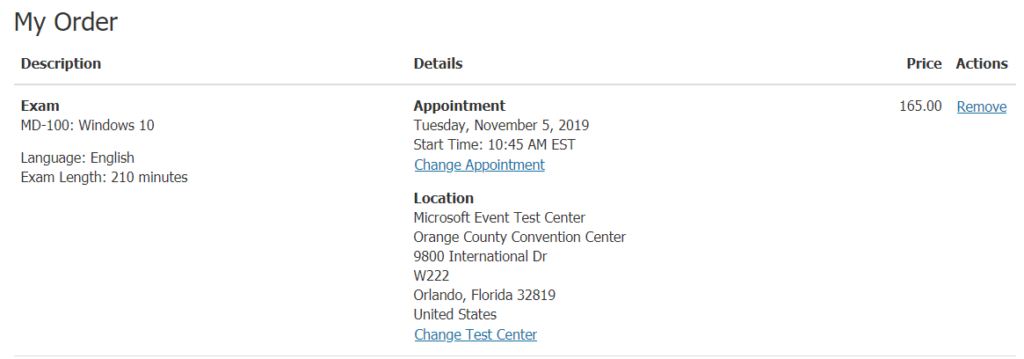
On the Test Center Search page, type “Orlando, FL” and click search. Choose option 3 from the search results for “Microsoft Event Test Center, Orange County Convention Center”, and click next
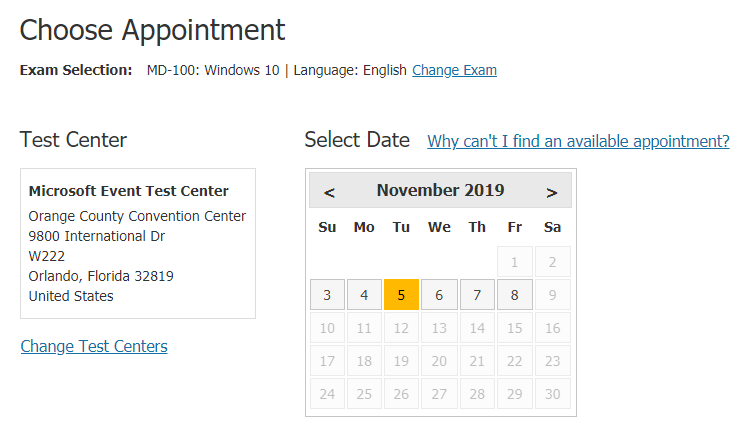
On the Choose Appointment page, change the month to November and pick a date which you prefer to sit for the exam. You will be given a selection of times to choose from. Pick one.
Click on Proceed to Checkout, and confirm your personal information on the following page and click Next
Agree to the terms and conditions and click Next
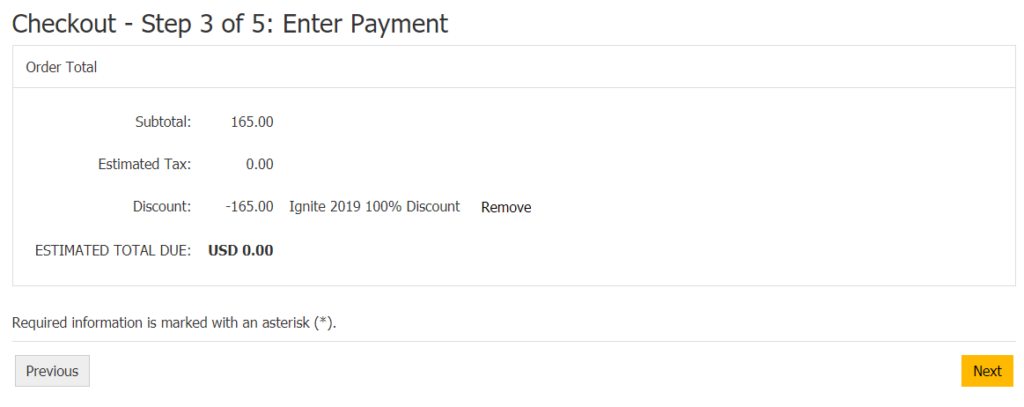
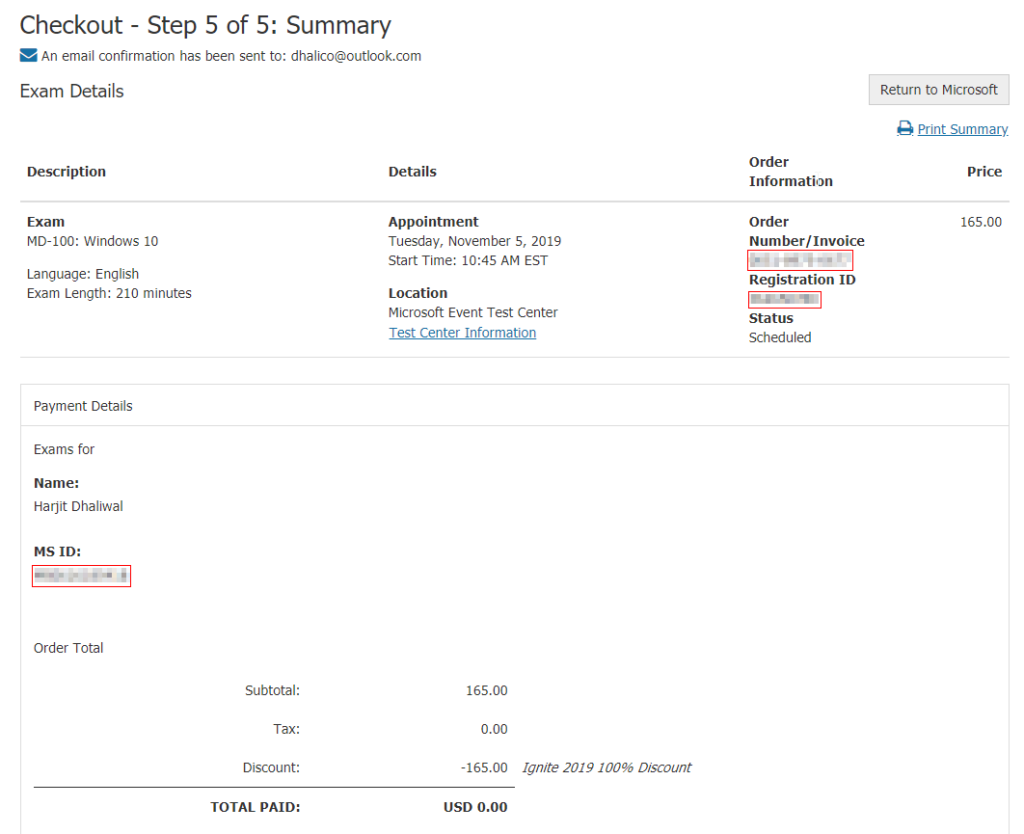
Confirm the payment information which would be USD$0.00
Click Submit Order to confirm
And Voila, your free Microsoft certification exam confirmation
My friend Vlad Catrinescu has has usual study guides to help you study for a few of the role-based exams. See below:
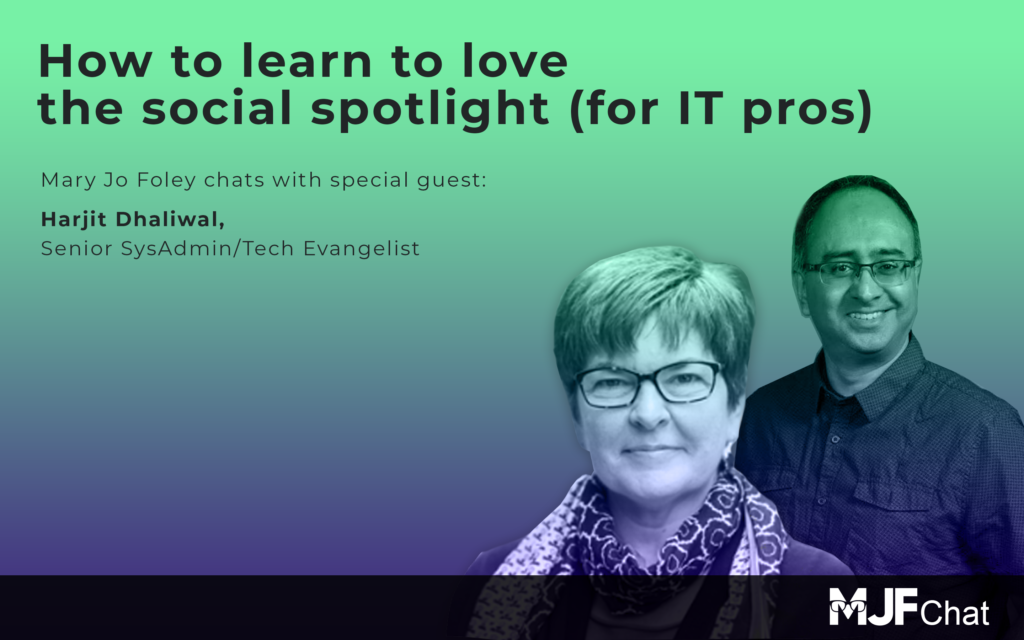
I was so thrilled when Mary-Jo Foley contacted me sometime around June 2019 and invite me to join her as a guest on her MJFChat podcast series on Petri.com. I have known Mary-Jo aka MJ for a few years and have had the pleasure of doing some community focused work with her and her counterpart, Paul Thurrot during Microsoft Ignite 2017 and 2018 in Orlando. I definitely could not say no, and jumped on the opportunity to do a fun and informative podcast with her.
Mary-Jo is a well respected technology journalist and known to everyone in the tech industry. Here’s her short bio:
Mary Jo Foley has covered the tech industry for 30 years for a variety of publications, including ZDNet, Redmond Magazine and more. She is the author of Microsoft 2.0: How Microsoft plans to stay relevant in the post-Gates era (John Wiley & Sons, 2008). She also is the co-host of the “Windows Weekly” podcast on the TWiT network.
Check out the podcast which is focused on community engagements, personal branding, making connections, and much more. The transcript of the interview is available here.
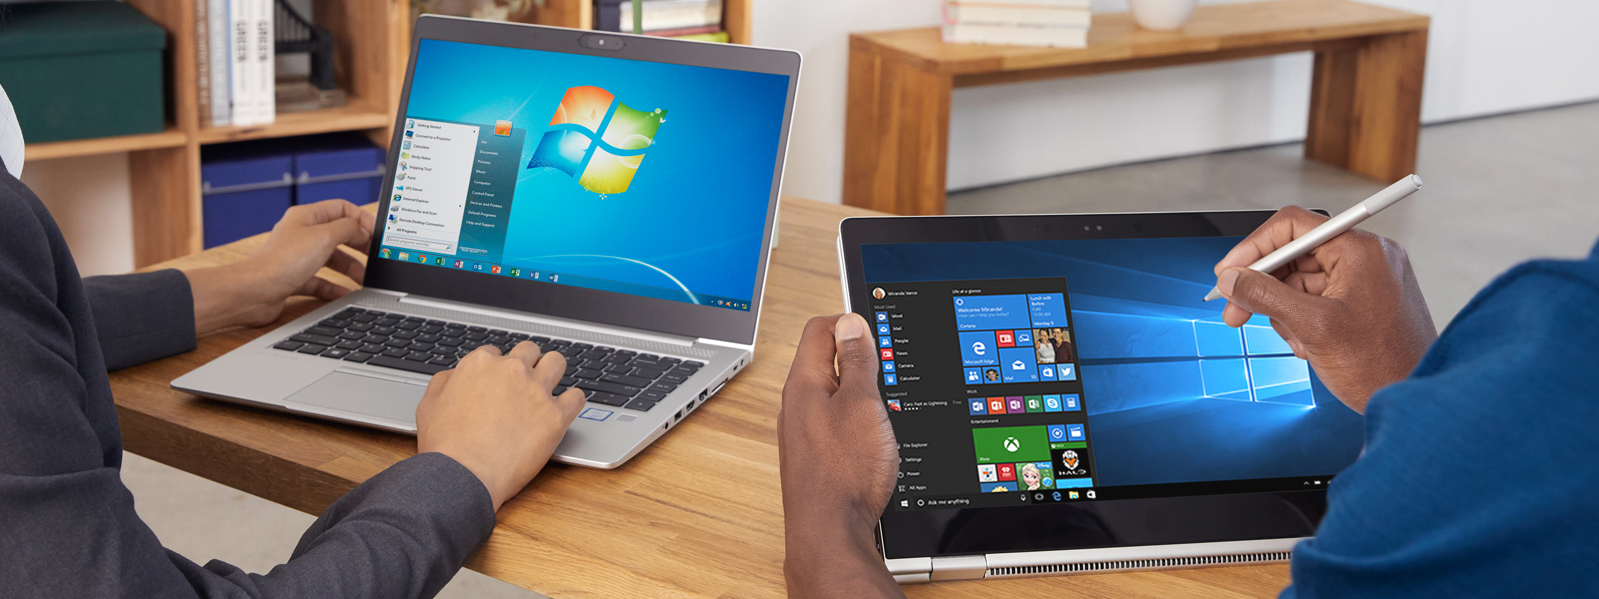
Starting January 14, 2020, Microsoft will no longer provide security updates, software updates and technical support for computers running Windows 7. Start upgrading the Windows 7 computers in your organizations or in your homes to Windows 10 ASAP.
This website, Windows 7 End of Life provides a nice countdown along with a calculator to determine how many computers you will need to upgrade per month, per week, or per day given the number of Windows 7 computers you have left to upgrade.
Nash Pherson, the creator of the Win 7 End of Life website also provides a nice PowerShell script to find all the Windows 7 computer objects remaining in your Active Directory. Great resource, Thanks Nash!
This is the Windows Lifecycle Fact Sheet for every Windows product available, which provides information for support timelines and more.