Adobe Flash End-of-Life and How To Uninstall

Adobe Flash Player went out of support as of December 31, 2020. For more information, see the Adobe Flash Player EOL General Information Page.

Microsoft has released update KB4577586, which is named “Update for the removal of Adobe Flash Player: October 27, 2020“. This update removes Adobe Flash from all Windows 10 and Windows Server systems. Please note: Once this update has been installed, it cannot be removed. Also, this update will only uninstall the ActiveX version of Adobe Flash, and not those installed via other mechanisms.

This update is currently not available in Windows Server Update Service (WSUS), and therefore is only available via the Microsoft Update Catalog. Microsoft states that it will be made available in early 2021.

Manual Installation:
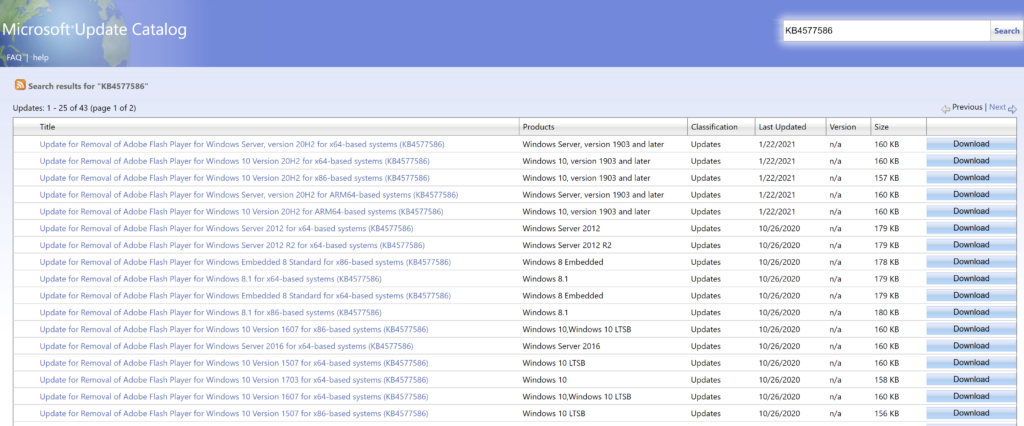
You can install this update manually on systems running Windows 10 or server OS such as Windows Server 2012, 2012 R2, 2016, and 2019 by downloading the update using the Microsoft Update Catalog portal, and selecting the appropriate OS for your system.
Deployment Using WSUS/ConfigMgr:
To deploy this update to multiple systems, you will need to use WSUS to import the update.
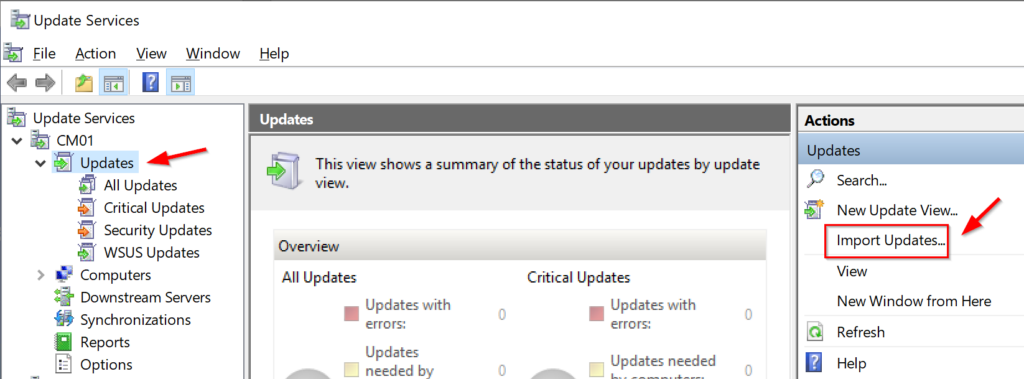
1. Launch the WSUS console, expand your server name, then click on Updates in the left-hand pane.
2. In the right-hand Actions pane, click on Import Updates. This will launch the Microsoft Update Catalog in your default browser.
3. In the Microsoft Update Catalog portal, click in the Search box on the top right hand side, and type KB4577586, and click Search.

4. Select the update for the desired OS types, and click on the Add button. This will add the updates to the basket.

5. Click on view basket on the top right-hand side of the page, which is located right below the search box. You will find all the updates you have added to be imported. Make sure that the checkbox for “Import directly into Windows Server Update Services” is selected, and then click the Import button. A window will open to show the import progress and when completed, the updates will be in WSUS.

In case you run into the following failed import state, you will need to add a fix in the registry.
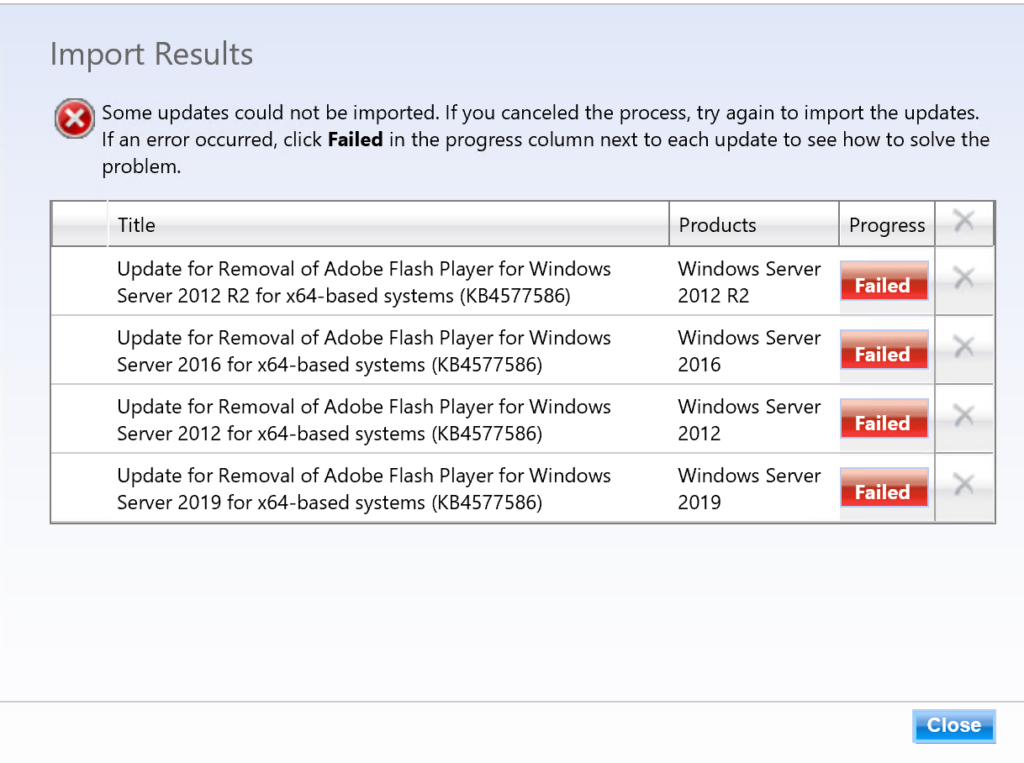
By clicking on the red button labeled “Failed“, you will see it mentions the error number 80131509 with a description as seen in the image below.
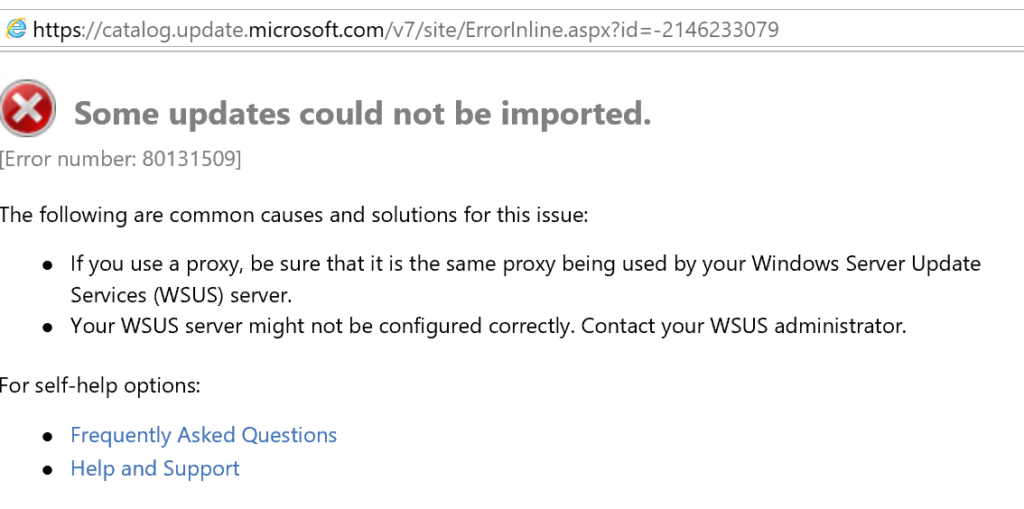
To fix the error, launch the registry console by running regedit on the server.
Navigate to: HKEY_LOCAL_MACHINE\SOFTWARE\Microsoft\.NETFramework\v4.0.30319.

Create a new DWORD (32-bit) key, and specify the name as SchUseStrongCrypto and apply the value as 1. Then, restart the server.

Update With ConfigMgr:
If you use ConfigMgr to manage and deploy your Windows Updates, you will need to run a Software Update sync from the ConfigMgr console to pull in the recently imported updates from WSUS.

In the ConfigMgr console, under the Software Library node, go to Software Updates > All Software Updates. To synchronize updates, you can either click the Synchronize Software Updates button on the top left-hand of the console or right-click on “All Software Updates, and select “Synchronize Software Updates” from the pop-out menu.
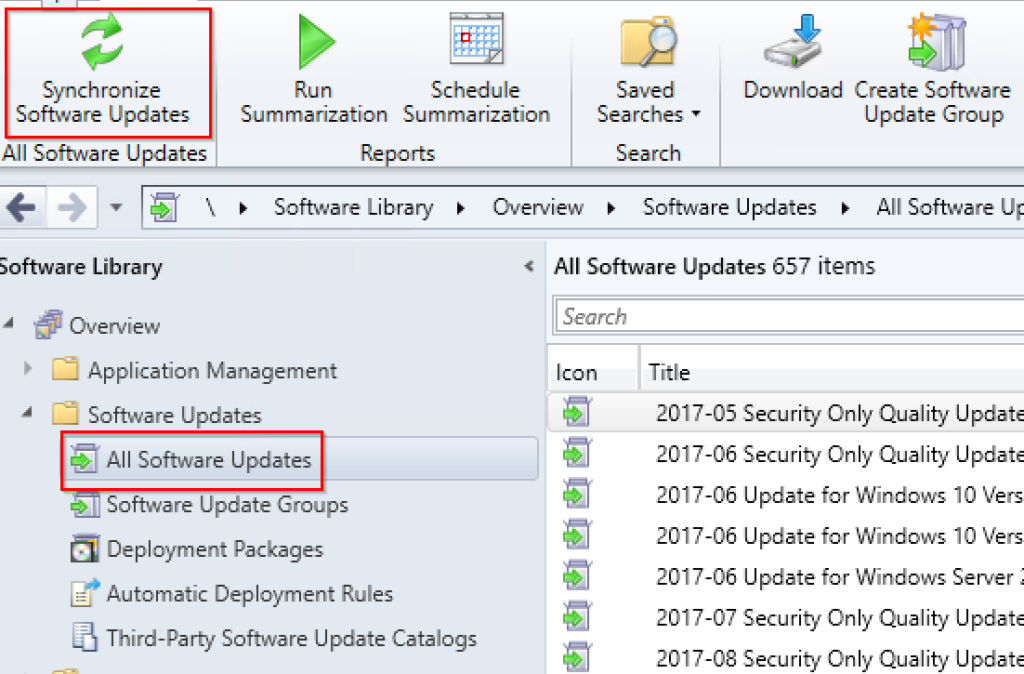
On successful completion of the software update sync, you will find the update for KB4577586 under “All Software Updates”. At this point, you will need to download the updates into a deployment package, and then deploy the updates to the device collections.

I will add the steps and screen captures to show how to download and deploy the updates using ConfigMgr in my next update or revision of this blog post. Stay tuned.

The resources below are other options available to uninstall using PowerShell scripts. These were written by my friend Ben Whitmore aka ByteBen. He uses the application method instead of the software updates method to uninstall Adobe Flash from systems using the scripts he wrote. Check it out:

1. How to Uninstall Adobe Flash Player from Windows 10 with ConfigMgr
2. Deploy the Update for Removal of Adobe Flash Player (KB4577586) using Intune

Here’s a YouTube episode on Namaste Techies covering all about Adobe Flash removal, including demos and useful tips. Please like and subscribe to the channel. Thanks.

ConfigMgr Reporting Error – UserTokenSIDs LDAP Server Unavailable

I recently switched to using my new-ish laptop (Lenovo P1) for my day-to-day technical work and decided I should redo my test lab in Hyper-V, particularly for my ConfigMgr / MEMCM / Intune testing and troubleshooting stuff. While I have been actively using my ConfigMgr site in my lab, I didn’t pay much attention to the built-in reports until very recently, when I discovered I had an issue as all the reports produced an error.

The Component Status in the Monitoring node of the ConfigMgr console indicated no issues with the Reporting Services Point Role.

The Site Status was lit up nice and green and indicated all was working fine with my ConfigMgr site.

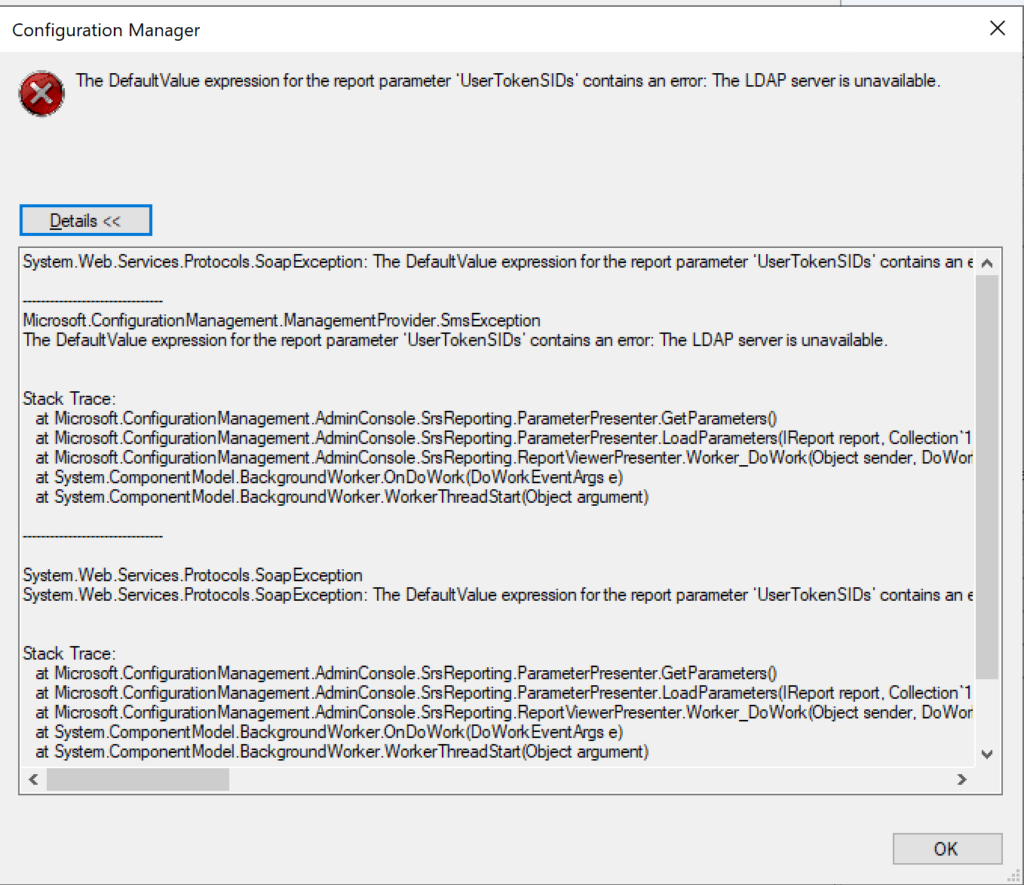
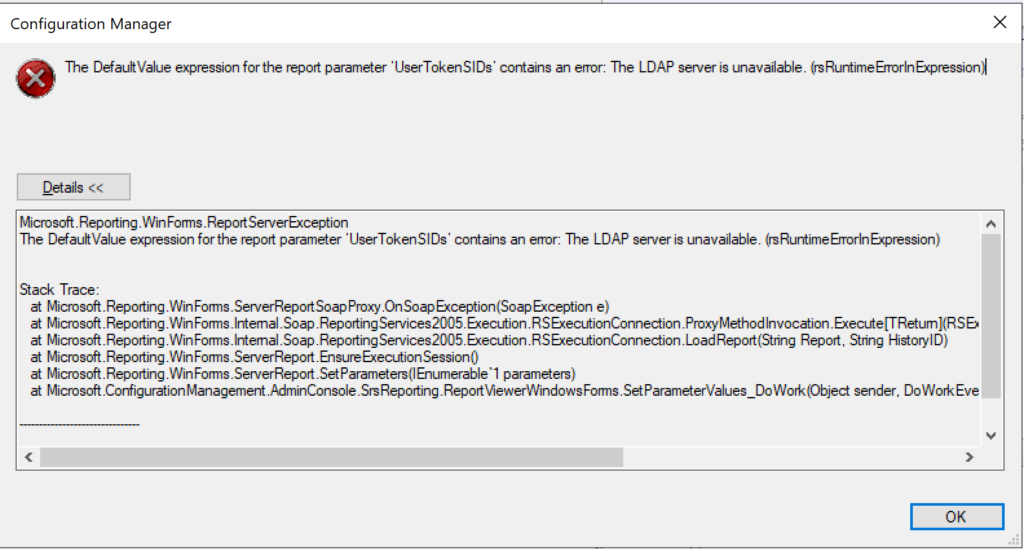
When a report is run from the ConfigMgr console or SSRS, the following error is produced (see image above):

The DefaultValue expression for the report parameter ‘UserTokenSIDs’ contains an error: The LDAP server is unavailable. (rsRuntimeErrorInExpression)

The full error is provided below:

System.Web.Services.Protocols.SoapException: The DefaultValue expression for the report parameter ‘UserTokenSIDs’ contains an error: The LDAP server is unavailable.
at Microsoft.ReportingServices.Library.ReportingService2005Impl.GetReportParameters(String Report, String HistoryID, Boolean ForRendering, ParameterValue[] Values, DataSourceCredentials[] Credentials, ParameterInfoCollection& Parameters)
at Microsoft.ReportingServices.WebServer.ReportingService2005.GetReportParameters(String Report, String HistoryID, Boolean ForRendering, ParameterValue[] Values, DataSourceCredentials[] Credentials, ReportParameter[]& Parameters)


Microsoft.ConfigurationManagement.ManagementProvider.SmsException
The DefaultValue expression for the report parameter ‘UserTokenSIDs’ contains an error: The LDAP server is unavailable.

Stack Trace:
at Microsoft.ConfigurationManagement.AdminConsole.SrsReporting.ParameterPresenter.GetParameters()
at Microsoft.ConfigurationManagement.AdminConsole.SrsReporting.ParameterPresenter.LoadParameters(IReport report, Collection`1 navigationParameters, IResultObject resultObject)
at Microsoft.ConfigurationManagement.AdminConsole.SrsReporting.ReportViewerPresenter.Worker_DoWork(Object sender, DoWorkEventArgs e)
at System.ComponentModel.BackgroundWorker.OnDoWork(DoWorkEventArgs e)
at System.ComponentModel.BackgroundWorker.WorkerThreadStart(Object argument)


I tried several troubleshooting steps including the following:

1. Uninstalled the Reporting role from ConfigMgr
2. Uninstalled the SQL Reporting Services
3. Reinstalled SQL Reporting Services
4. Reinstalled the Reporting role in ConfigMgr
5. Changed the registry key: “HKEY_LOCAL_MACHINE/SOFTWARE/Wow6432Node/Microsoft/ConfigMgr10/
AdminUI/Reporting/ReportBuilderApplicationManifestName” from the value “ReportBuilder_2_0_0_0.application” to “ReportBuilder_3_0_0_0.application”
6. Edited the file:
“C:\Program Files (x86)\Microsoft Configuration
Manager\AdminConsole\bin\Microsoft.ConfigurationManagement.exe.config” and changed the 2 to a 3 in the two locations:
<add key=”10.0″ value=”ReportBuilder_3_0_0_0.application”/>
<add key=”DEFAULT” value=”ReportBuilder_3_0_0_0.application”/>
7. Checked accounts including the service account for SQL reporting

None of the above steps helped fix the UserTokenSIDs issue. I searched high and low on Google / Bing and did not discover anything regarding “LDAP server is unavailable” specifically relating to UserTokenSIDs. I finally got the big guns out and contacted my close friend, Garth Jones, who is a known industry expert with SQL and SSRS. He is a Microsoft MVP and also owns a company called Enhansoft which provides a subscription service for all things reports, which extends the reporting capabilities in ConfigMgr. Enhansoft also provides a free report as a giveaway each month.

RESOLUTION:

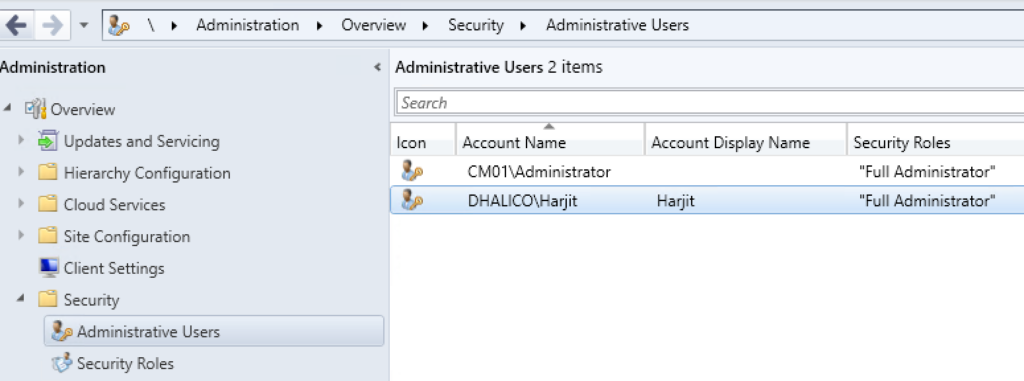
With Garth’s help, the issue was quickly discovered and fixed quite easily. Bottom line is that I was using a local administrator account (CM01\Administrator) to login to my ConfigMgr server as opposed to using a Domain account (Dhalico\Harjit) with the necessary privileges. FYI, “Dhalico” is my domain.
1. Added the Dhalico\Harjit account in the ConfigMgr console under
Administration > Overview > Security > Administrative Users (see image below)
2. Provided “Full Administrator” security role
3. Logged on to the ConfigMgr server as “Harjit” and tested running reports
4. Success! And Thank you Garth! 🙂

How To Install ConfigMgr Client On VDI Template

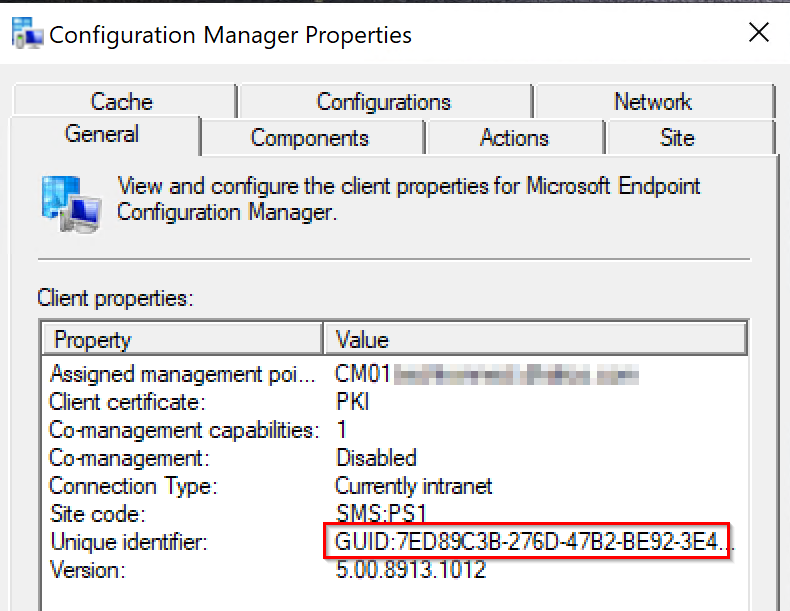
The installation of the ConfigMgr client on workstations and servers is pretty straight forward, and can be done manually, with Client Push, and Software Update Based client installation to name a few. However, it is not as simple when dealing with Windows VDI systems, where extra steps need to be taken to avoid duplicate ConfigMgr client GUIDs and certificates on cloned VDI systems. Below are the steps to follow.

On the master or template system:

  1. Install the ConfigMgr client. Ensure it is properly functioning and has all the necessary components and actions.
  2. Stop the SMS Host Service. This can be done by launching the Command Prompt (CMD) as Administrator and running the following command:
    net stop ccmexec
  3. Delete the SMSCFG.ini file from the Windows folder location. In Administrator CMD, run the following command:
    del %WINDIR%\SMSCFG.ini
  4. Delete the SMS Certificates. To do this, launch PowerShell as Administrator and run the following command:
    Remove-Item -Path HKLM:\Software\Microsoft\SystemCertificates\SMS\Certificates\* -Force
  5. Remove the Inventory Action ID 1 in WMI. You can run the following command:
    wmic /namespace:\root\ccm\invagt path inventoryActionStatus where InventoryActionID=”{00000000-0000-0000-0000-000000000001}” DELETE /NOINTERACTIVE
  6. Once the above steps have been completed, shutdown the master template, capture a snapshot, and provision the VDI systems. At this point, each VDI system will generate a unique ConfigMgr GUID and will function as expected.

For step number 5, this can be achieved by using the wbemtest tool with the following steps:

  • Launch wbemtest as Administrator
  • Click Connect
  • Change the Namespace field as root\ccm\invagt, and click Connect
  • Click on Enum Classes
  • Select Recursive and click Ok
  • Scroll down and locate InventoryActionStatus, and double click
  • Click on the Instances button
  • Select the Inventory GUID and click Delete

ConfigMgr Guidance For SQL CE Levels

What is Cardinality Estimation or SQL CE Level?
The Cardinality Estimator is a SQL Server Query Processor component that is responsible for predicting the number of rows that the query will return. Microsoft provides some great documentation about SQL CE which you can read more on Microsoft Docs.

As for how SQL CE works and it’s importance with ConfigMgr, Umair Khan of Microsoft has shared a great blog post explaining the details, which you can read more here:
https://blogs.technet.microsoft.com/umairkhan/2019/01/28/configmgr-current-branch-1810-guidance-for-the-sql-ce-levels-with-various-sql-versions

ConfigMgr Technical Preview 1801 Released

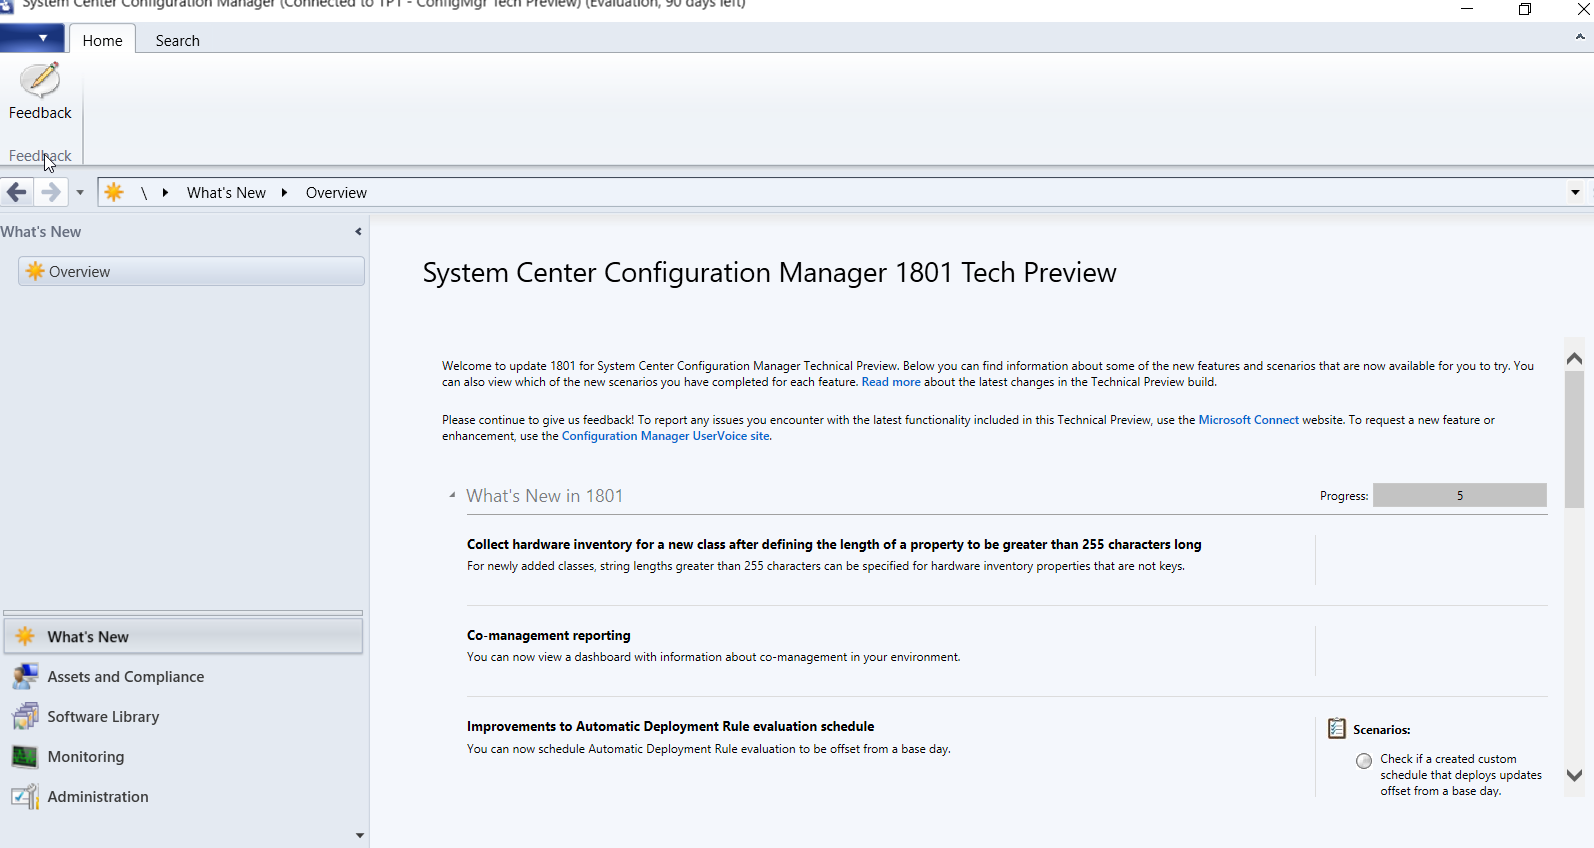
The Microsoft System Center Configuration Manager (ConfigMgr) team has kicked off 2018 with a brand new release of the ConfigMgr Technical Preview branch with version 1801. As always, new features and improvements to the product derive from the feedback they receive from the community on the ConfigMgr UserVoice forum. Now, you can also provide feedback directly from within Windows 10 by using the Feedback Hub App. See additional documentation to provide ConfigMgr feedback.

This update has a number of new features (as listed in the Enterprise Mobility & Security blogpost) which include:

  • Run Scripts – You can now import and run signed scripts and monitor the script results.
  • Moving Distribution Points between sites – You can now move an eligible distribution point from one primary site to another primary site or from under a secondary site to a primary site . For information about requirements for moving a distribution point see “Reassign Distribution Point”.
  • Improvements to client settings for Software Center – Client settings for Software Center now has a customize button where you can preview your customizations before deploying them to machines. You can also hide unapproved applications in Software Center.
  • New settings for Windows Defender Application Guard – For Windows 10 version 1709 and later devices, there are two new host interaction settings for Windows Defender Application Guard. Websites can be given access to the host’s virtual graphics processor and files downloaded inside the container can be persisted on the host.
  • Co-management reporting – You can now view a dashboard with information about co-management in your environment.
  • Phased Deployments – You can use phased deployments to automate a coordinated, sequenced rollout of software without creating multiple deployments.
  • Support for hardware inventory strings greater than 255 characters in length – For newly added classes, you can specify string lengths greater than 255 characters for hardware inventory properties that are not keys.
  • Improvements to Automatic Deployment Rule evaluation schedule – You can now schedule Automatic Deployment Rule evaluation to be offset from a base day.

You can update to the 1801 Tech Preview release via the ConfigMgr console under the Updates & Servicing node. The baseline version of the Technical Preview branch is now at version 1711 and available on the TechNet Evaluation Center.

The following document provides further details on the capabilities in Technical Preview 1801 for System Center Configuration Manager.

Here’s my video tutorial which I did for version 1701. The steps are the same for 1801.

Here are the step-by-step upgrade guide (if you prefer not to watch the video) to get your current ConfigMgr Technical Preview site to version 1801:

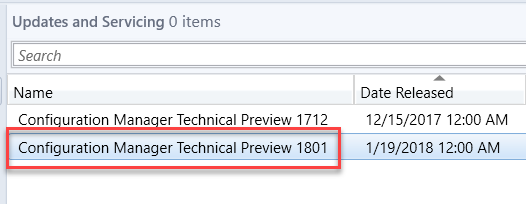
You will find the 1801 update available in the ConfigMgr console under Administration > Updates and Servicing. If you don’t see it, click on Check for Updates in the menu ribbon.

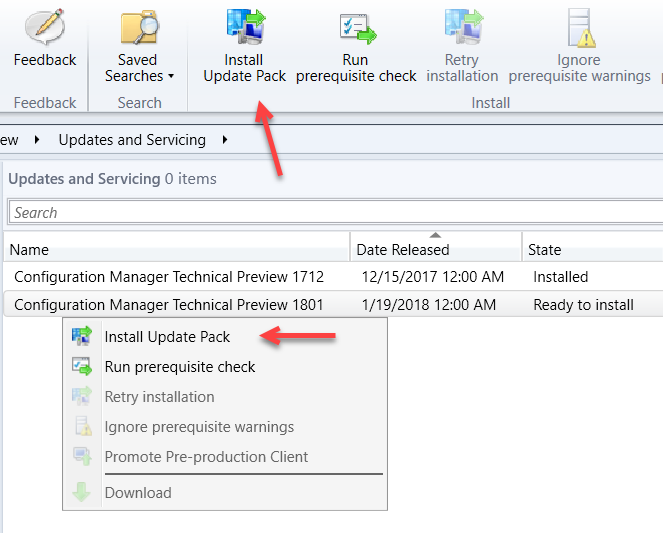
Right-click on Configuration Manager Technical Preview 1801 and click on Install Update Pack. If you prefer, you can also use the Install Update Pack option from the ribbon menu. I recommend that you run the prerequisite check first to make sure there are no issues reported with your site server. Otherwise, you will need to address the issues before proceeding with the update.

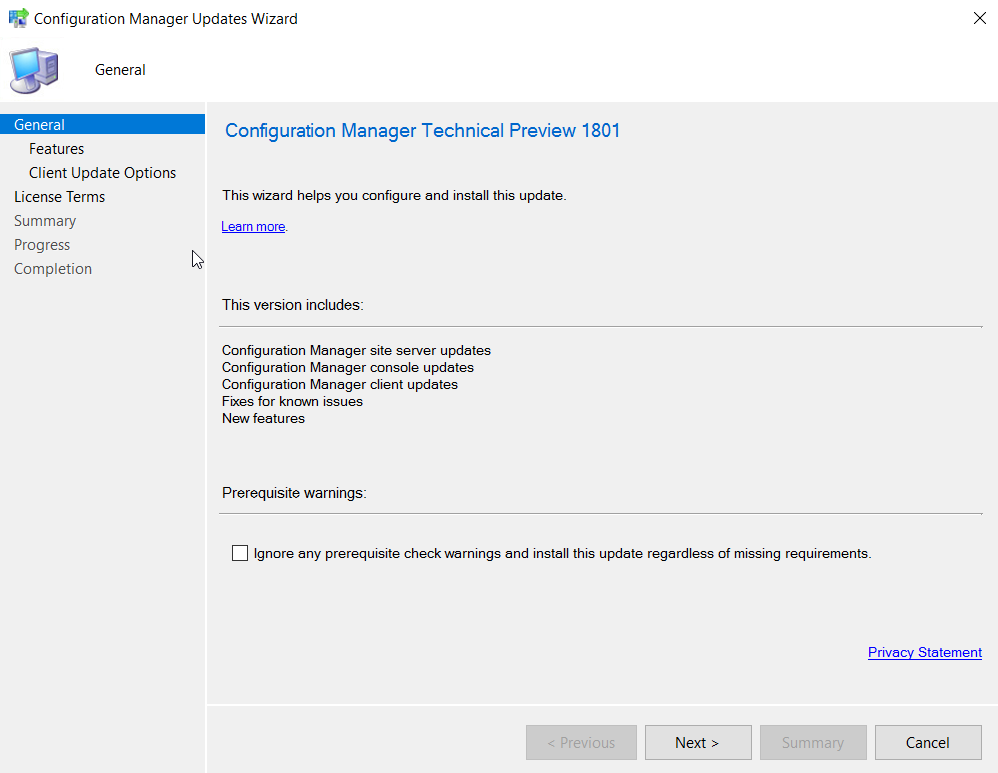
Click Next and select the checkbox if you want to ignore the prerequisite check warning.

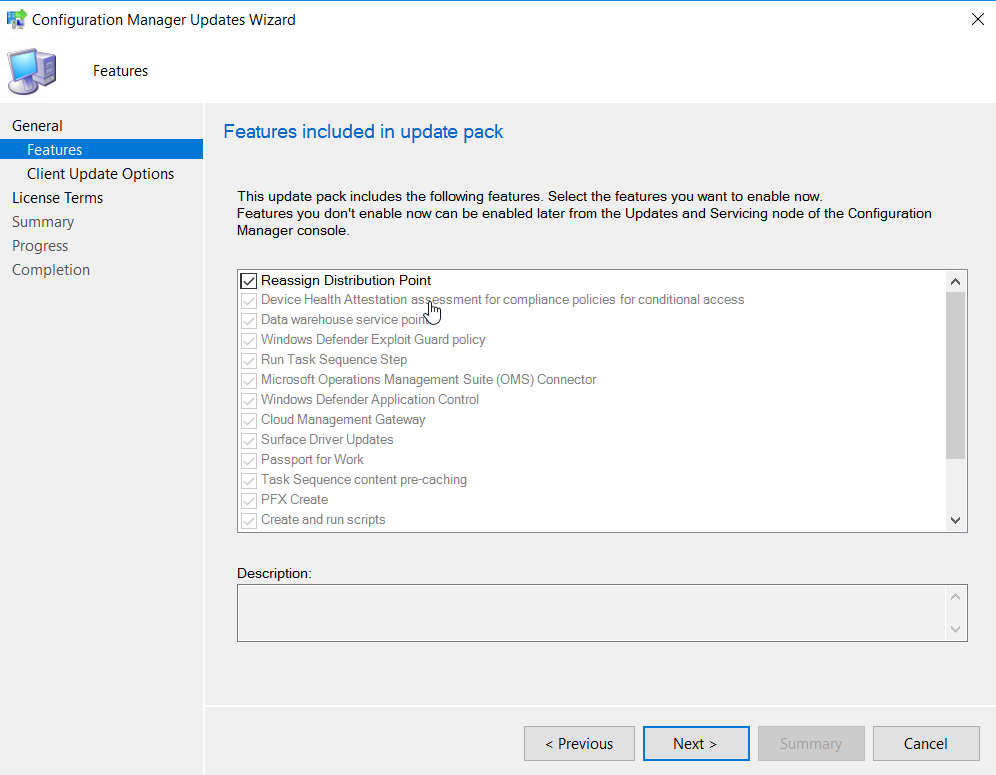
Select the features desired for install in the update pack. You can choose to do this later under the Updates and Servicing node.

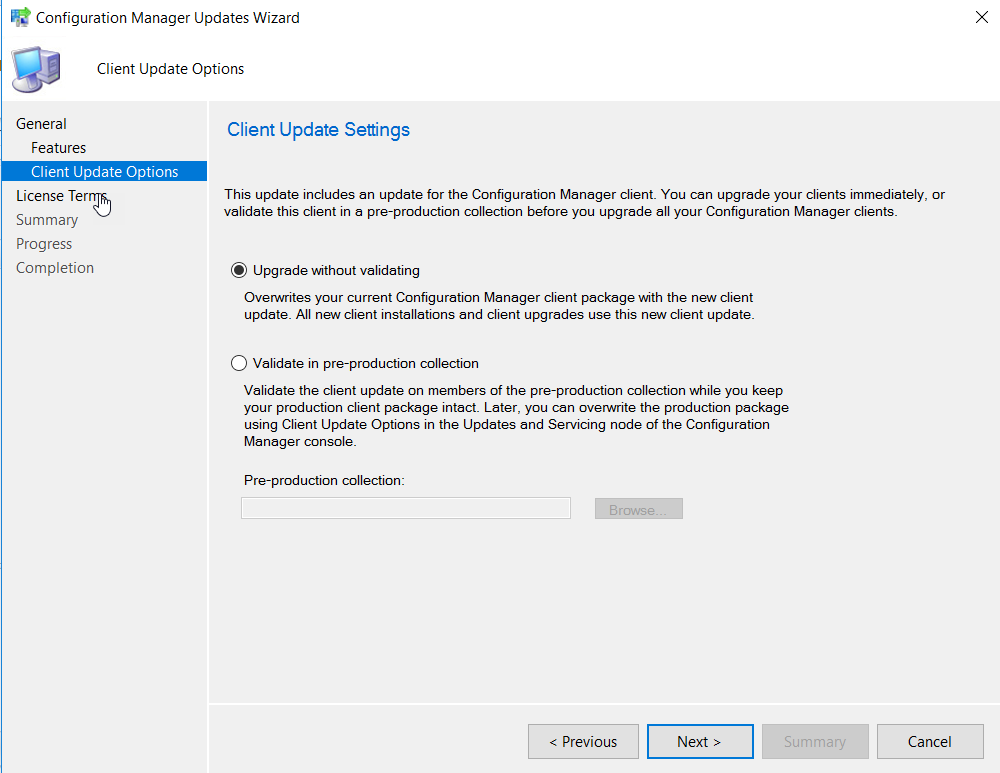
Pick your option to validate or not to validate the upgrade against a collection. For my production Current Branch site, I generally select Validate in pre-production collection and choose one of my test collections for the first phase of the upgrade. However, since this is the Technical Preview site and only used in a test environment, you can continue with the option, Upgrade without validating.

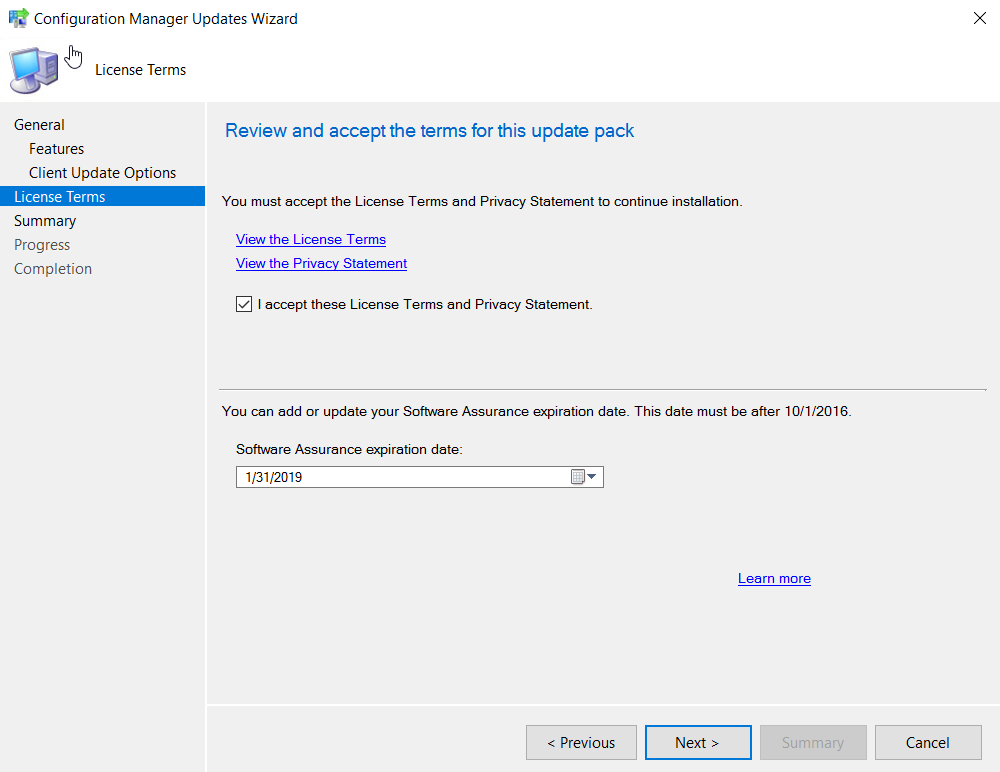
Select the license terms and click Next.

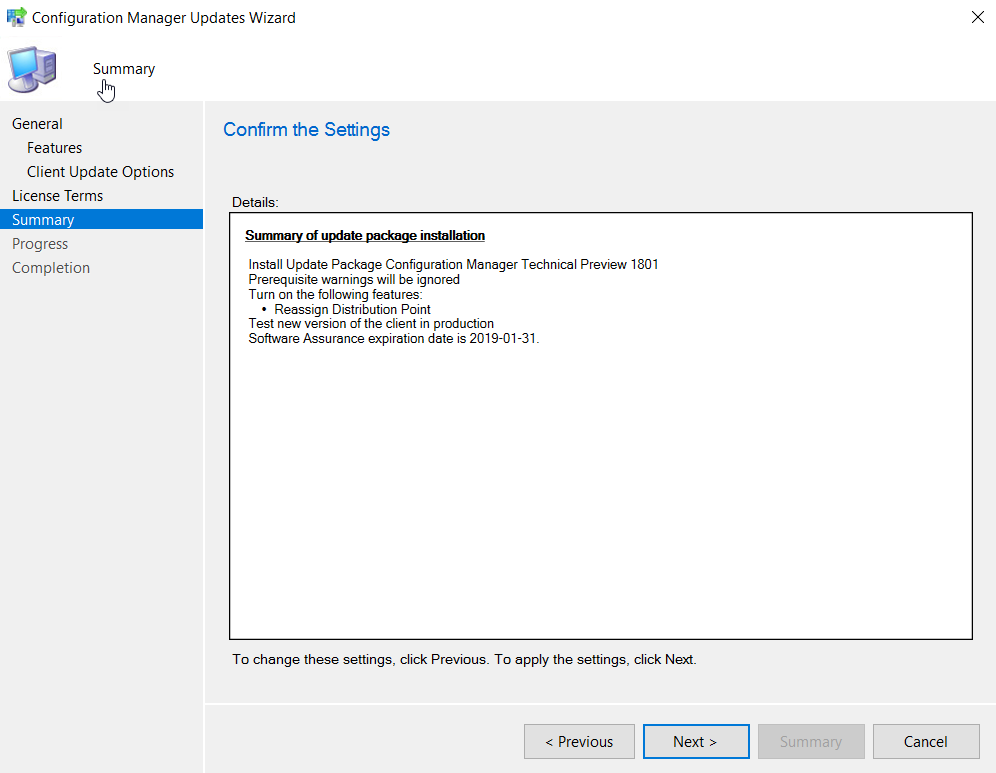
Click Next to confirm the settings.

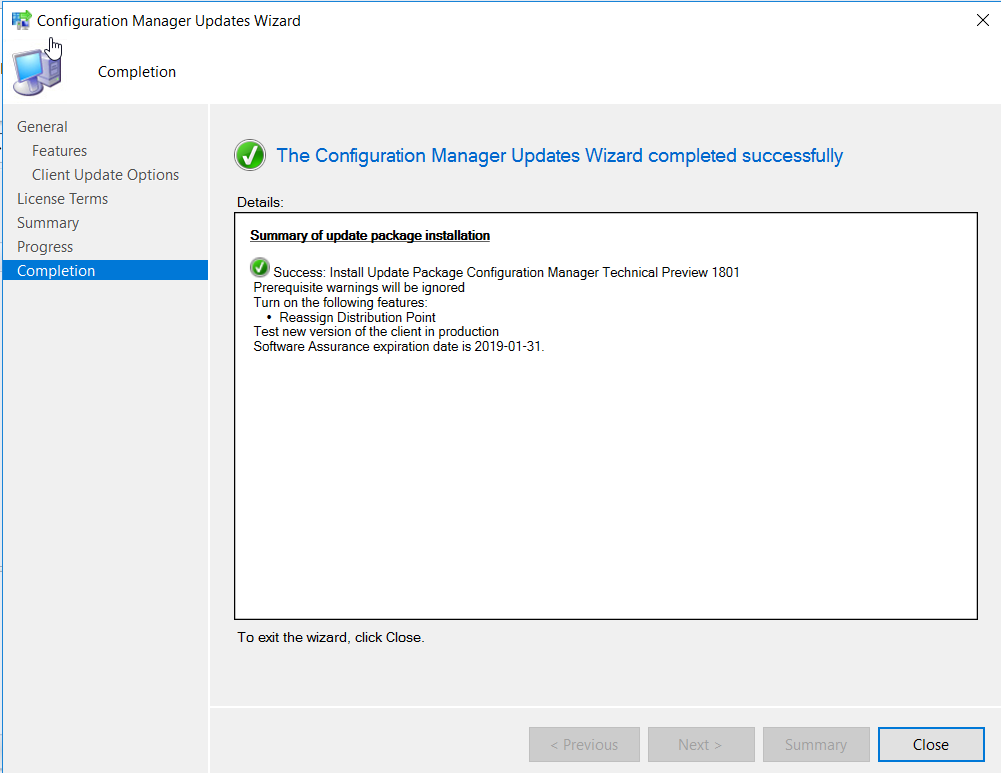
Click Close.

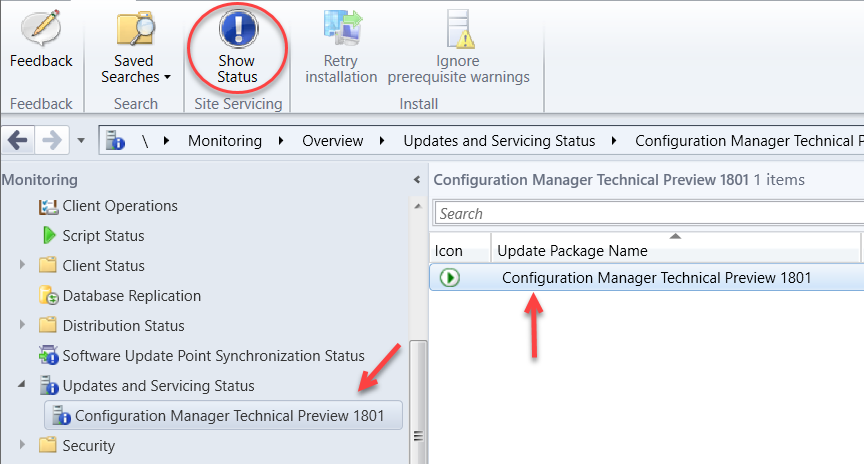
You can now monitor the status of the upgrade under Monitoring > Updates and Servicing Status. Then select the update package name and click on Show Status in the ribbon menu.

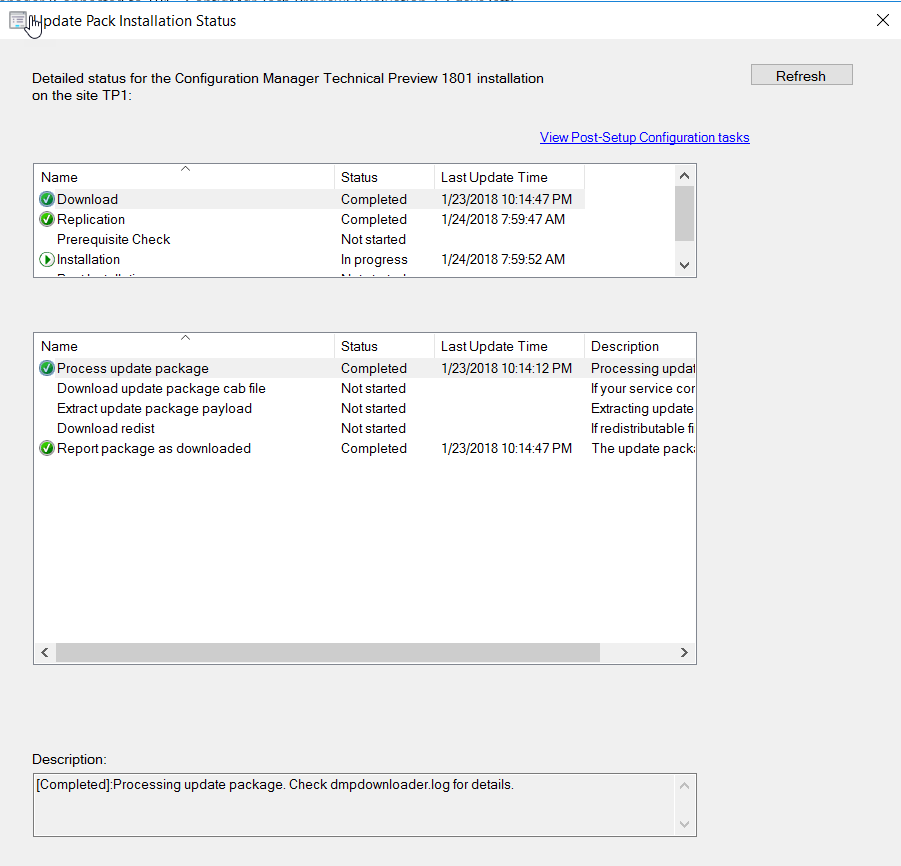
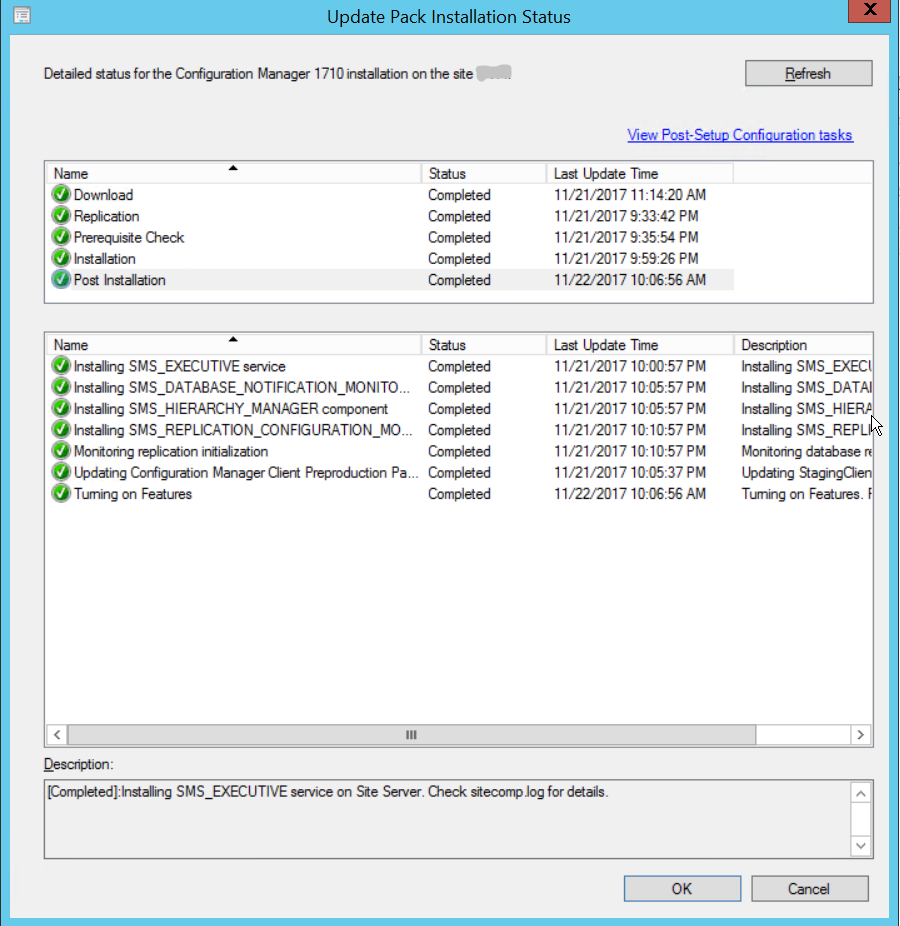
The window below will show the stages of the upgrade process where you can monitor it’s progress. If there are any issues, you will see it listed here with a warning and the details provided in the description box in the bottom of the window.

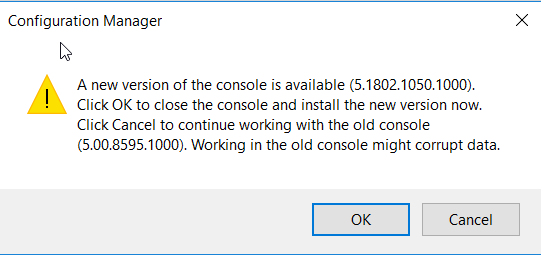
Upon successful completion of the hotfix installation, you will be presented with the pop-up window as seen below to indicate a console upgrade from version 5.0.0.8595.1000 to 5.1802.1050.1000 is available.

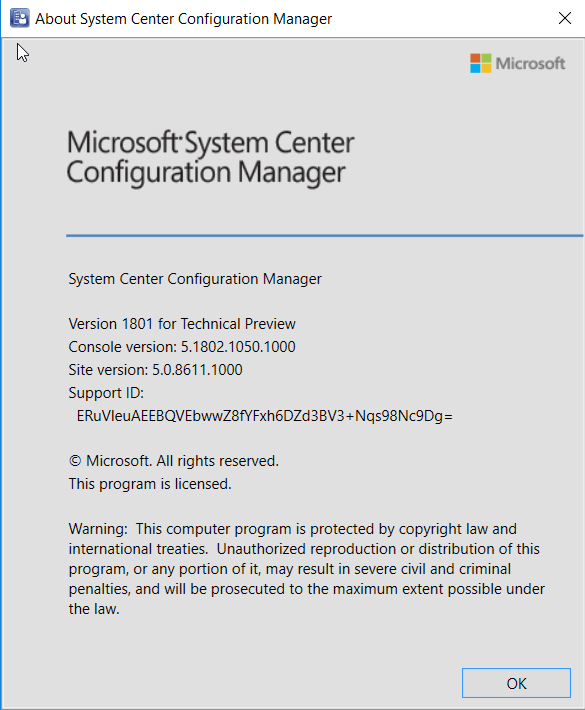
You can verify the console upgrade in the About System Center Configuration Manager drop down menu from the console.
Version 1801 for Technical Preview
Console version: 5.1802.1050.1000
Site version: 5.0.8611.1000

And you now have ConfigMgr Technical Preview 1801 running in your test environment.


ConfigMgr 1710 Hotfix Rollup (KB4057517)

ConfigMgr Current Branch version 1710 now has a hotfix (KB4057517) available which addresses some issues, which you can read up here. The following are the fixes resolved with this hotfix (there are 13 of them):

  • Clients who use Azure Active Directory (Azure AD) for authentication do not successfully communicate with a management point
  • The Configuration Manager console may terminate unexpectedly after you browse to a content location in the Office 365 Client Installation wizard
  • Download of express updates may fail on Windows 10 clients because of an issue that affects files in temporary and cache folders
  • Configuration Manager current branch, version 1710 clients are not upgraded on systems that are running Windows Server 2008 SP2. The client Setup program, Ccmsetup.exe, terminates unexpectedly
  • The Office 365 Application Installation Wizard may try to download content from an incorrect channel. This causes download failures
  • The fallback time that is configured for content is not honored if distribution points or their content are inaccessible
  • The Client Notification Restart request is processed incorrectly by remote management points. This causes a .bld notification file to be left in the \MP\Outboxes\bgb.box folder on the remote management point
  • Retrying a large single-file download, such as an Office 365 update file, may fail on a site server
  • The Persist content in the client cache setting on Package Properties is not honored by clients
  • Decommission-related State messages from co-managed client computers are processed incorrectly
  • State messages sent by Azure AD users may not be processed
  • If a Configuration Manager client restarts during the process of retrying a task sequence policy download, that task sequence does not run automatically after the restart
  • Conditional access policies may block access to Office 365 applications for domain-joined devices after migrating to Intune standalone

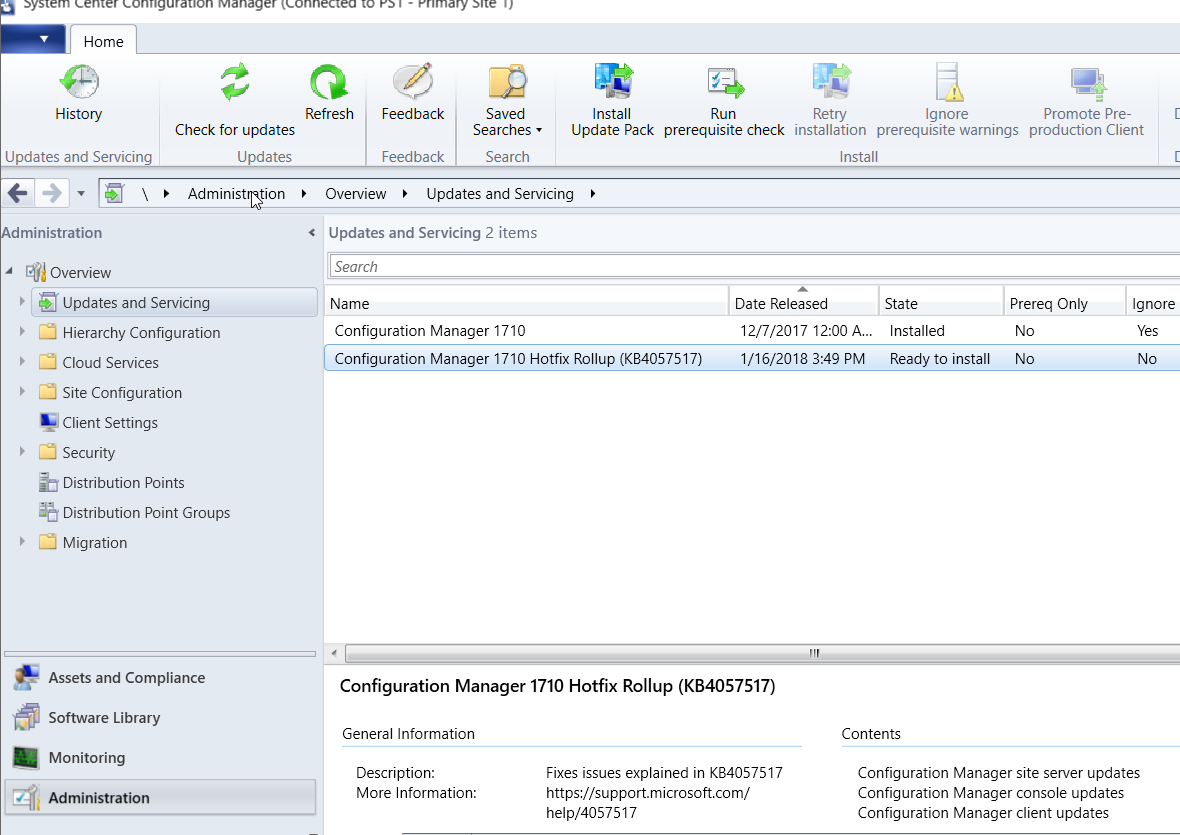
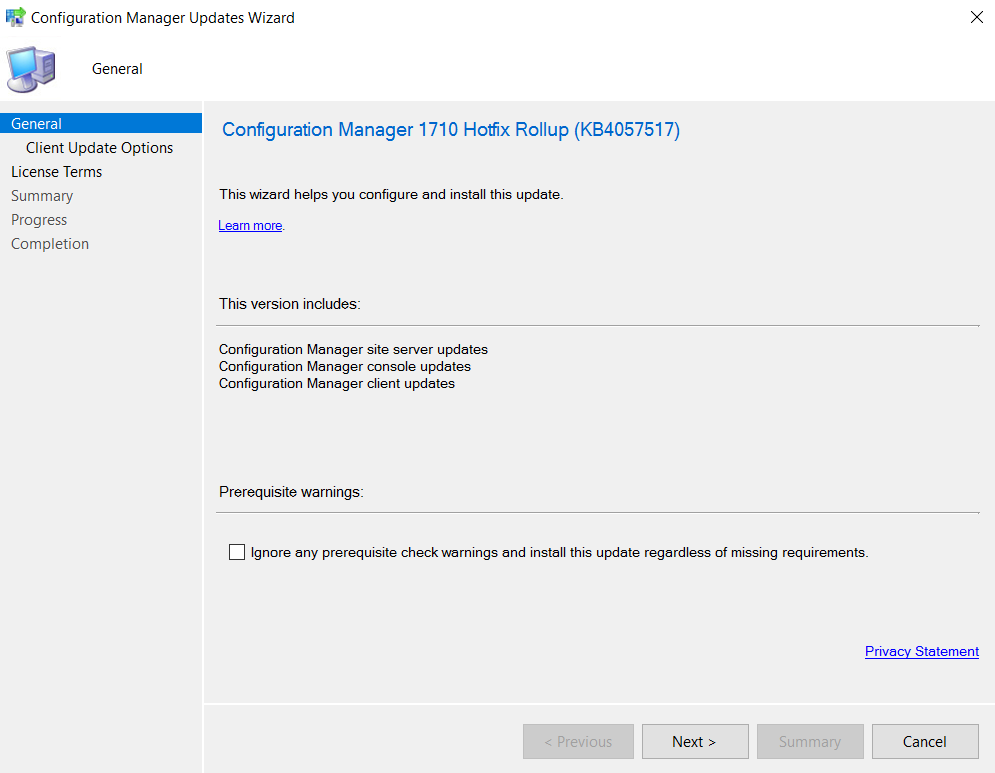
Here are the steps on how to install this hotfix. You will find it available in the ConfigMgr console under Administration > Updates and Servicing. If you don’t see it, click on Check for Updates in the menu ribbon.

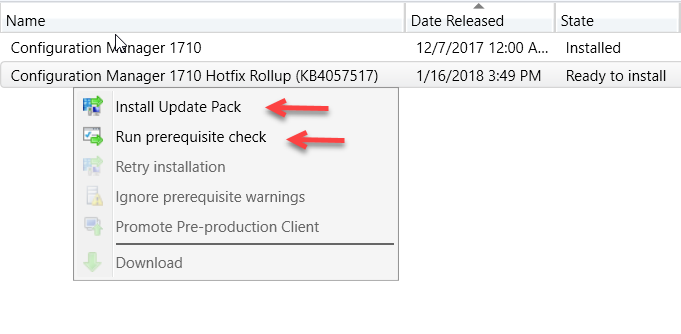
Right-click on Configuration Manager 1710 Hotfix Rollup (KB4057517) and click on Install Update Pack. I recommend that you run the prerequisite check first to make sure there are not issues reported with your site server.

Click Next and select the checkbox if you want to ignore the prerequisite check warning.

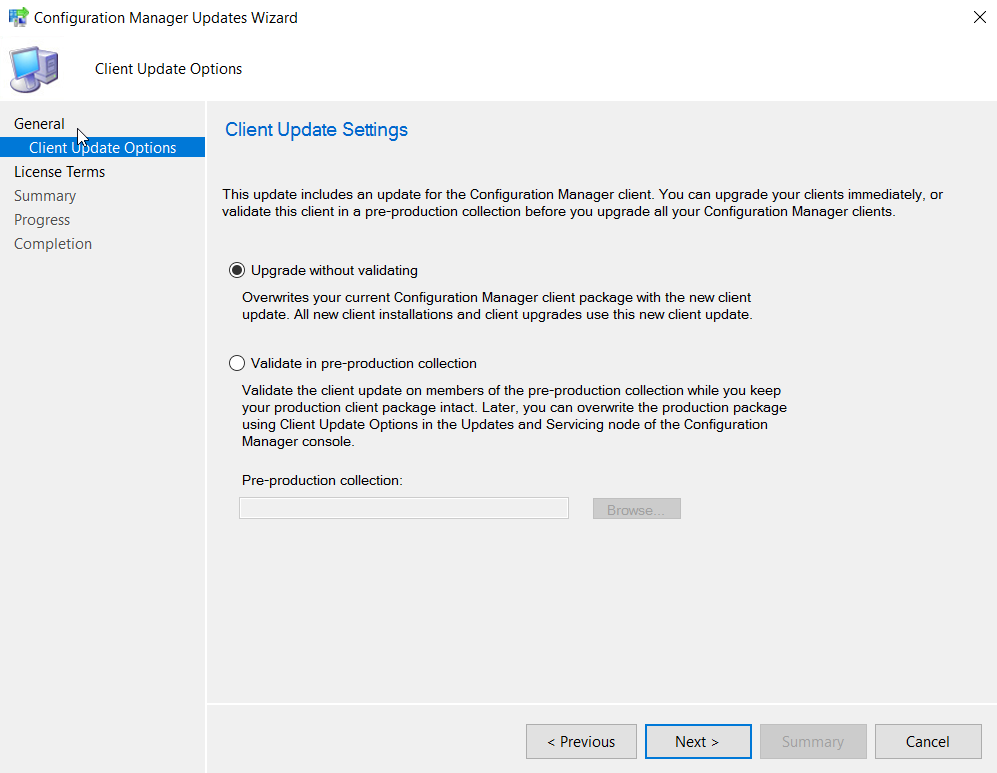
Pick your option to validate or not to validate the upgrade against a collection. I generally tend to select Validate in pre-production collection and choose one of my test collections for the first phase of the upgrade.

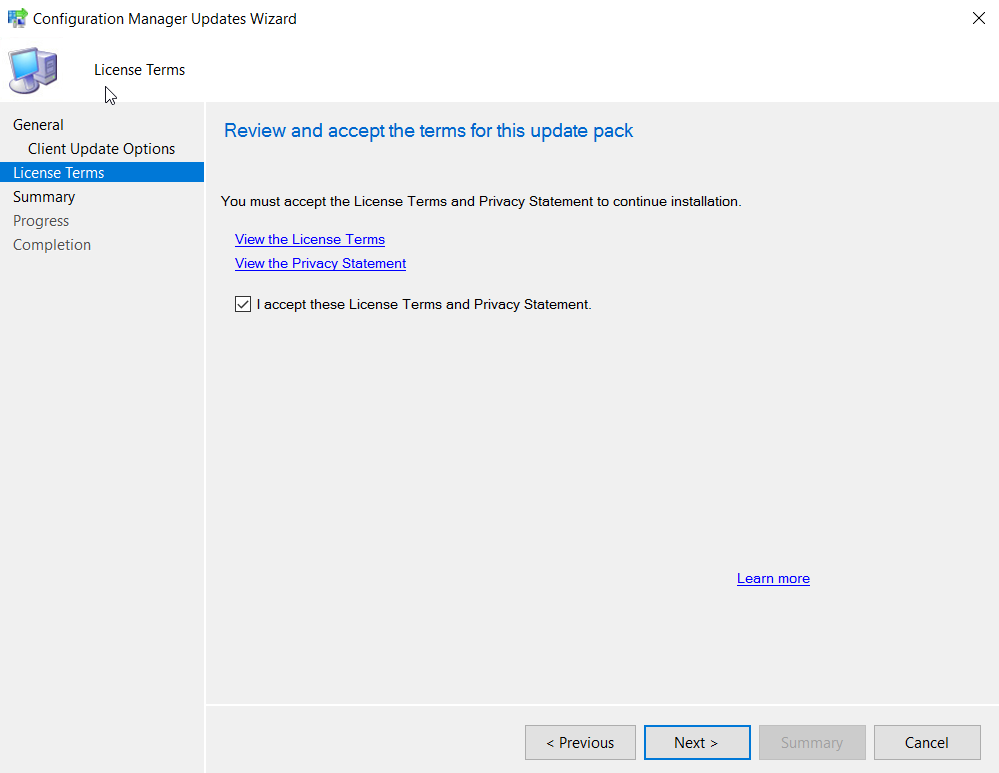
Select the license terms and click Next.

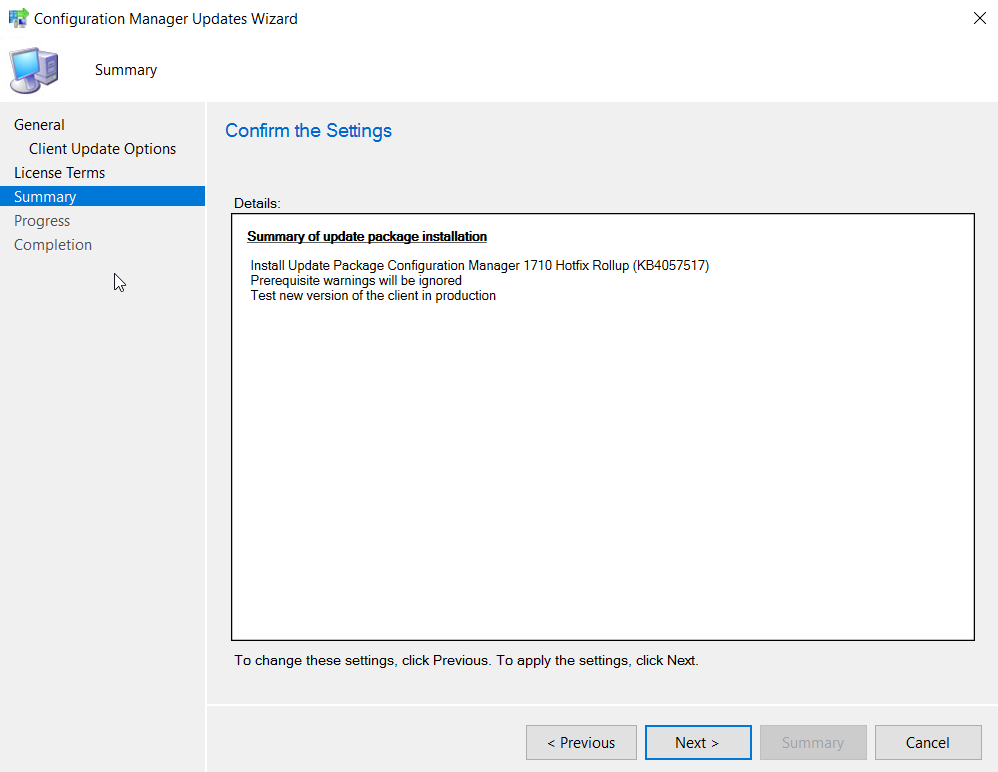
Click Next to confirm the settings.

Click Close.

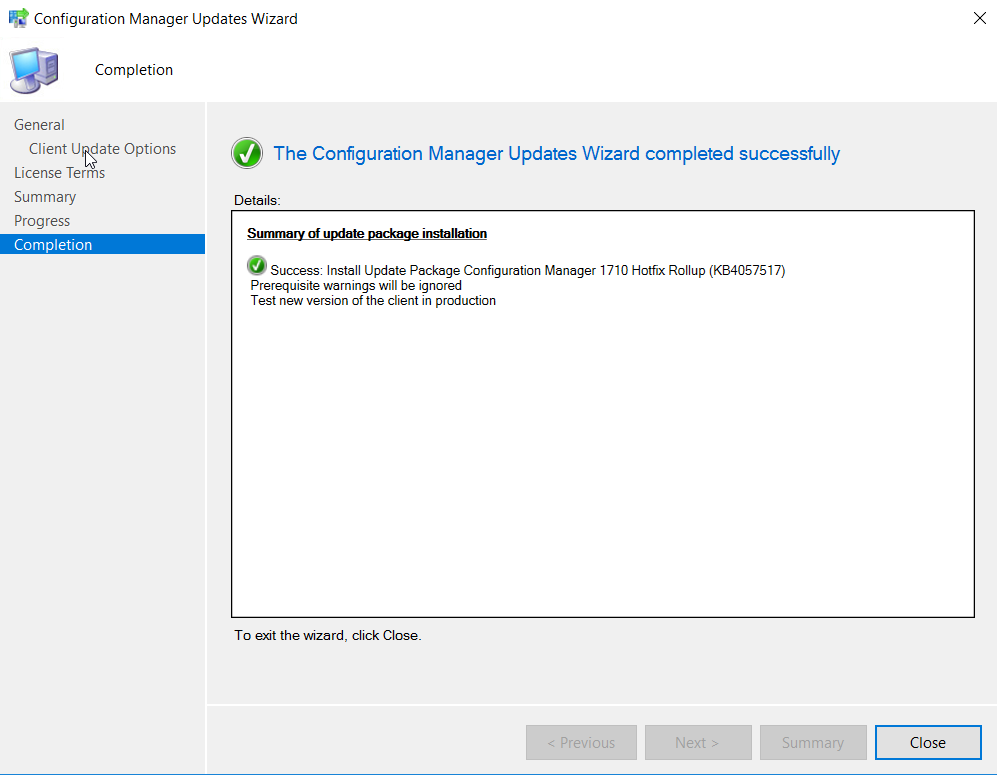
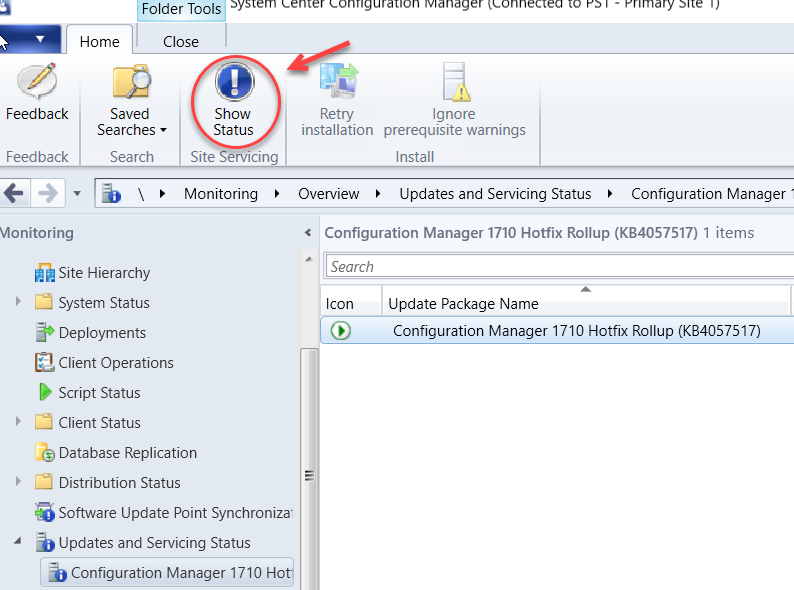
You can now monitor the status of the upgrade under Monitoring > Updates and Servicing Status. Then select the update package name and click on Show Status in the menu ribbon.

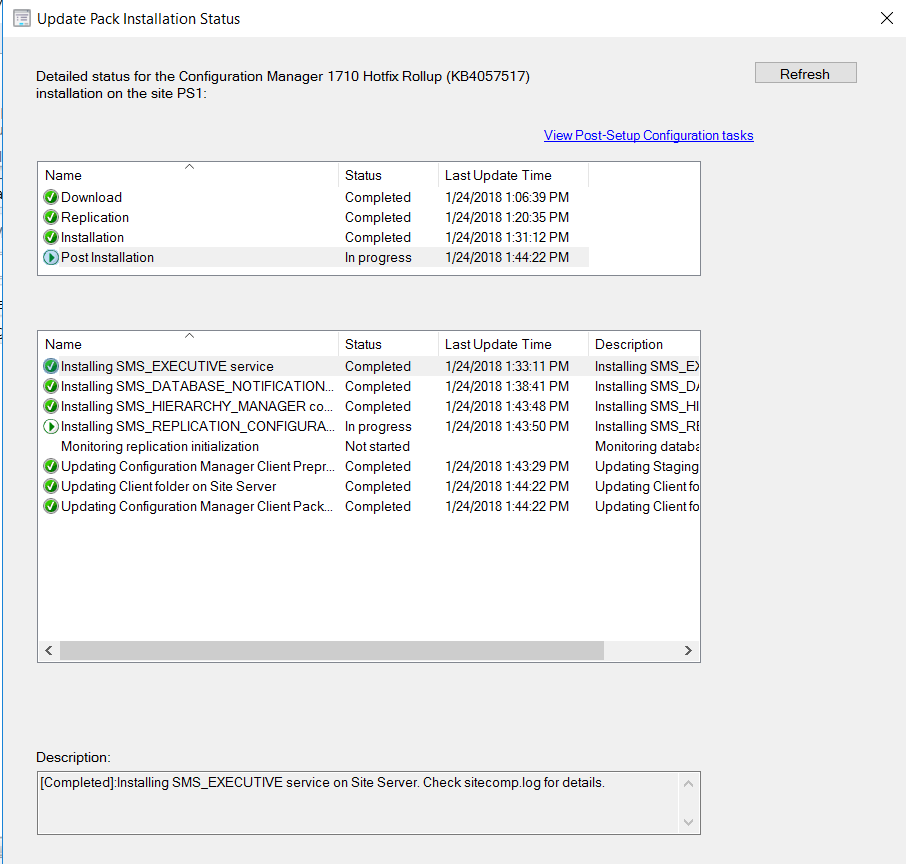
The window below will show the stages of the upgrade process where you can monitor it’s progress. If there are any issues, you will see it listed here with a warning and the details provided in the description box in the bottom of the window.

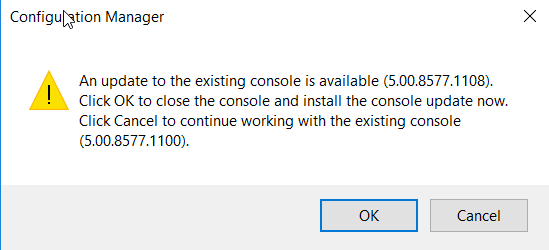
Upon successful completion of the hotfix installation, you will be presented with the pop-up window as seen below to indicate a console upgrade from version 5.0.0.8577.1100 to 5.0.0.8577.1108 is available.

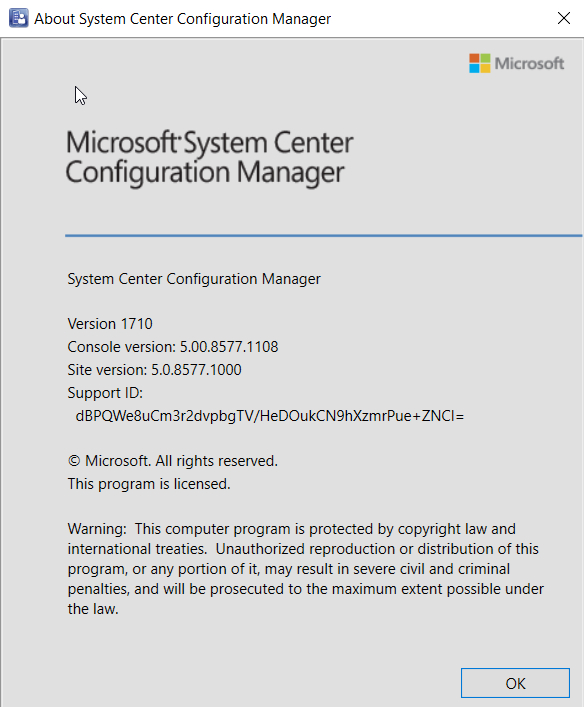
You can verify the console upgrade in the About System Center Configuration Manager drop down menu from the console.
Version 1710
Console version: 5.0.0.8577.1108
Site version: 5.0.8577.1000

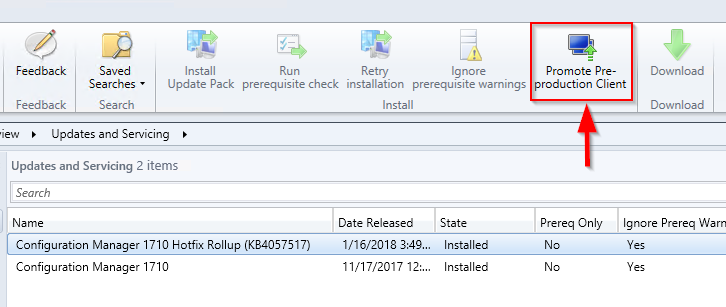
Once you are comfortable with the client upgrade on your test collection which you selected during the validate in pre-production collection phase, you can deploy the client upgrade to all clients in the hierarchy by selecting the Promote Pre-production Client option as seen below.

Your ConfigMgr site is now upgraded with the KB4057517 hotfix.


SQL Query To Find The Collection Membership of a Specific Computer in ConfigMgr

Every now and then, you will encounter a situation when you need to find which ConfigMgr Collection(s) a specific computer is a member of for troubleshooting purposes. I came across this TechNet post which describes a SQL query to find the collection information.

Run the following query in SQL against the SMS Database:

select v_FullCollectionMembership.CollectionID As ‘Collection ID’, v_Collection.Name As ‘Collection Name’, v_R_System.Name0 As ‘Machine Name’ from v_FullCollectionMembership
JOIN v_R_System on v_FullCollectionMembership.ResourceID = v_R_System.ResourceID
JOIN v_Collection on v_FullCollectionMembership.CollectionID = v_Collection.CollectionID
Where v_R_System.Name0=’ClientMachineName’

Note: Replace ClientMachineName with the name of the Client Machine in question. Additionally, you can also make a Custom Report to get this information if you intend to use this frequently:

The SQL Statement For this Report would be as follows:

select v_FullCollectionMembership.CollectionID As ‘Collection ID’, v_Collection.Name As ‘Collection Name’, v_R_System.Name0 As ‘Machine Name’ from v_FullCollectionMembership
JOIN v_R_System on v_FullCollectionMembership.ResourceID = v_R_System.ResourceID
JOIN v_Collection on v_FullCollectionMembership.CollectionID = v_Collection.CollectionID
Where
v_R_System.Name0=@Comp

Click on Prompts while providing the SQL Statement, and Create a new prompt named ‘Comp’ without the quotes. Provide a SQL Statement for the prompt as follows:

select Name0 from v_R_System

Source: http://blogs.technet.com/b/configurationmgr/archive/2009/08/24/how-to-find-the-collection-membership-information-of-a-specific-client-machine.aspx

UserVoice: Microsoft Product Feedback And Feature Request Resources

I recently came across a post by Jim Naroski on The Office 365 Guy TechNet blog site. He listed the links to the UserVoice portal for the various products or topics which Microsoft utilizes to gather feedback and feature requests. One important link is missing from the TechNet blog, which is for the System Center Configuration Manager (ConfigMgr) feedback site, and I have added that to the list below. Start using this valuable resource to help improve products and make your voice heard.

Products Links
Access https://access.uservoice.com
Bookings https://outlook.uservoice.com/forums/314907-microsoft-bookings
Business Center https://office365.uservoice.com/forums/600793-office-365-business-center
ConfigMgr https://configurationmanager.uservoice.com
Excel https://excel.uservoice.com
Flow https://powerusers.microsoft.com/t5/Flow-Feedback/ct-p/Feedback
Forms https://microsoftforms.uservoice.com
Connections https://office365.uservoice.com/forums/600610-microsoft-connections
Invoicing https://office365.uservoice.com/forums/600781-microsoft-invoicing
Listings https://office365.uservoice.com/forums/600778-microsoft-listings
Mix https://officemix.uservoice.com/
MyAnalytics https://myanalytics.uservoice.com/
Office 365 https://office365.uservoice.com
Office 365 Groups https://office365.uservoice.com/forums/286611-office-365-groups
OneDrive https://onedrive.uservoice.com
OneNote https://onenote.uservoice.com
Outlook https://outlook.uservoice.com
Planner https://planner.uservoice.com
Power BI https://ideas.powerbi.com/forums/265200-power-bi-ideas
PowerApps https://powerusers.microsoft.com/t5/Product-Feedback/ct-p/PA-feedback
PowerPoint https://powerpoint.uservoice.com
Project https://microsoftproject.uservoice.com
SharePoint https://sharepoint.uservoice.com
StaffHub https://staffhub.uservoice.com
Skype for Business https://www.skypefeedback.com
Stream https://techcommunity.microsoft.com/t5/Microsoft-Stream-Ideas/idb-p/StreamIdeas
Sway https://sway.uservoice.com
Teams https://microsoftteams.uservoice.com/forums/555103-public
To-Do https://todo.uservoice.com/
Visio https://visio.uservoice.com
Word https://word.uservoice.com
Yammer https://yammer.uservoice.com

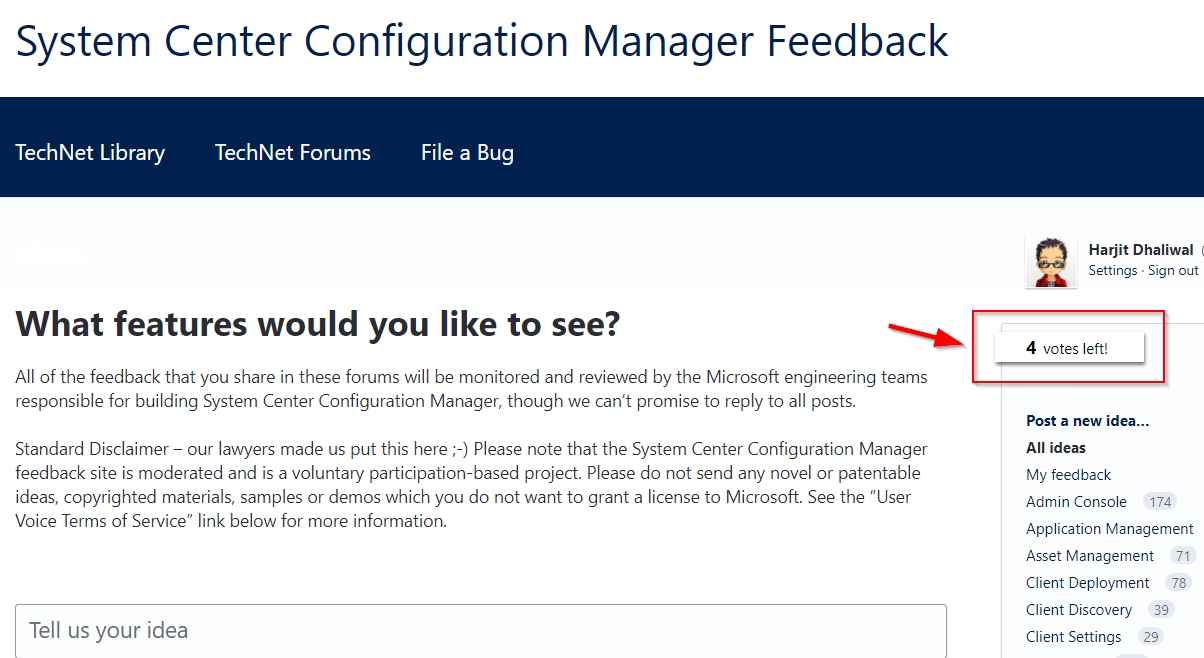
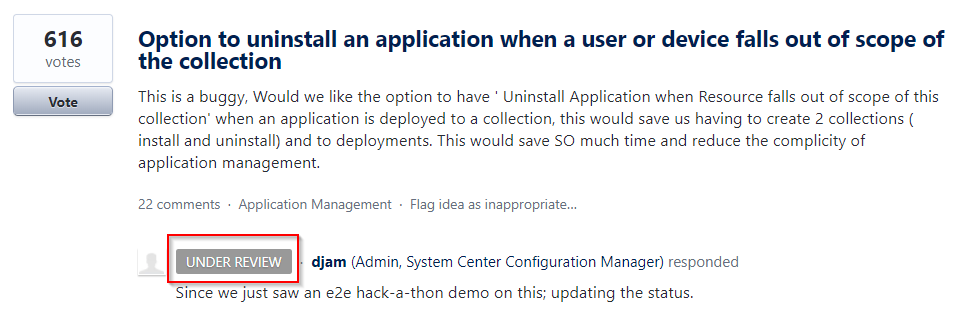
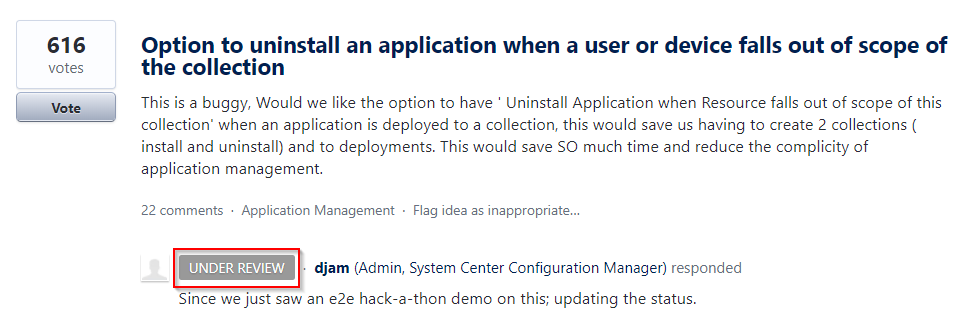
Uservoice provides an opportunity for customers or end users of products to provide feedback, request features and interact with others as well as with the product teams. If you discover a request or feedback that you agree with and would like to support, you can add a vote to that post. Each UserVoice member receives a limited number of votes to use and these votes are returned once the the particular feedback has been acknowledged and completed. See above screen capture.

Another useful feature of UserVoice is the ability to see the status of the posts such as Noted, Planned, Under Review, Started, and Completed. See examples below:

Source: https://blogs.technet.microsoft.com/o365guy/2018/01/02/submit-product-feedback-or-feature-requests-to-microsofts-virtual-suggestion-boxes/

Fix For Error: Failed To Process Configuration Manager Update 0x87d20b15

With the release of version 1710 for System Center Configuration Manager Current Branch on November 20, 2017, I pursued to update my ConfigMgr 1706 site to take advantage of some of the exciting new features, which you can read more here! Use this PowerShell script to enable the early update ring for ConfigMgr 1710.

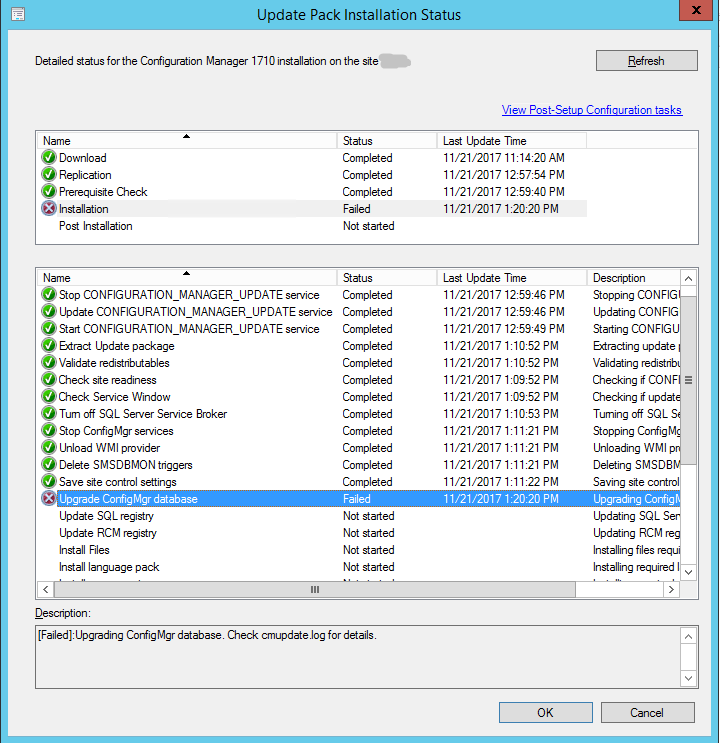
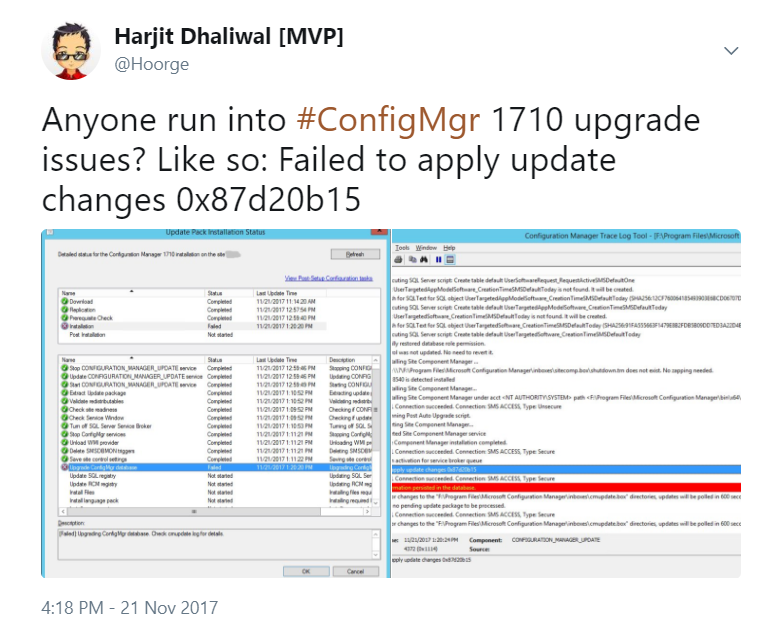
I tested the update in my test lab and the upgrade to v1710 worked just fine. As usual with my production environment, I always run the prerequisite checker to make sure nothing is flagged as an issue, which in my case all was fine with green checkmarks. However, the actual installation of the update failed on the Installation step for “Upgrade ConfigMgr database” as seen in the screen capture above. The description for the error indicates: [Failed]: Upgrading ConfigMgr database. Check cmupdate.log for details.
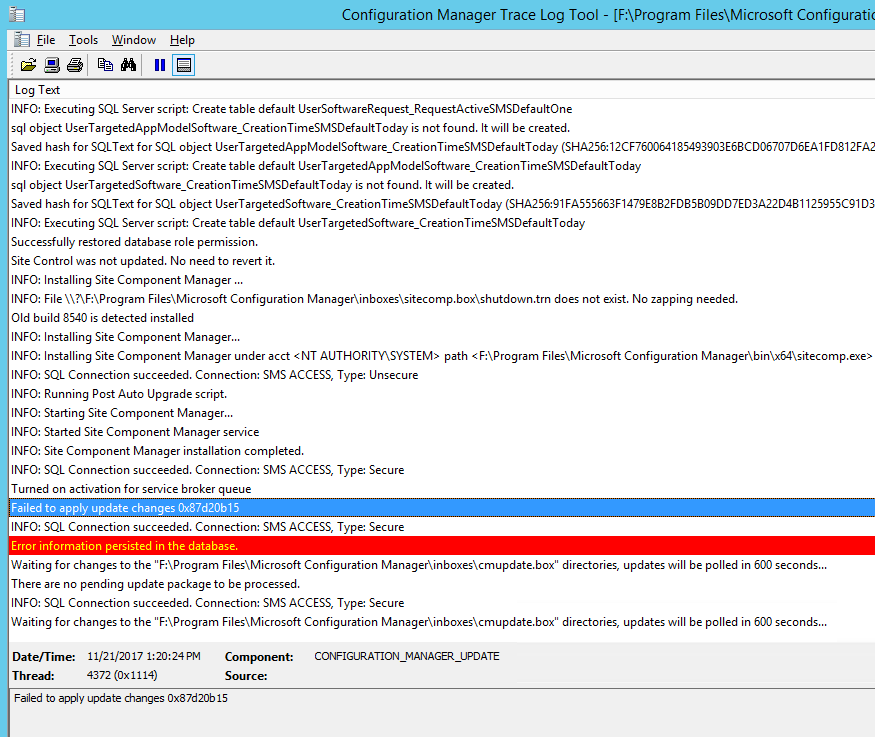
The following is an error was seen in the cmupdate.log: Failed to apply update changes 0x87d20b15

I located a blog post by my friend Anoop dated from October 2016 referencing a similar error code where he points to providing the NT Authority/System account in SQL with the sysadmin security role, however that was not the cause of my upgrade failure and the security roles were already defined correctly. The following TechNet thread was a dead end as well.

My post on Twitter as seen above caught the attention of another friend of mine, David James, Director of Engineering for ConfigMgr at Microsoft, who with his team were able to pinpoint the problem in no time at all and quickly provided a solution which resolved my ConfigMgr 1710 upgrade installation hang up. Thanks David and to the ConfigMgr team! The gist of the problem is that my environment had an old compatibility level 100 set for the SQL Server database for the CM_XXX database, and you can find this referenced in the cmupdate.log file. Changing it to 110 fixed the compatibility level needed for ConfigMgr 1710.

Run the following query in SQL Management Studio (please change XXX to your ConfigMgr Site Code) and retry the installation via the Update and Servicing node in the ConfigMgr Admin Console. This also addresses the issue where TRY_CONVERT is not recognized as a built-in SQL function:

ALTER DATABASE CM_XXX SET COMPATIBILITY_LEVEL = 110

SUCCESS!!

** Additional Mention **

Check out this blog post, “In Telemetry We Trust?” written by a friend and fellow ConfigMgr admin, Peter Egerton, who shares a similar experience and the positive nature of telemetry data especially in the ConfigMgr space.

ConfigMgr Technical Preview 1706 Released

Friday, June 23rd, 2017 brought us a brand new build of ConfigMgr Technical Preview (1706), which has some stunning new features. The Microsoft System Center Configuration Manager (ConfigMgr) team has been rapidly implementing new features and improving the product following the Software as a Service (SaaS) model and using feedback from the community on the Microsoft Connect site, as well as paying close attention to feature and enhancement requests on the ConfigMgr UserVoice forum.

This update has a number of new features (as listed in the Enterprise Mobility & Security blogpost) which include:

    • Improved boundary groups for software update points
    • Site server role high availability
    • Include trust for specific files and folders in a Device Guard policy
    • Hide task sequence progress
    • Accessibility improvements
    • Upgrade Readiness support with Azure Services Wizard
    • New client settings for cloud services
    • Create and run PowerShell scripts from the ConfigMgr console
    • PXE network boot support for IPv6
    • Microsoft Surface driver update management
    • Configure Windows Update for Business deferral policies
    • Support for Entrust certification authorities
    • Cisco (IPsec) support for macOS VPN profiles
    • New Windows configuration item settings
    • Device compliance policy improvements
    • New mobile application management (MAM) policy settings
    • Android and iOS enrollment restrictions
    • Android for Work application management policy for copy-paste
    • Device Health Attestation assessment for compliance policies for conditional access

The above features are listed in detail in the Capabilities in Technical Preview 1706 doc.

You can update to the 1706 Tech Preview release via the ConfigMgr console under the Updates & Servicing node.

Here’s my video tutorial which I did for version 1701. The steps are the same for 1706.

Follow me (@Hoorge) on Twitter and join Tech Konnect on Facebook and Twitter (@TechKonnect) to stay current on technology related matters.