Windows PXE Boot Issues – KB4493467 (April 9, 2019)

Microsoft has acknowledged an issue with PXE boot affecting Windows 8.1 and Windows Server 2012 R2 systems caused by a Security-Only update (KB4493467) released on April 9, 2019.

The Issue:

After installing this update, there may be issues using the Preboot Execution Environment (PXE) to start a device from a Windows Deployment Services (WDS) server configured to use Variable Window Extension. This may cause the connection to the WDS server to terminate prematurely while downloading the image. This issue does not affect clients or devices that are not using Variable Window Extension.

The Workaround:

To mitigate the issue, disable the Variable Window Extension on WDS server using one of the following options:

Option 1:
Open an Administrator Command prompt and type the following:

Wdsutil /Set-TransportServer /EnableTftpVariableWindowExtension:No

Option 2:
Use the Windows Deployment Services UI.

  1. Open Windows Deployment Services from Windows Administrative Tools.
  2. Expand Servers and right-click a WDS server.
  3. Open its properties and clear the Enable Variable Window Extension box on the TFTP tab.

Option 3:
Set the following registry value to 0:

HKLM\System\CurrentControlSet\Services\WDSServer\Providers\WDSTFTP\EnableVariableWindowExtension”.

Restart the WDSServer service after disabling the Variable Window Extension.

Microsoft is working on a resolution and will provide an update in an upcoming release.

Fix WordPress “Destination Folder Already Exists”Issue

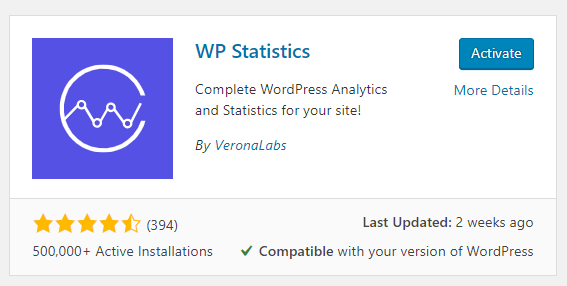
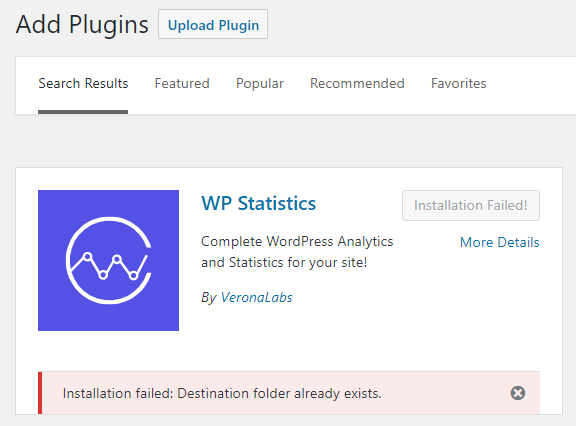
I encountered an issue with my WordPress hosted site when I was attempting to install a plugin, in this case the WP Statistics plugin. I know I had previously installed this plugin but it did not show up in my installed plugin list in the WordPress Admin dashboard. The installation fails with an error: “Installation failed: Destination folder already exists.”

When you install a WordPress theme or plugin, WordPress will extract and copy the folder from a zip file into the wp-content/themes or wp-content/plugins directory. If the folder already exist, then WordPress is unable to copy the files and therefore generates the error. This can happen if the theme or plugin files that are already installed are missing or corrupted.

Here’s the fix for this issue:

  • Use a FTP client such as FileZilla, and connect to your WordPress site.
  • Drill down into the wp-content/plugins directory and delete the plugins folder which you are having issues with. In my case the WP Statistics plugin folder.
  • Once the folder is deleted, go back to your WordPress admin site and reinstall the plugin. You should see a successful installation and at which point, you can activate the plugin and configure the settings if necessary.

ConfigMgr 1710 Hotfix Rollup (KB4057517)

ConfigMgr Current Branch version 1710 now has a hotfix (KB4057517) available which addresses some issues, which you can read up here. The following are the fixes resolved with this hotfix (there are 13 of them):

  • Clients who use Azure Active Directory (Azure AD) for authentication do not successfully communicate with a management point
  • The Configuration Manager console may terminate unexpectedly after you browse to a content location in the Office 365 Client Installation wizard
  • Download of express updates may fail on Windows 10 clients because of an issue that affects files in temporary and cache folders
  • Configuration Manager current branch, version 1710 clients are not upgraded on systems that are running Windows Server 2008 SP2. The client Setup program, Ccmsetup.exe, terminates unexpectedly
  • The Office 365 Application Installation Wizard may try to download content from an incorrect channel. This causes download failures
  • The fallback time that is configured for content is not honored if distribution points or their content are inaccessible
  • The Client Notification Restart request is processed incorrectly by remote management points. This causes a .bld notification file to be left in the \MP\Outboxes\bgb.box folder on the remote management point
  • Retrying a large single-file download, such as an Office 365 update file, may fail on a site server
  • The Persist content in the client cache setting on Package Properties is not honored by clients
  • Decommission-related State messages from co-managed client computers are processed incorrectly
  • State messages sent by Azure AD users may not be processed
  • If a Configuration Manager client restarts during the process of retrying a task sequence policy download, that task sequence does not run automatically after the restart
  • Conditional access policies may block access to Office 365 applications for domain-joined devices after migrating to Intune standalone

Here are the steps on how to install this hotfix. You will find it available in the ConfigMgr console under Administration > Updates and Servicing. If you don’t see it, click on Check for Updates in the menu ribbon.
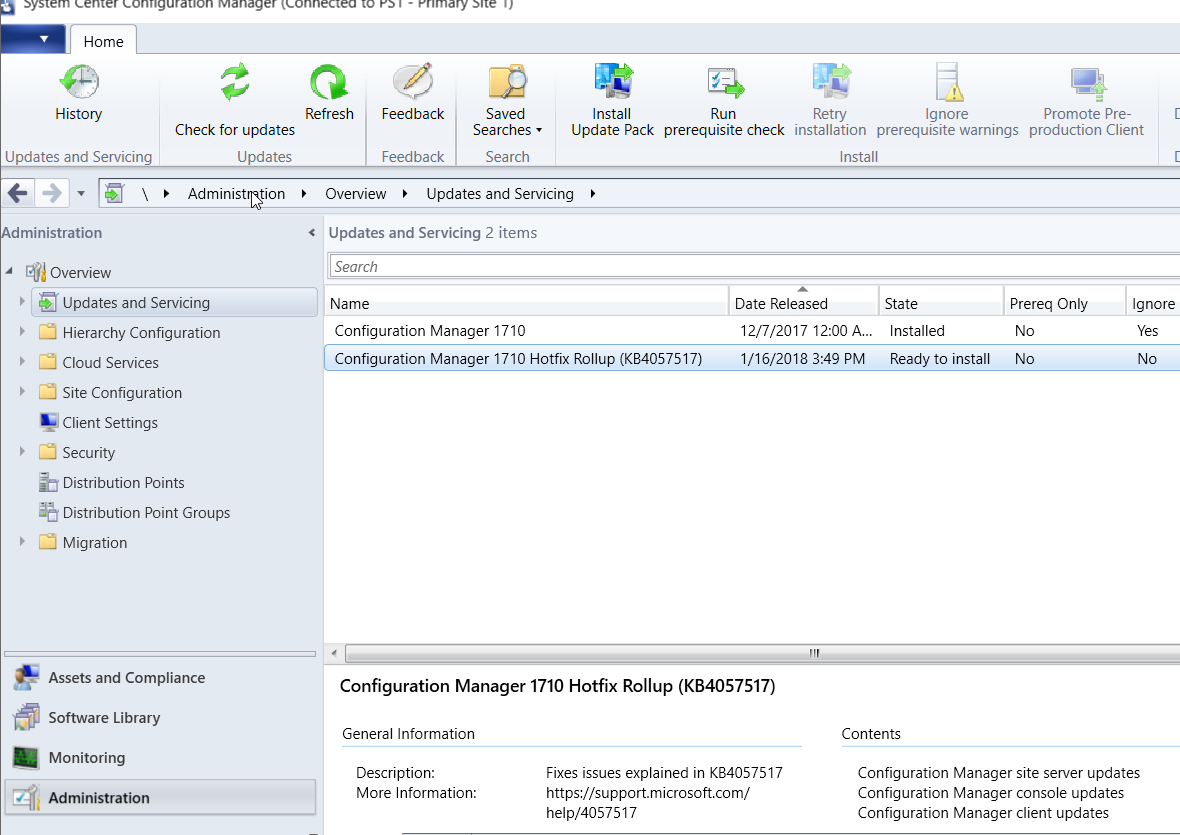
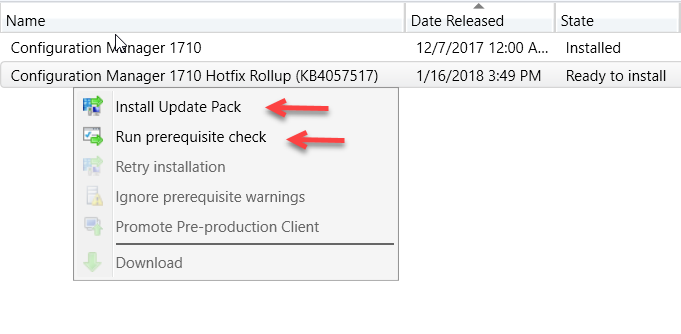
Right-click on Configuration Manager 1710 Hotfix Rollup (KB4057517) and click on Install Update Pack. I recommend that you run the prerequisite check first to make sure there are not issues reported with your site server.
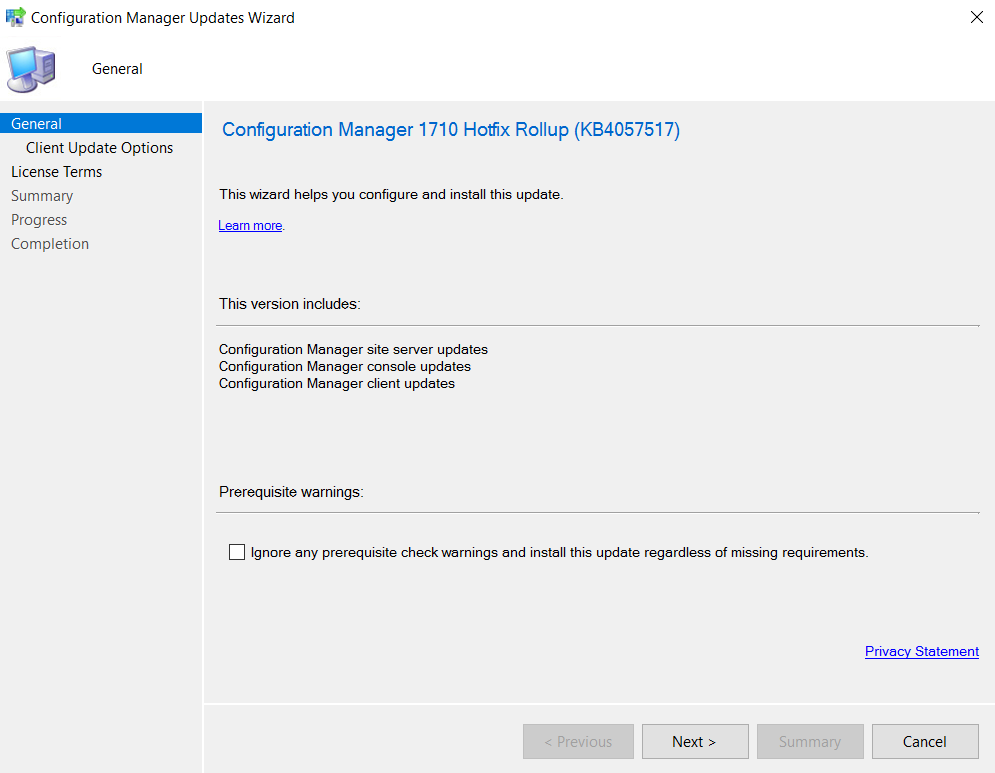
Click Next and select the checkbox if you want to ignore the prerequisite check warning.
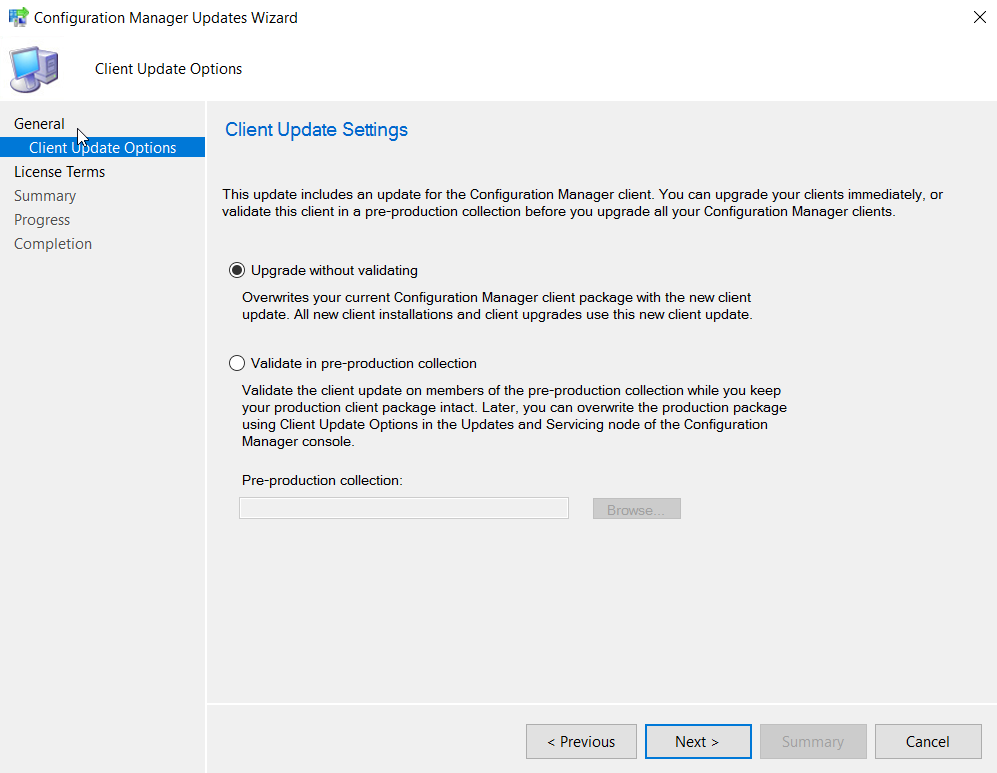
Pick your option to validate or not to validate the upgrade against a collection. I generally tend to select Validate in pre-production collection and choose one of my test collections for the first phase of the upgrade.
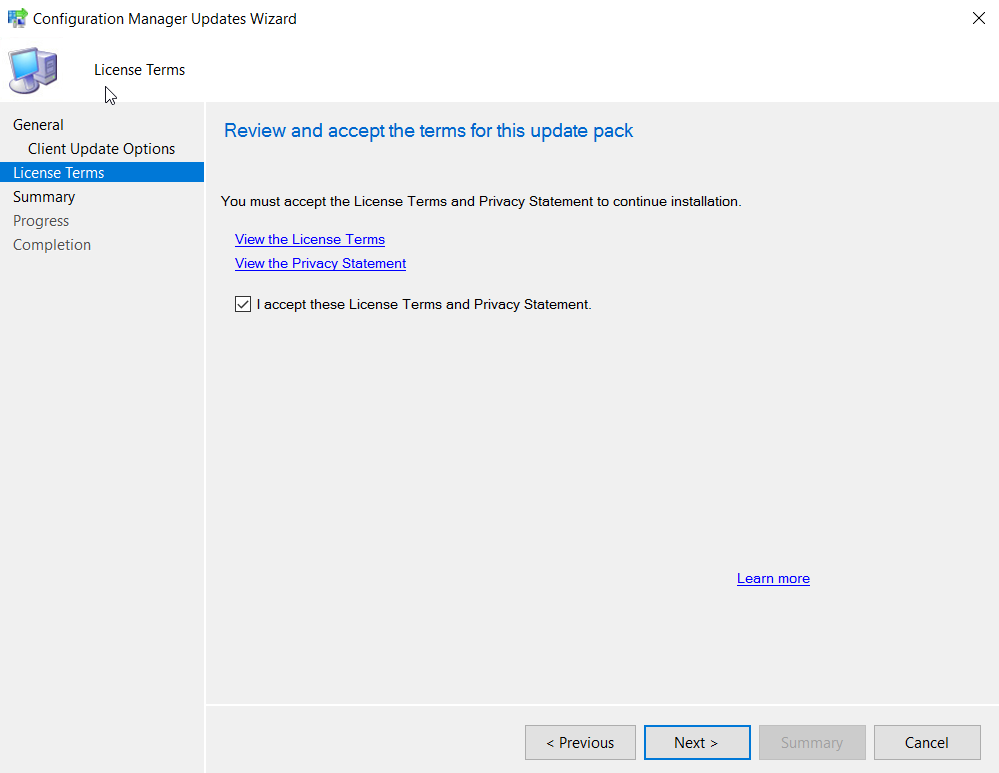
Select the license terms and click Next.
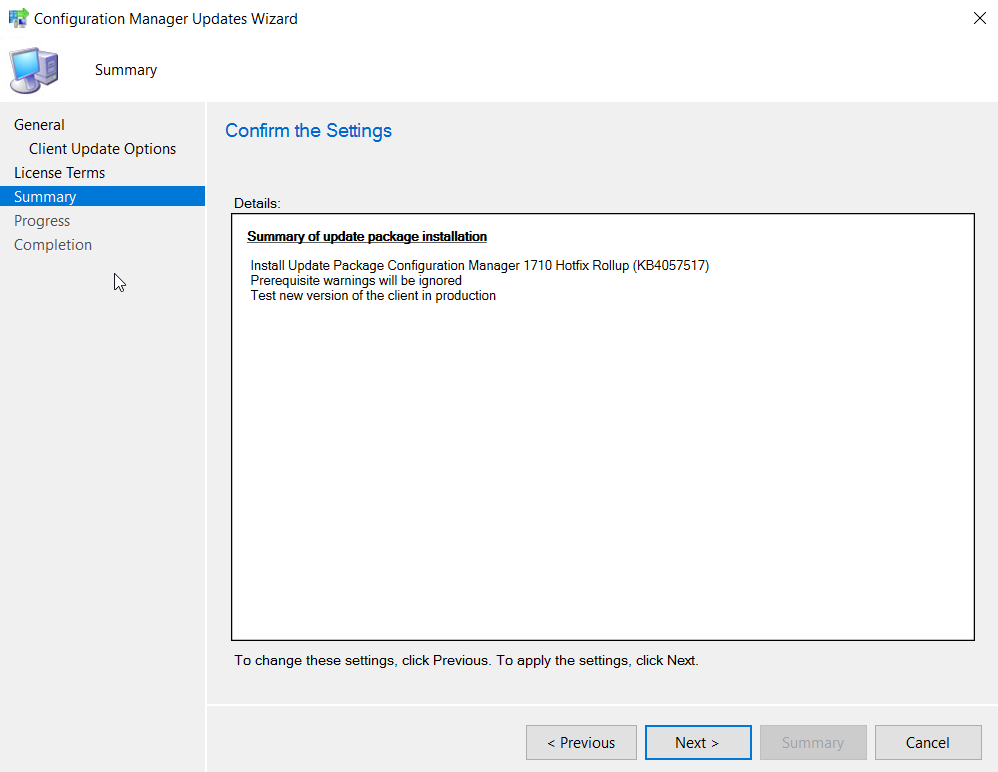
Click Next to confirm the settings.
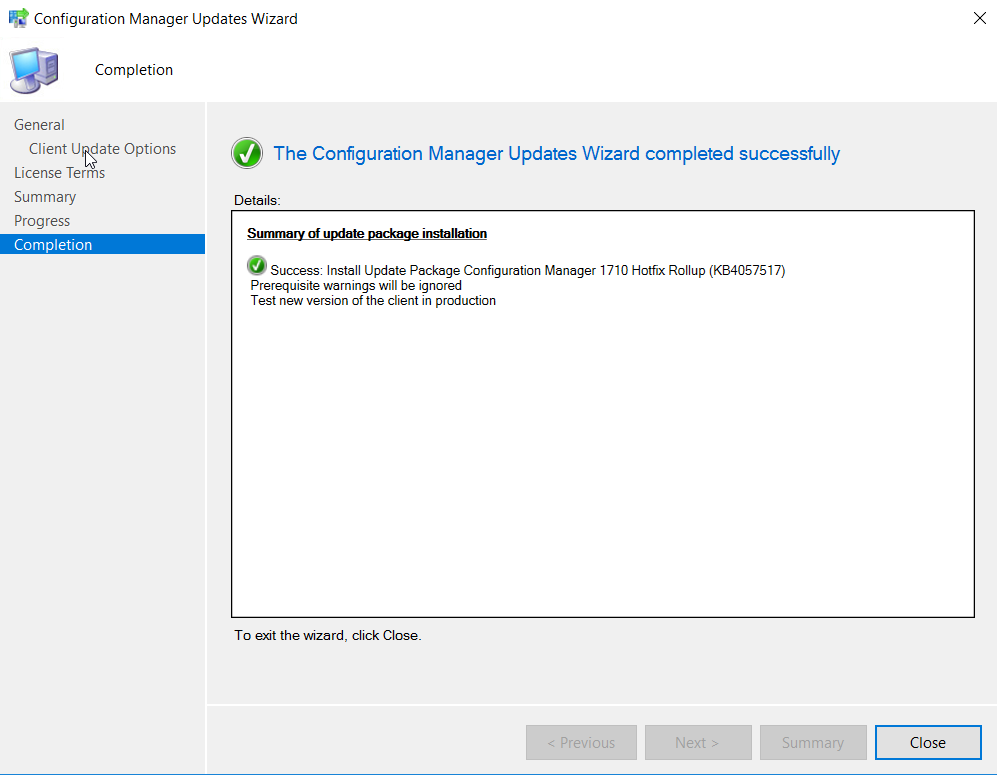
Click Close.
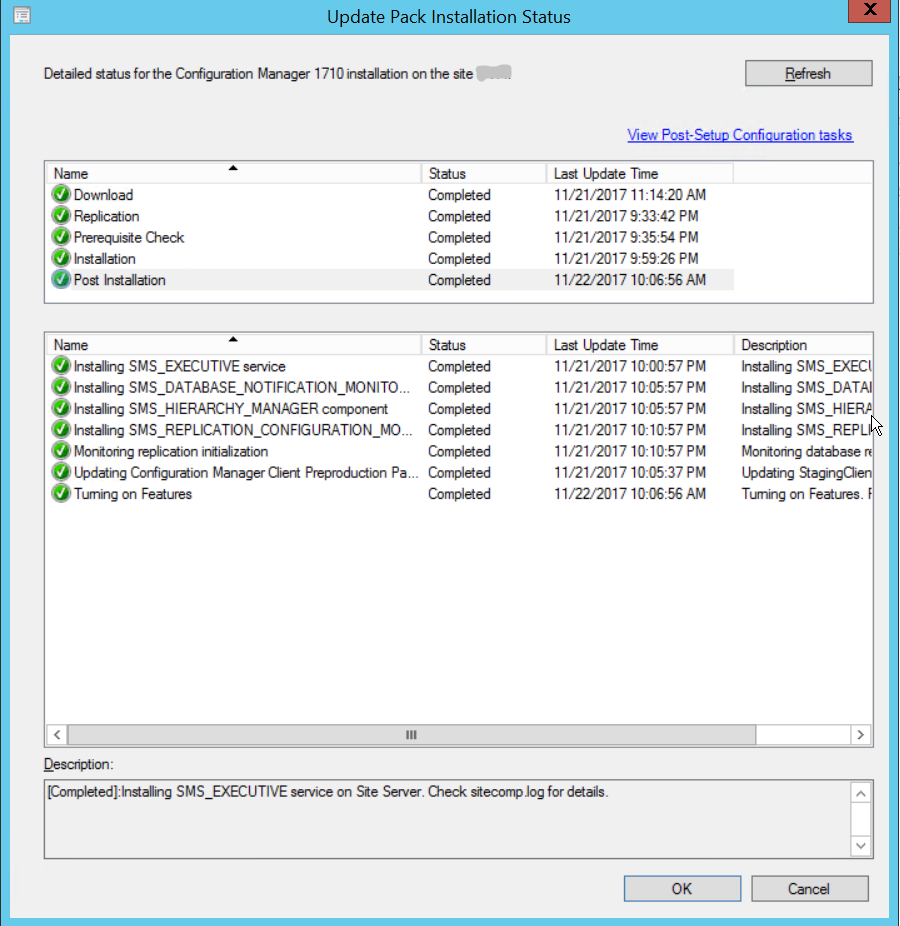
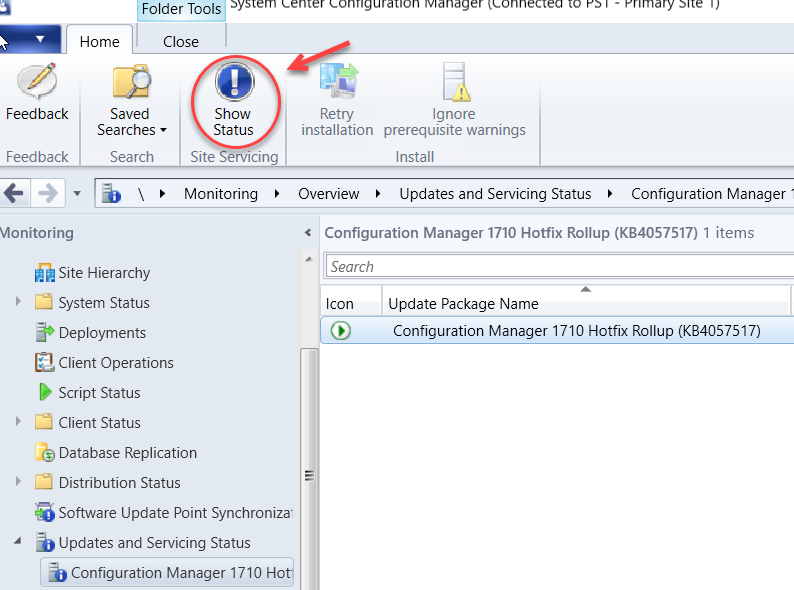
You can now monitor the status of the upgrade under Monitoring > Updates and Servicing Status. Then select the update package name and click on Show Status in the menu ribbon.
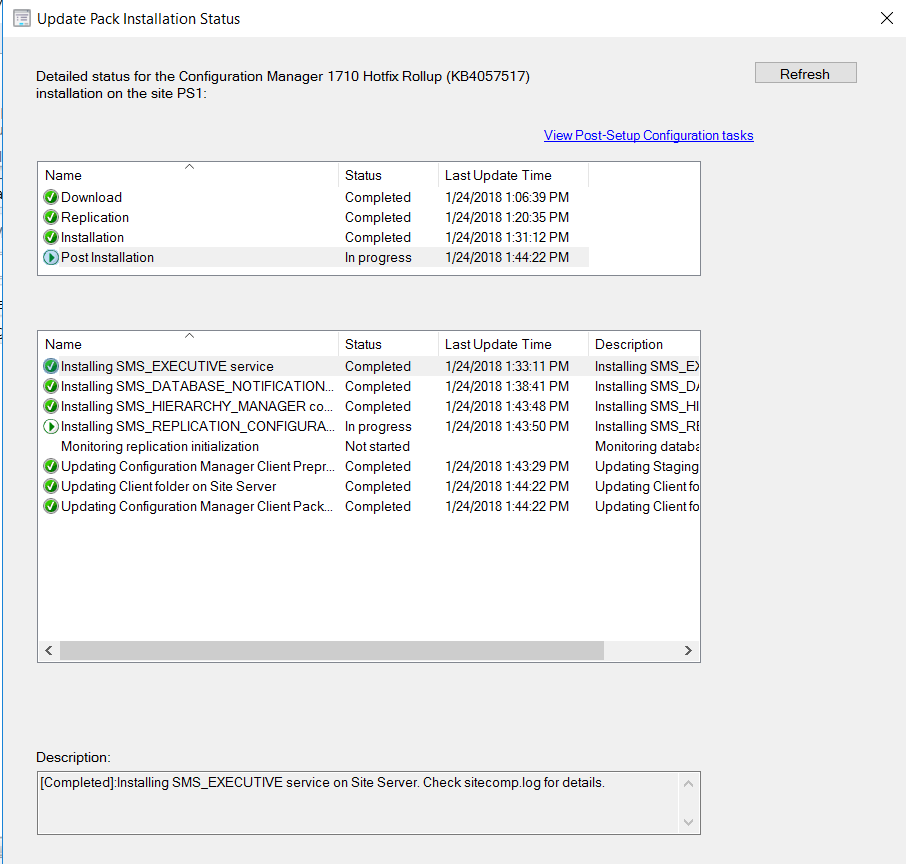
The window below will show the stages of the upgrade process where you can monitor it’s progress. If there are any issues, you will see it listed here with a warning and the details provided in the description box in the bottom of the window.
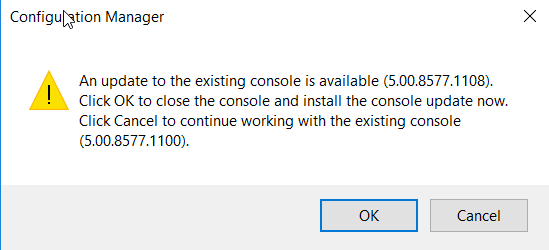
Upon successful completion of the hotfix installation, you will be presented with the pop-up window as seen below to indicate a console upgrade from version 5.0.0.8577.1100 to 5.0.0.8577.1108 is available.
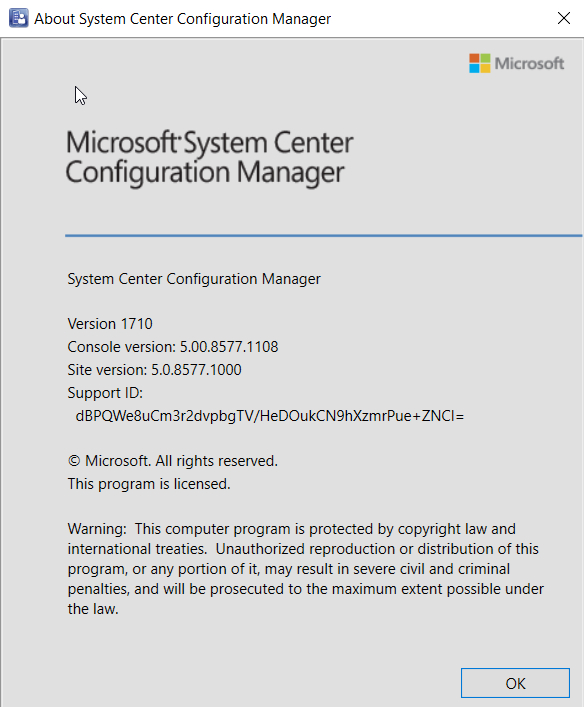
You can verify the console upgrade in the About System Center Configuration Manager drop down menu from the console.
Version 1710
Console version: 5.0.0.8577.1108
Site version: 5.0.8577.1000
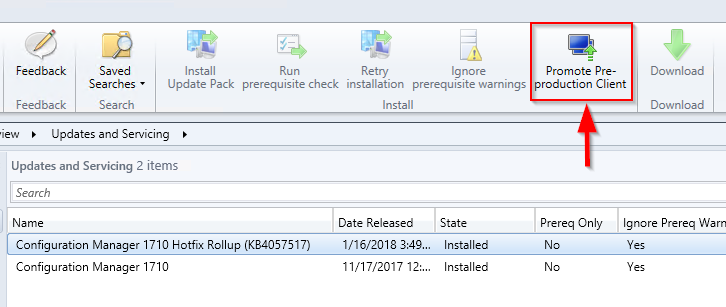
Once you are comfortable with the client upgrade on your test collection which you selected during the validate in pre-production collection phase, you can deploy the client upgrade to all clients in the hierarchy by selecting the Promote Pre-production Client option as seen below.
Your ConfigMgr site is now upgraded with the KB4057517 hotfix.

 

How To Change GUID Partition Table to MBR

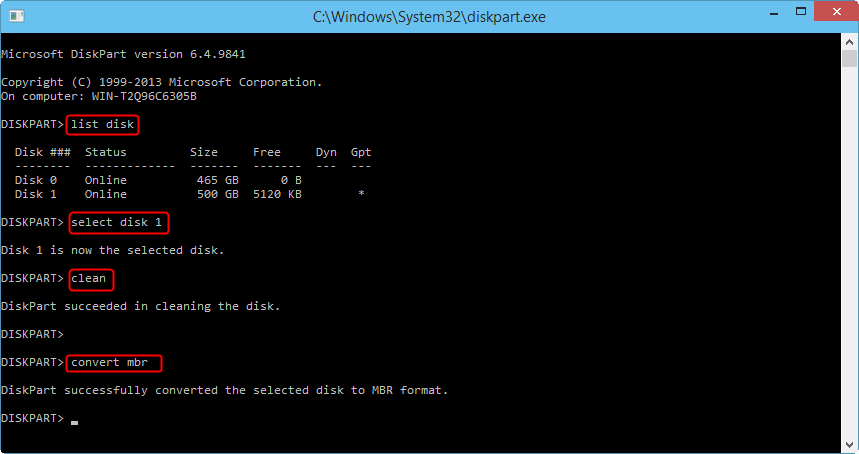
To change a GUID partition table disk into a master boot record disk using command line, follow the steps below.

1. Back up or move all volumes on the basic GUID partition table (GPT) disk you want to convert into a master boot record (MBR) disk.

2. Open an elevated command prompt (right-click Command Prompt, and then click Run as Administrator) and type diskpart.
If the disk does not contain any partitions or volumes, skip to step 6.

3. At the DISKPART prompt, type list disk. Make note of the disk number you want to delete

4. At the DISKPART prompt, type select disk <disknumber>

5. At the DISKPART prompt, type clean

6. At the DISKPART prompt, type convert mbr

And there you have it.

Fix For Error: Failed To Process Configuration Manager Update 0x87d20b15

With the release of version 1710 for System Center Configuration Manager Current Branch on November 20, 2017, I pursued to update my ConfigMgr 1706 site to take advantage of some of the exciting new features, which you can read more here! Use this PowerShell script to enable the early update ring for ConfigMgr 1710.

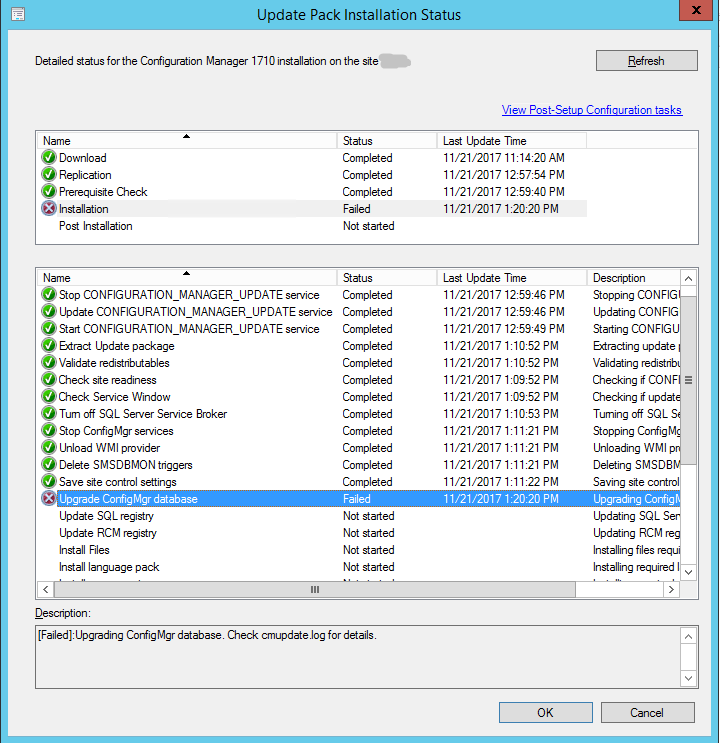
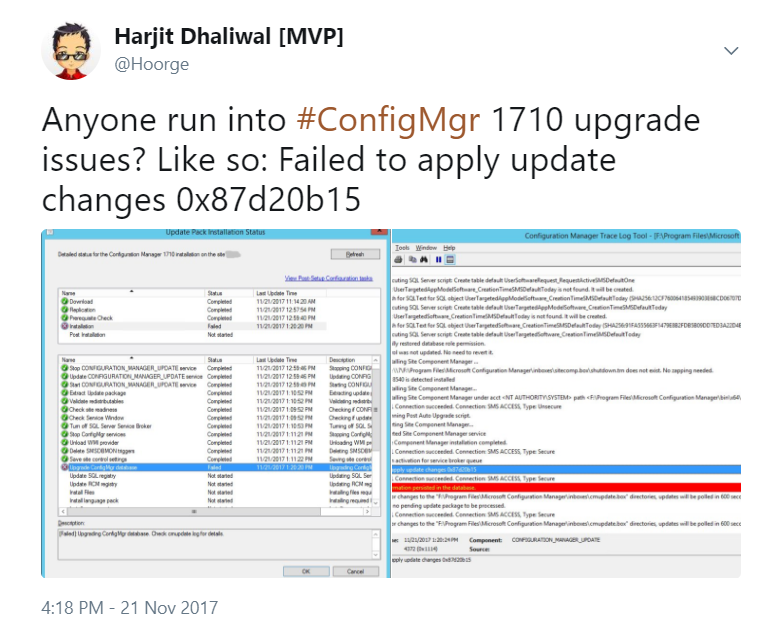
I tested the update in my test lab and the upgrade to v1710 worked just fine. As usual with my production environment, I always run the prerequisite checker to make sure nothing is flagged as an issue, which in my case all was fine with green checkmarks. However, the actual installation of the update failed on the Installation step for “Upgrade ConfigMgr database” as seen in the screen capture above. The description for the error indicates: [Failed]: Upgrading ConfigMgr database. Check cmupdate.log for details.

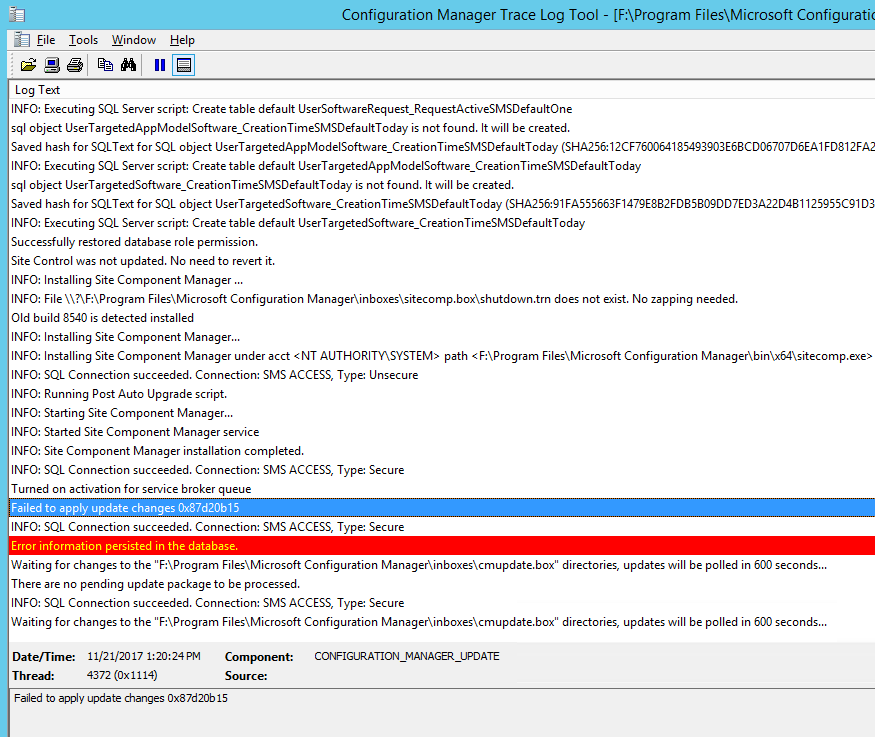
The following is an error was seen in the cmupdate.log: Failed to apply update changes 0x87d20b15

I located a blog post by my friend Anoop dated from October 2016 referencing a similar error code where he points to providing the NT Authority/System account in SQL with the sysadmin security role, however that was not the cause of my upgrade failure and the security roles were already defined correctly. The following TechNet thread was a dead end as well.


My post on Twitter as seen above caught the attention of another friend of mine, David James, Director of Engineering for ConfigMgr at Microsoft, who with his team were able to pinpoint the problem in no time at all and quickly provided a solution which resolved my ConfigMgr 1710 upgrade installation hang up. Thanks David and to the ConfigMgr team! The gist of the problem is that my environment had an old compatibility level 100 set for the SQL Server database for the CM_XXX database, and you can find this referenced in the cmupdate.log file. Changing it to 110 fixed the compatibility level needed for ConfigMgr 1710.

Run the following query in SQL Management Studio (please change XXX to your ConfigMgr Site Code) and retry the installation via the Update and Servicing node in the ConfigMgr Admin Console. This also addresses the issue where TRY_CONVERT is not recognized as a built-in SQL function:

ALTER DATABASE CM_XXX SET COMPATIBILITY_LEVEL = 110

SUCCESS!!

** Additional Mention **

Check out this blog post, “In Telemetry We Trust?” written by a friend and fellow ConfigMgr admin, Peter Egerton, who shares a similar experience and the positive nature of telemetry data especially in the ConfigMgr space.

How To Fix: Bitlocker Recovery Key Prompts On Every Reboot

windows-10-bitlocker-featured

There are few reports of users having Bitlocker issues following the October 2016 patches.

The issue: On every reboot, the Bitlocker recovery key is required which is quite disruptive and cumbersome. As a workaround in order to solve this issue, the following steps can be taken:

On the next reboot and once in Windows, reset Bitlocker by disabling and re-enabling it.
In administraive command prompt, do the following:
manage-bde -protectors c:-disable
then do this:
manage-bde -protectors c:-enable

At this time, I’m not certain on which patch is causing the issue but I wanted to share this info to help. You can also discuss in this TechNet post.

Follow (@Hoorge) on Twitter and join Tech Konnect on Facebook and Twitter (@TechKonnect) to stay current on technology related matters.