How To Disable Blur on Windows 10 Sign-In Screen

Starting with Windows 10 “19H1” or build 18237, you have likely encountered a blurred background on the login screen. Some users like this feature and some don’t. If you’d like to change the blurred effect to a clear image, then you can do it in two ways:
1. Group Policy or Local Policy
2. Registry setting

Change using Group Policy or Local Policy:

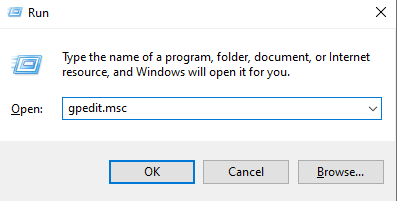
  • Launch the Group Policy Editor > gpedit.msc
  • In Group Policy Editor, go to: Computer Configuration\Administrative Templates\System\Logon
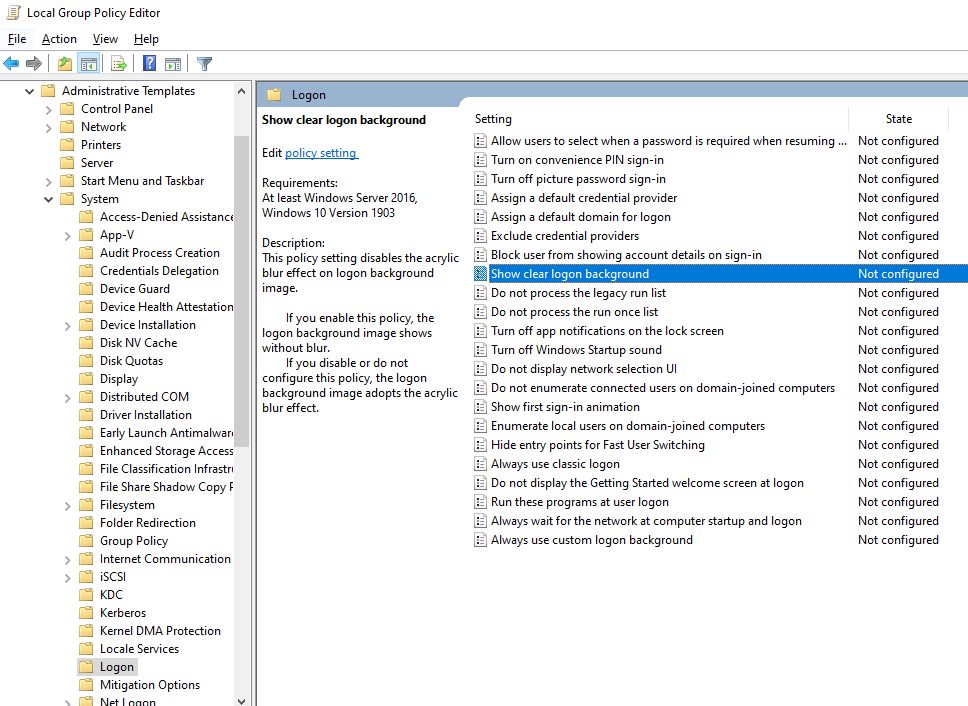
  • Enable the policy option: Show clear logon background
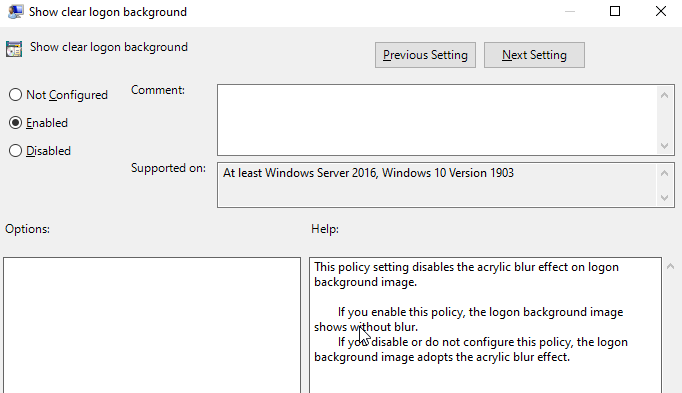
  • Restart the computer for good measure

Change using Registry setting:

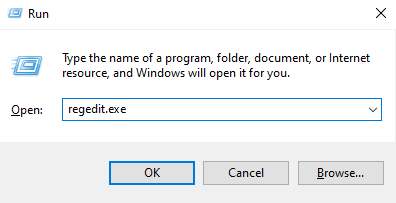
  • Launch the Registry editor (make sure you backup the registry prior to making any changes) > regedit.exe
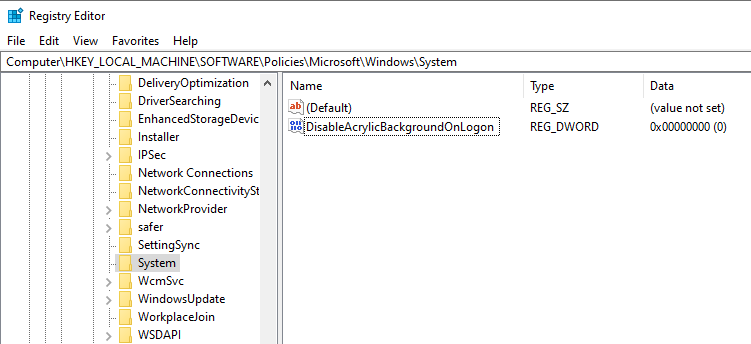
  • Go to: HKEY_LOCAL_MACHINE\SOFTWARE\Policies\Microsoft\Windows\System
  • Create a new DWORD (32-bit) value: DisableAcrylicBackgroundOnLogon
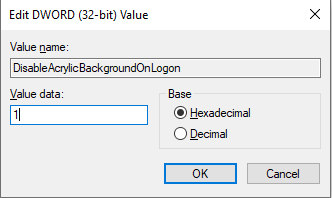
  • Set the Value data to 1 to disable the blur effect on the login screen
  • Restart the computer

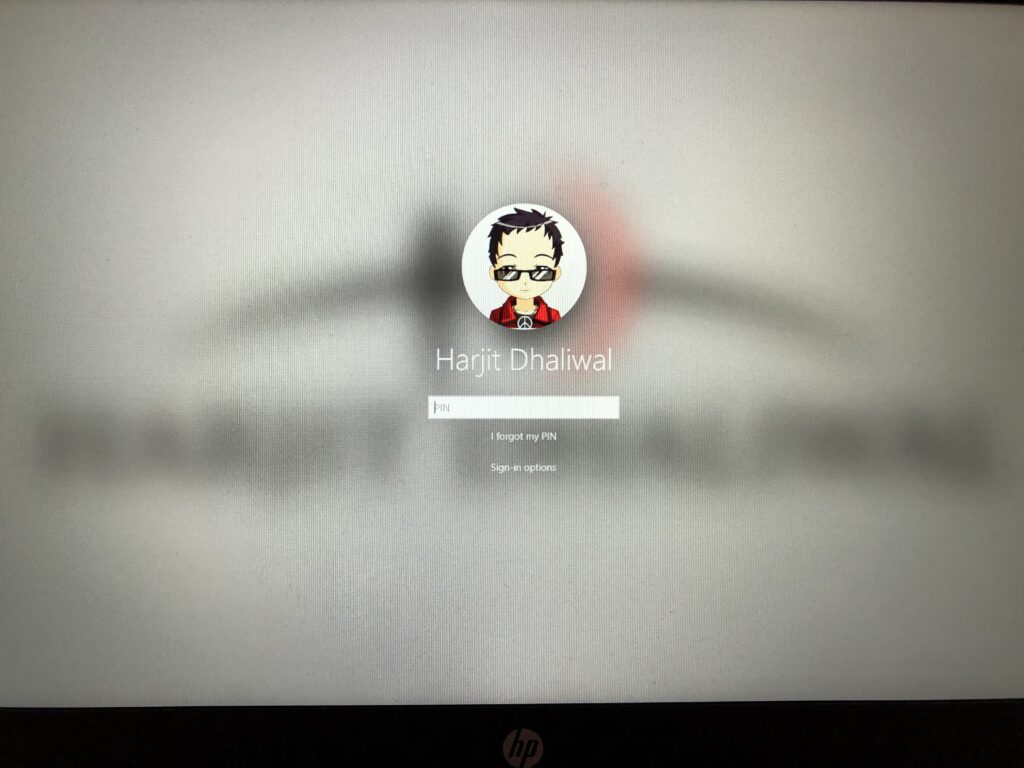
Now, you should have a clear login screen background.

Sony A6500 Bulb Mode Setting

Bulb Mode is a shutter speed option which can be used in Manual setting to capture subjects in long exposures such as fireworks, trailing lights, night sky, light painting, and other creative photo captures. In general, DSLR cameras limit shutter speed captures to a maximum of 30 seconds which can be limiting or too much depending on what subject is being captured. Using Bulb Mode, a photographer has the ability to control how long the shutter needs to stay open by pressing down on the shutter and then releasing for the desired exposure required for a particular shot.

On my Nikon DSLR cameras such as the D700, the Bulb option was straight forward to find under the Manual setting and scrolling the wheel for the shutter speed until the screen displayed “BULB”. On my Sony A6500 camera, I had difficulty locating Bulb Mode, with the maximum option of only 30 seconds available. I then realized that I had to change a few other settings which I had configured from the factory settings in order to activate Bulb mode.

If you are using the following settings below, you will not be able to set the shuttle speed to Bulb mode. In this case, the shutter speed will be limited to 30 seconds.

  • Smile Shutter
  • Auto HDR
  • Picture Effect is set to HDR Painting or Rich-tone Mono
  • Multi Frame NR
  • When Drive Mode is set to the following:
    • Cont. Shooting
    • Self-timer (Cont)
    • Cont. Bracket
  • Silent Shooting

Once you have reset the above settings, follow these steps to use Bulb mode on your Sony A6500 camera:

  1. Set the mode dial to M (Manual Exposure).
  2. Turn the control wheel counterclockwise until [BULB] is indicated.
  3. Set the aperture value (F-value) by turning the control dial.
  4. Press the shutter button halfway down to focus.
  5. Press and hold the shutter button for the duration of the shot. The shutter will remain open as long as the shutter button is pressed.

Microsoft Insider Programs

Microsoft provides several Insider programs which you can participate to get a preview of the latest features and updates, as well as provide feedback to Microsoft for bugs, issues, and request features.

In case you are trying to figure out what Insider programs are available and how you can sign up to participate, see below for the individual programs.

Windows Insider
Bing Insider
Microsoft Edge Insider
Microsoft Office Insider
MSIX Insider
Visual Studio Code Insider
Visual Studio Preview
Skype Insider
Xbox Insider

Source: https://insider.microsoft.com/en-us

Microsoft MVP 2019-2020 Renewal

I’m so Thankful, honored, and excited to receive the above email from the Microsoft Most Valuable Professional (MVP) Award team confirming my award renewal for the 2018-2019 year. This is my second consecutive award since receiving my first one on January 1, 2017. It has been a wonderful, exciting, fun, challenging, and rewarding experience with endless opportunities.

The MVP award has provided me with some great opportunities in terms of my career growth, skill development, and avenues to give back and help others in the IT Professional community. I have been invited to speak at conferences such as Microsoft Ignite (Orlando 2017 & 2018), MVP Community Connections (Boston and New York City), TechMentor, IT/Dev Connections, MMSMOA, user groups, various webinars, as well as opportunities to guest blog, join technical expert panelist, review technical books, test and evaluate software, provide technical expertise, guest speak on podcasts, community reporter at Microsoft Ignite 2017, community engagement specialist at various events, and much more.

This is my 3rd MVP Award and I am very grateful and appreciative for it and for the various opportunities provided to me over time. Thank you very much to each and every one of you for making me successful in my efforts as a MVP, IT Professional, and community contributor, and for providing me with the valuable resources and networking opportunities. Thank you!

MVP Profile

Windows PXE Boot Issues – KB4493467 (April 9, 2019)

Microsoft has acknowledged an issue with PXE boot affecting Windows 8.1 and Windows Server 2012 R2 systems caused by a Security-Only update (KB4493467) released on April 9, 2019.

The Issue:

After installing this update, there may be issues using the Preboot Execution Environment (PXE) to start a device from a Windows Deployment Services (WDS) server configured to use Variable Window Extension. This may cause the connection to the WDS server to terminate prematurely while downloading the image. This issue does not affect clients or devices that are not using Variable Window Extension.

The Workaround:

To mitigate the issue, disable the Variable Window Extension on WDS server using one of the following options:

Option 1:
Open an Administrator Command prompt and type the following:

Wdsutil /Set-TransportServer /EnableTftpVariableWindowExtension:No

Option 2:
Use the Windows Deployment Services UI.

  1. Open Windows Deployment Services from Windows Administrative Tools.
  2. Expand Servers and right-click a WDS server.
  3. Open its properties and clear the Enable Variable Window Extension box on the TFTP tab.

Option 3:
Set the following registry value to 0:

HKLM\System\CurrentControlSet\Services\WDSServer\Providers\WDSTFTP\EnableVariableWindowExtension”.

Restart the WDSServer service after disabling the Variable Window Extension.

Microsoft is working on a resolution and will provide an update in an upcoming release.

Windows 10 Automatically Uninstalls Problematic Software Updates

Patch Management is an important role of a Sysadmin in the Enterprise, because securing endpoints with security updates to keep systems secure and functional, receive fixes that resolve issues, and patch security holes is highly important. However, with the frequency of security updates which are released these days, patch management tasks feels like a full-time job!

For the most part, monthly patches are straight forward, however in recent months, they have been problematic where they have caused system crashes, blue screens, application functionality issues, and introduced other bugs. Some faulty patches are quickly reversed or rectified by Microsoft, while others go unfixed for a longer duration causing further duress and downtime in many organizations. This has been a major pain point for Sysadmins in the field.

Well, we may have some reprieve from these buggy patches. Microsoft has announced that it will start uninstalling problematic patches automatically from Windows 10 systems when it detects a startup issue due to incompatibility or issues stemming from a recently installed patch. The following notification will be presented:
“We removed some recently installed updates to recover your device from a startup failure.”

According to this KB4492307 posted by Microsoft, the problematic patch will not be reinstalled for 30 days to allow Microsoft and it’s partners to investigate and fix the issues. This process seems like a good proactive approach by Microsoft to get a handle of buggy patches, however more information is needed in terms of how this will work with detection, deployments, and compliance of these patches using ConfigMgr and WSUS as mechanisms for patch management in the enterprise. Time will tell, we hope!

Free Microsoft Learning For AI

Microsoft is a leading edge company for Artificial Intelligence (AI) and has been working in this space for quite some time to bring AI into business processes including several Microsoft products.

Today, Microsoft announced via a blog post “Microsoft launches business school focused on AI strategy, culture and responsibility” that it is providing a free learning platform for AI at Microsoft AI Business School. This is going to be a hot sector in the Information Technology industry and now is a good time to get your feet wet with some AI knowledge. Happy learning!

Fix WordPress “Destination Folder Already Exists”Issue

I encountered an issue with my WordPress hosted site when I was attempting to install a plugin, in this case the WP Statistics plugin. I know I had previously installed this plugin but it did not show up in my installed plugin list in the WordPress Admin dashboard. The installation fails with an error: “Installation failed: Destination folder already exists.”

When you install a WordPress theme or plugin, WordPress will extract and copy the folder from a zip file into the wp-content/themes or wp-content/plugins directory. If the folder already exist, then WordPress is unable to copy the files and therefore generates the error. This can happen if the theme or plugin files that are already installed are missing or corrupted.

Here’s the fix for this issue:

  • Use a FTP client such as FileZilla, and connect to your WordPress site.
  • Drill down into the wp-content/plugins directory and delete the plugins folder which you are having issues with. In my case the WP Statistics plugin folder.
  • Once the folder is deleted, go back to your WordPress admin site and reinstall the plugin. You should see a successful installation and at which point, you can activate the plugin and configure the settings if necessary.

Enable Windows 10 Administrator Account

This post is not to emphasize or promote the use of the local administrator account or provide such level of access to your users. IT Professionals and security experts will tell you that providing local administrator account privileges for end users is risky as it can introduce lots of issues such as ransomware attacks, malware infections, risk of compromised systems, and Pass-the-Hash attacks to name a few.

The local administrator account on a Windows 10 system is disabled by default. If you need to enable it for troubleshooting purposes or for some management tasks, you can do so in 3 ways.

Option 1: Computer Management

  • Click Start > search for Computer Management
  • Expand Local Users and Groups
  • Expand Users
  • Right-click on Administrator account
  • Uncheck Account is disabled box > click Apply and OK
  • Right-click Administrator account
  • Click on Set Password
  • Click on Proceed
  • Enter new password as desired
  • Confirm password > click OK

Option 2: Command Prompt

  • Click on Start > search for Command Prompt
  • Right-click and Run as Administrator
  • Type the following command and press enter:

net user “Administrator” /active:yes

Option 3: PowerShell

  • Click on Start > search for PowerShell
  • Right-click and Run as Administrator
  • Type the following command and press enter:

Get-LocalUser -Name “Administrator” | Enable-LocalUser

To disable the local Administrator account:

Get-LocalUser -Name “Administrator” | Disable-LocalUser

ConfigMgr Guidance For SQL CE Levels

What is Cardinality Estimation or SQL CE Level?
The Cardinality Estimator is a SQL Server Query Processor component that is responsible for predicting the number of rows that the query will return. Microsoft provides some great documentation about SQL CE which you can read more on Microsoft Docs.

As for how SQL CE works and it’s importance with ConfigMgr, Umair Khan of Microsoft has shared a great blog post explaining the details, which you can read more here:
https://blogs.technet.microsoft.com/umairkhan/2019/01/28/configmgr-current-branch-1810-guidance-for-the-sql-ce-levels-with-various-sql-versions